Data Exchange - Installation
With the Data Exchange program, stores running Data Exchange can share information and transfer items to each other without being part of a centralized accounting system. This document, which is intended for use only by ASA Support and Client Services personnel, describes how to install Data Exchange.
Version Requirement
Stores that will be sharing information with Data Exchange need to be running TireMaster Plus or TireMaster Point of Sale version 9.2.5 or newer.
Note: Data Exchange can be used in an environment in which some stores run TireMaster Plus and others run TireMaster Point of Sale.
Installing Data Exchange
ASA Support is responsible for installing Data Exchange for each of the stores that will be sharing information.
Before you begin the installation, representatives from the participating stores need to do the following:
Register their Data Exchange systems, if they haven’t already
Note: Registering Data Exchange ensures that a system control for replication is set correctly. The control, which is on the None tab uses one of the following names: Regional CUCD for replication or Regional Site for replication.
Tell you which store will function as the hub (the origination point for replication)
Provide you with names for identifying each store
Note: You will assign these names during the installation and refer to them when troubleshooting
The Data Exchange installation process includes installing the following:
The Regional Replication program (MLRegion.exe), which allows stores to share data
Note: The Regional Replication installation process includes starting the replication program.
The Data Exchange program (datax00000000-02000000.exe), which allows stores to view and update information from other stores
Install the two programs at the hub and assign the hub’s IP address first. Installation at the sites can occur once installation at the hub is finished.
Installing Regional Replication at the Hub
To begin the installation process, install Regional Replication on the server for the location that will function as the hub.
To install regional replication at the Hub
|
1.
|
Close all applications on the server, including those in the Windows System Tray (such as antivirus programs). |
|
2.
|
Begin the installation. |
|
a.
|
Go to the directory in which MLRegion.exe has been saved. |
|
b.
|
Right-click MLRegion.exe and select Run as Administrator. A prompt to make changes to your device appears. |
|
c.
|
Click Yes. The Data Exchange - Installation Program screen opens. |
|
3.
|
Select the location in which you want to install Regional Replication, and click Install. At the end of the installation, the Support login screen opens. |
Note: During this stage of the installation, the ML_Batch, ML_Certs, and ML_Log directories, which include all of the replication files, are created within the Data Exchange program directory.
|
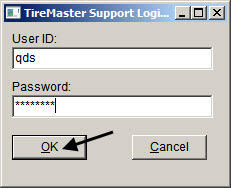
4.
|
Type the QDS user name and password, and click OK. The Replication setup screen opens. |
|
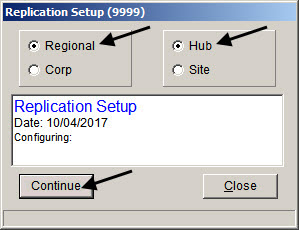
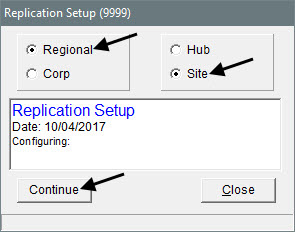
5.
|
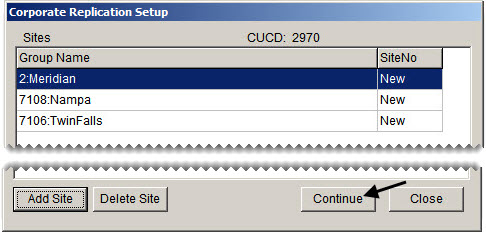
Make sure Regional and Hub are selected. Then click Continue. The Corporate Replication Setup screen opens. |
|
6.
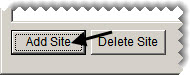
|
Add each of the sites. |
|
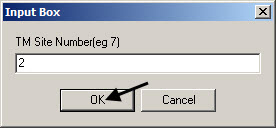
b.
|
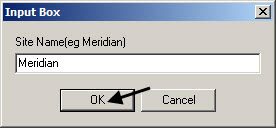
Type the site number, and click OK. |
Note: In a TireMaster Corporate environment, use the site number. Otherwise, use the site’s CUCD.
|
c.
|
Type the name of the site, and click OK. |
Note: Site names are case sensitive and cannot have spaces. Names entered here are used when installing Regional Replication at the sites and in the replication log.
|
7.
|
When you’re done adding sites, click Continue. |
|
8.
|
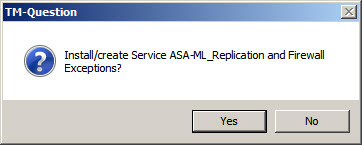
Answer the replication and firewall exceptions question. |
Note: Typically, you’ll answer Yes to create exceptions that will run in the background. The process that creates the exceptions might run for several minutes.
|
9.
|
Close the Corporate Replication Setup screen. The installation is complete. |
|
10.
|
Click Finish. Now you can install the Data Exchange program. |
Installing Data Exchange at the Hub
Once the Regional Replication installation is complete at the hub, install the Data Exchange program. This installation is also performed on the server.
To install the Data Exchange program at the hub
|
1.
|
Make sure all applications on the server, including those in the Windows System Tray (such as antivirus programs), are closed. |
|
2.
|
Begin the installation. |
|
a.
|
Go to the directory in which datax00000000-02000000.exe has been saved. |
|
b.
|
Right-click datax00000000-02000000.exe and select Run as Administrator. A prompt to make changes to your device appears. |
|
c.
|
Click Yes. The Data Exchange - Installation Program screen opens. |
|
3.
|
Select the location in which you want to install the Data Exchange program, and click Install. |
|
4.
|
When the installation is done, click Finish. |
Adding the Hub’s IP Address to the Support Site
When installation of Regional Replication and the Data Exchange program are complete, add a record with the IP address for the hub computer to the Data Exchange Support site.
To Add the hub’s IP address to the Support site
|
1.
|
On the server, launch Command Prompt. (Type cmd in the Windows search field, and press Enter.) |
|
2.
|
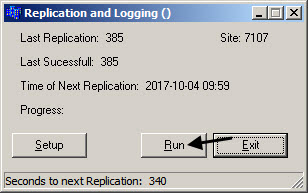
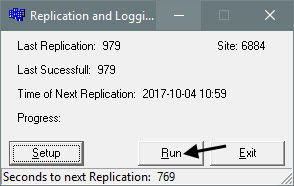
Type tmwlog and press Enter. The Replication and Logging screen opens. |
Installing Regional Replication at the Sites
Once the Regional Replication and Data Exchange installations have been completed at the hub, you can perform both installations for each of the sites. At the sites, install Regional Replication on the server.
To install regional replication at a site
|
1.
|
Close all applications on the server, including those in the Windows System Tray (such as antivirus programs). |
|
2.
|
Begin the installation. |
|
a.
|
Go to the directory in which MLRegion.exe has been saved. |
|
b.
|
Right-click MLRegion.exe and select Run as Administrator. A prompt to make changes to your device appears. |
|
c.
|
Click Yes. The Data Exchange - Installation Program screen opens. |
|
3.
|
Select the location in which you want to install Regional Replication, and click Install. At the end of the installation, the Support login screen opens. |
|
4.
|
Type the QDS user name and password, and click OK. The Replication setup screen opens. |
|
5.
|
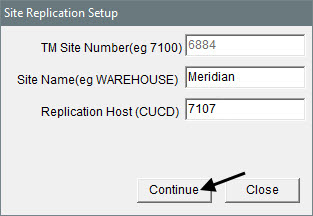
Make sure Regional and Site are selected. Then click Continue. |
Note: This entry needs to match the site name that was assigned when installing Regional Replication at the hub. Site names are case sensitive and cannot have spaces.
|
7.
|
Type the CUCD number for the hub in the Replication Host field. |
|
9.
|
Close the Site Replication Setup screen. |
Installing Data Exchange at the Sites
When you’ve finished installing Regional Replication at a site, you can then install the Data Exchange program.
To install the Data Exchange program at a site
|
1.
|
Make sure all applications on the server, including those in the Windows System Tray (such as antivirus programs), are closed. |
|
2.
|
Begin the installation. |
|
a.
|
Go to the directory in which datax00000000-02000000.exe has been saved. |
|
b.
|
Right-click datax00000000-02000000.exe and select Run as Administrator. A prompt to make changes to your device appears. |
|
c.
|
Click Yes. The Data Exchange - Installation Program screen opens. |
|
3.
|
Select the location in which you want to install the Data Exchange program, and click Install. |
|
4.
|
When the installation is done, click Finish. |
Checking the Replication Setup
When you’re finished with both installations, verify that the following are correct and update the frequency of replication cycles if needed:
The path for the MobiLink synchronization client
The Data Exchange version
The CUCD server
To check the replication setup
|
1.
|
Open Data Exchange on the server. |
|
2.
|
Select CMD from the Help menu. The Command Prompt screen opens. |
|
3.
|
Type tmwlog. The Replication and Logging screen opens. |
|
5.
|
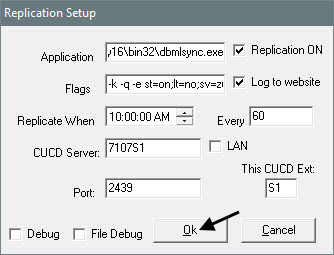
Verify that the entries in the following fields are correct: |
Application (Includes the path for the MobiLink synchronization client)
Flags (Includes the Data Exchange version)
CUCD Server
|
6.
|
If you need to update the frequency, change the entry in the Every field. |
Setting the Replication System Control
The final step of the Data Exchange installation is to set a system control that defines whether regional replication runs as a service. Set this control at the sites only. It is not used by the hub.
To set the replication system control
|
1.
|
On the server at a site, select System Controls from the Setup menu. |
|
3.
|
Select Replication Service and press Enter. |
|
4.
|
To run replication as a service, click Yes. Otherwise, click No. |
|
5.
|
Click OK to save your changes. |
|
6.
|
Close the System Controls screen. |