Spreadsheet Load Utility
This help topic is applicable to the following TireMaster applications:
|
TireMaster Point of Sale |
TireMaster Plus |
TireMaster Corporate |
|---|---|---|

|
|
|
By using the Spreadsheet Load Utility, you can significantly reduce the amount of data entry associated with performing a variety of tasks in TireMaster. With the Spreadsheet Load Utility, you retrieve a Microsoft® Excel® spreadsheet with multiple entries for a specific transaction type or activity, load the spreadsheet into TireMaster, and complete the task.
Update, April 2025
Inventory update spreadsheets no longer require data in all columns. Now you can use spreadsheets with data only in the columns for the Product Code and the field or fields that need to be updated. For example, to change the inventory groups and sell prices for a collection of items, you would add data to the following spreadsheet columns:
Product code (inv.invno), to identify the items that need to be updated
Group (inv.invgroup)
Parts (invprice.edl)
When you load an inventory spreadsheet with only the data that needs to be updated, select the Limited Inv Update check box to successfully process the update.
Original Release, April 2022
The Spreadsheet Load Utility can be used to perform the following activities:
Post journal entries
Create purchase orders
Enter vendor charges
Add and update price levels
Add and update inventory items
Mark vendor invoices for payment
Make customer balance adjustments (AR journal entries)
Apply ROAs that have already been entered
To load use the Spreadsheet Load Utility, you need to know how to do the following:
Prepare spreadsheets with Microsoft Excel
Create journal entries in TireMaster
Create purchase orders in TireMaster
Enter and process vendor charges in TireMaster
Create and update price levels in TireMaster
Add and update inventory items in TireMaster
Prepare and process AP payments in TireMaster
Create and post customer balance adjustments
Enter and apply received on account payments from customers
To use the Spreadsheet Load Utility, you need the following:
TireMaster 9.4.0 or newer installed on your computer
Microsoft Excel installed on your computer
Before you can install the Spreadsheet Load Utility, do one of the following to locate the installation program:
Access the automatically-deployed installer in the apps directory. For instructions, see Access Automatically-Deployed Installers.
Download the installer from the TireMaster Support site. For instructions, see Download the Spreadsheet Load Utility Installer.
Once you’ve located the installer complete the installation. For instructions, see Complete the Spreadsheet Load Utility Installation.
If your TireMaster system is set up to download automatically-deployed installers as part of the nightly backup process, the installer for the Spreadsheet Load Utility is already available to you. Typically, installers are placed in one of the following locations:
|
c:\TireMaster\apps |
c:\TMPOS\apps |
d:\QDSTM\apps |
|
c:\QDSTM\apps |
d:\TireMaster\apps |
d:\TMPOS\apps |
To access automatically-deployed installers in Windows
| 1. | Depending on the computer's operating system, do one of the following: |
For Windows 11, right-click  and select File Explorer from the menu that appears. Then find This PC on the Home panel. If the computer's drives are not displayed, click
 ![]() to open the list.
to open the list.
For Windows 10, right-click  and select File Explorer from the menu that appears. Then scroll to This PC on the Quick Access panel. If File Explorer opened the This PC screen instead, disregard this step.
| 2. | Double-click the letter or icon for the drive in which TireMaster is installed. (Usually, it’s the c: or d: drive.) |
| 3. | Double-click the TireMaster program folder (typically named TireMaster, qdstm, or tmpos). |
| 4. | Double-click the apps folder, and locate the file TMReadExcel00000000-01020000.exe. Once you have located the installer, complete the installation. For instructions, see Complete the Spreadsheet Load Utility Installation. |
The installer for the Spreadsheet Load Utility is available for download from the TireMaster Support site. When you download the installer, save it on your TireMaster server. To log on to the TireMaster Support Site, you need your TireMaster customer number and password. If you no longer have these credentials, log a support request via the online portal, by email, or calling 800-891-7437.
To download the Spreadsheet Load Utility Installer
| 1. | Close all applications. |
| 2. | Log on to support.tiremaster.com. |
| 3. | Type your customer number and password, and click Login. The Support Center home page opens. |
| 4. | Click Download Programs on the menu. The Download Center page opens. |
| 5. | Under Update Files, click the link for the Spreadsheet Load Utility. The download begins. If the download doesn't begin immediately, check your browser settings. |
| 6. | Move the installer from the default downloads folder to another folder (optional). |
| 7. | Exit the TireMaster Support site. Once you have finished downloading the installer, you can complete the installation. For instructions, see Complete the Spreadsheet Load Utility Installation. |
After you’ve located the installer for the Spreadsheet Load Utility, you can complete the installation. Install the applications on the TireMaster server and workstations.
To install the Spreadsheet Load Utility
| 1. | Right-click TMReadExcel00000000-01020000.exe, and select Run as Administrator. A confirmation message appears. |
| 2. | Click Yes. The TireMaster - Installation Program screen opens. |
| 3. | Click OK. The TireMaster - Search Results screen opens. |
| 4. | Select the TireMaster location in which you want to install the interface, and click Install. |
| 5. | At the end of the installation, click Finish. |
To ensure data can be successfully loaded into TireMaster, the spreadsheets created for the Spreadsheet Load Utility need to meet specific formatting requirements. To ensure your spreadsheets are formatted correctly, use templates (available for download) to create them.
The column names for journal entry spreadsheets need to match the field and column names on the Journal Entries screen in TireMaster. To create a journal entry spreadsheet, download the template, save it with a different name, and replace the data. For a copy of the journal entry spreadsheet template, click here.
Spreadsheets for creating new purchase orders need columns for the product codes and quantities of the items you want to order. To create a purchase order spreadsheet, download the template, save it with a different name, and replace the data. For a copy of the purchase order spreadsheet template, click here.
Spreadsheets for entering vendor charges need columns for nearly all of the fields on the Vendor Charge screen. To create a vendor charge spreadsheet, download the template, save it with a different name, and replace the data. For a copy of the vendor charge spreadsheet template, click here.
Spreadsheets for adding and updating price levels and price level discounts need to include the code for each price level you want to work with, along with columns for the fields and options on the Price Level Discount Edit screen. To create a price level spreadsheet, download the template, save it with a different name, and replace the data. For a copy of the price level spreadsheet template, click here.
Spreadsheets for adding and updating inventory items need columns that match the fields and options on the Inventory Maintenance screen’s General tab and Notes tab and the Site Prices and Quantity screen. Requirements for spreadsheet columns depend on whether you're adding or updating inventory:
For adding inventory, all of the fields on the spreadsheet must have entries.
For updating inventory, you have the option to populate all of the spreadsheet columns or the columns for only the product codes (to identify the items being updated) and the field or fields being updated.
To create an inventory spreadsheet, download the template, save it with a different name, and replace the data. For a copy of the inventory spreadsheet template, click here.
Spreadsheets for working with AP Payments need columns for the vendor, invoice, amount, and marking the entries as paid. To create an AP Payment spreadsheet, download the template, save it with a different name, and replace the data. For a copy of the AP Payment spreadsheet, click here.
Spreadsheets for making customer balance adjustments (AR journal entries) need columns for the customers, reference numbers, amounts, and the GL accounts for the offsetting entries. To create a customer balance adjustment spreadsheet, download the template, save it with a different name, and replace the data. For a copy of the customer balance adjustment spreadsheet, click here.
Spreadsheets for applying ROAs (that have already been entered) need columns for customers, invoices or balance adjustments, payment amounts, and marking payments as applied. To create an ROA spreadsheet, download the template, save it with a different name, and replace the data. For a copy of the ROA spreadsheet, click here.
Once you’ve created your spreadsheets, you can load them into TireMaster and complete the corresponding tasks.
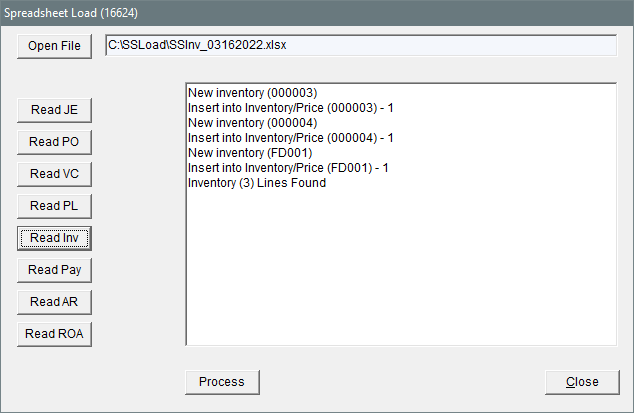
To use the Spreadsheet Load Utility
| 1. | Select Interfaces > Spreadsheet Load. The Spreadsheet Load Utility opens. |

| 2. | Retrieve the spreadsheet you want to work with. |
| a. | Click Open File. |

| b. | Locate the spreadsheet on your computer, select it, and click Open. |
| 3. | Depending on the type of data to be loaded from the spreadsheet, do one of the following: |
For journal entries, click Read JE. Once journal entries have been loaded, they are available for viewing and posting on the Journal Entries screen.
For purchase orders, click Read PO. When you’re prompted for a name, search for the vendor. Once purchase orders are loaded, they’re available in the PO System and the orders can be placed.
For vendor charges, click Read VC. Then click Process. Once the vendor charges have been loaded, they are available for viewing and completing on the Vendor Charges screen.
For price levels, click Read PL. Then click Process. Once price level information has been loaded, you can view the details on the various price levels screens.
For inventory do one of the following:
If you're adding new items, click Read Inv. Then click Process.
If you're updating items and all of the columns on your spreadsheet are populated, click Read Inv. Then click Process.
If you're updating items and the spreadsheet's populated columns are only for the product code and the field or fields being updated, select the Limited Inv Update check box, click Read Inv, and then click Process.

Once the items have been added or updated, you can view them on the Inventory List or individually in Inventory Maintenance.
For payments, click Read Pay. Once the payments have been loaded, they are available for viewing on the AP Payment screen and can be processed.
For customer balance adjustments (AR journal entries), click Read AR. Once the balance adjustments have been loaded, they are available for viewing on the affected customers’ open item ledgers.
For applying received on account payments (that have already been entered), click Read ROA. Once the spreadsheet has been loaded, open the customer records to verify that the invoices and balance adjustments have been fully paid or partially applied. When transactions are fully paid, they’re removed from the customer’s Open Item Ledger.
| 4. | If you need to load additional spreadsheets, repeat steps 2 and 3. |
| 5. | When you’re done working with spreadsheets, click Close. |