TireConnect
This help topic is applicable to the following TireMaster applications:
|
TireMaster Point of Sale |
TireMaster Plus |
TireMaster Corporate |
|---|---|---|

|

|

|
TireConnect is an e-commerce plug-in for dealer web sites that allows customers to browse inventory, place orders, and submit callback and appointment requests. The TireConnect integration moves the information submitted by customers from dealer web sites to TireMaster. Then, depending on the type of request, shop personnel can use that information to follow up with customers or create work orders and schedule appointments in TireMaster.
Initial release, September 2018.
To use the TireConnect integration, you need the following:
An account with TireConnect
An internet connection
TireMaster 9.2.0 or newer installed on your computers
To use the TireConnect integration, you should already know how to perform the following tasks in TireMaster:
Add customers and vehicles
Schedule appointments
Create work orders
Installing the TireConnect integration is a two-step process. First, do one of the following to locate the installation program:
Access the automatically-deployed installer in the apps directory. For instructions, see Access Automatically-Deployed Installers.
Download the installer from the TireMaster Support site. For instructions, see Download the TireConnect Installer.
Once you’ve located the installer, complete the installation. For instructions, see Complete the TireConnect Installation. Install the TireConnect integration on the TireMaster server and workstations.
If your TireMaster system is set up to download automatically-deployed installers as part of the nightly backup process, the installer for the TireConnect integration is already available to you. Typically, installers are placed in one of the following locations:
|
c:\TireMaster\apps |
c:\TMPOS\apps |
d:\QDSTM\apps |
|
c:\QDSTM\apps |
d:\TireMaster\apps |
d:\TMPOS\apps |
To access automatically-deployed installers
| 1. | Right-click  and select File Explorer from the menu that opens. and select File Explorer from the menu that opens. |
| 2. | In the Quick Access navigation pane, scroll to This PC. |
| 3. | Double-click the letter or icon for the drive that TireMaster is installed in. (Usually, it’s the c: or d: drive.) |
| 4. | Double-click the TireMaster, qdstm, or tmpos program folder. |
| 5. | Double-click the apps folder, and locate the file TireConnect00000000-01000000.exe. Once you have located the installer, complete the installation. For instructions, see Complete the TireConnect Installation. |
The installer for the TireConnect integration is available for download from the TireMaster Support site. When you download the installer, save it on your TireMaster server. To log on to the TireMaster Support Site, you need your TireMaster customer number and password. If you no longer have that information, log a support request via the online portal, by email, or calling 800-891-7437.
To download the TireConnect Installer
| 1. | Close all applications. |
| 2. | Log on to support.tiremaster.com. |
| 3. | Type your customer number and password, and click Login. The Support Center home page opens. |
| 4. | Click Download Programs on the menu. The Download Center page opens. |
| 5. | Under Update Files, click the link for TireConnect. You’ll be prompted to save the file and possibly run the installation, depending on your browser. |
| 6. | Save the installer on your computer. |
| 7. | Exit the TireMaster Support site. |
| 8. | Once you have finished downloading the installer, you can complete the installation. For instructions, see Complete the TireConnect Installation. |
After you’ve located the installer for the TireConnect integration, you can complete the installation. Install the applications on the TireMaster server and workstations.
To install TireConnect
| 1. | Right-click TireConnect00000000-01000000.exe, and select Run as Administrator. A confirmation message appears. |
| 2. | Click Yes. The TireMaster - Installation Program screen opens. |
| 3. | Click OK. The TireMaster - Search Results screen opens. |
| 4. | Select the TireMaster location in which you want to install the interface, and click Install. |
| 5. | At the end of the installation, click Finish. |
Before you can retrieve orders and leads from your web site and turn that information into TireMaster work orders and appointments, you need complete the following tasks.
When orders and leads are received from TireConnect, the items on those documents are matched to the corresponding items in TireMaster. To ensure this matching occurs, product code entries in TireMaster need to be the same as the manufacturer’s part numbers. To handle scenarios in which the product code in TireMaster doesn't match the manufacturer’s part number, a generic TireConnect item is used instead.
When the manufacturer code for an item from TireConnect does not match the product code for that same item in TireMaster, a generic noninventoriable item is assigned. You define which TireMaster item to use in this scenario by setting a system control.
To define the generic TireConnect item
| 1. | Select Setup > System Controls. The System Controls screen opens. |
| 2. | Click the Inventory tab. |
| 3. | Select Noninventory Custom Item and press Enter. The Custom Inventory Lookup screen opens. |
| 4. | Look up the item you want to assign to items from TireConnect that don’t have matching items in TireMaster. |
| 5. | Close the System Controls screen. |
When customers order items via TireConnect, they make down payments toward their purchases. Because this money is owed to you, you need an AR account for tracking those down payments.
To add a customer record for TireConnect
| 1. | Select Customers > Maintenance. The Name Lookup/Entry screen opens. |
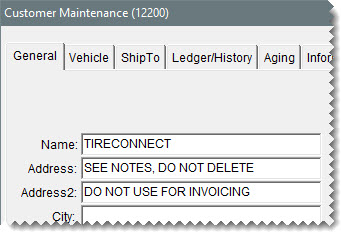
| 2. | Click Cancel, and then click Add. TireMaster prompts you for the customer name. |
| 3. | Type TireConnect and click OK. |
| 4. | Add the following information in the address fields: |
SEE NOTES, DO NOT DELETE
DO NOT USE FOR INVOICING
| 5. | Add TireConnect’s contact information. |
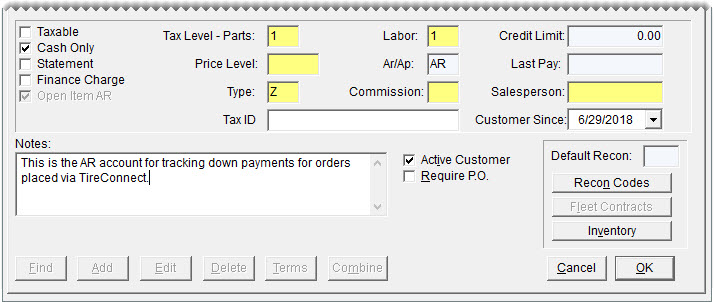
| 6. | Clear the Taxable, Statement, and Finance Charges check boxes. |
| 7. | Click the Type field and press  . Then select the customer type for bank cards. . Then select the customer type for bank cards. |
| 8. | Set the credit limit. For unlimited credit, leave it set to $0.00. |
| 9. | Type the following note: This is the AR account for tracking down payments for orders placed via TireConnect. |
| 10. | To save the TireConnect customer, click OK. |
When orders from TireConnect are turned into TireMaster work orders, you record the down payments as TireConnect credit card payments. Before you can do this, you need to set up a TireConnect credit card.
To add a TireConnect credit card
| 1. | Select Setup > Credit Cards. The Credit Card Controls screen opens. |
| 2. | Click Add. |
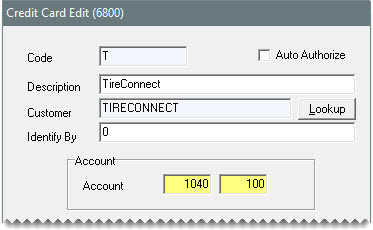
| 3. | Type a code for identifying the TireConnect card (such as T). |
| 4. | Make sure the Auto Authorize check box is clear. |
| 5. | For the description, type TireConnect. |
| 6. | Click Lookup, and search for the TireConnect customer record. |
| 7. | Type a card identification number (for example, 00). |
| 8. | Click the Account field and press  . Then select the GL account that deposits for TireConnect orders will post to. . Then select the GL account that deposits for TireConnect orders will post to. |
| 9. | To save the TireConnect credit card, click OK. |
| 10. | Close the Credit Card Controls screen. |
Before you can retrieve orders and leads from your web site and turn that information into TireMaster work orders and appointments, you need to complete settings that allow your TireMaster system and TireConnect to communicate.
To set up the TireConnect Interface
| 1. | Select Interfaces > Interface Setup. |
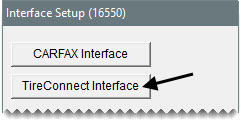
| 2. | Click TireConnect Interface. |
| 3. | Type the client ID and client secret provided by TireConnect in the applicable fields. |
| 4. | Click Credit Card, and select the TireConnect credit card from the list that opens. |
| 5. | Type the URL for your TireConnect site in the Host field. |
| 6. | Connect your TireMaster site(s) to the TireConnect location(s). To do this, select a TireMaster site (left side of screen) and then select the corresponding TireConnect location (right side of screen). Repeat as needed. |
| 7. | Click OK. |
To begin receiving data from TireConnect, you need to set a system control. Once the control is set, you’ll receive data from TireConnect every ten minutes.
To enable TireConnect data retrieval
| 1. | Select Setup > System Controls. The System Controls screen opens. |
| 2. | Click the Other tab. |
| 3. | Select WebLead Service and press Enter. |
| 4. | Select Yes and click OK. |
| 5. | Close the System Controls screen. |
The TireConnect Leads Report lists orders and callback and appointment requests received during a user-specified date range. Before employees can generate this report, it needs to be assigned to their security groups.
To assign the TireConnect Leads Report
| 1. | Select Setup > Users & Permissions. The User List opens. |
| 2. | Click Security. The Security Assignments screen opens. |
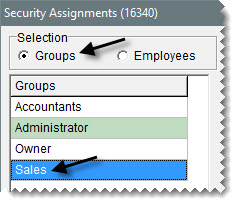
| 3. | Make sure Groups is selected (upper-left corner of the screen) and then select the group to which you want to assign the report. |
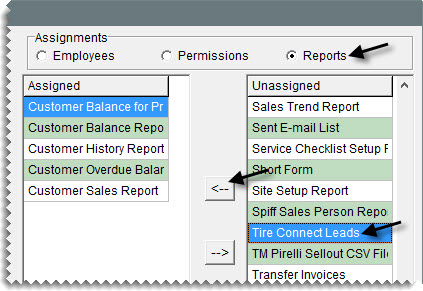
| 4. | Select Reports (upper-right corner of the screen). Then select TireConnect Leads from the list of unassigned reports and click  . . |
| 5. | To assign the report to additional security groups, repeat steps 3 and 4. |
The TireConnect integration sends orders and appointment and callback requests from your store web site to TireMaster every ten minutes. Depending on the type of information received, you can create work orders and schedule appointments in TireMaster or contact customers and answer their questions.
When customers place orders on your web site, you can turn the order information received via TireConnect into a TireMaster work order.
To turn a web order into a TireMaster work order
| 1. | If the Open Work Order List isn’t already open, click Invoicing. |
| 2. | Click Web Lead. |
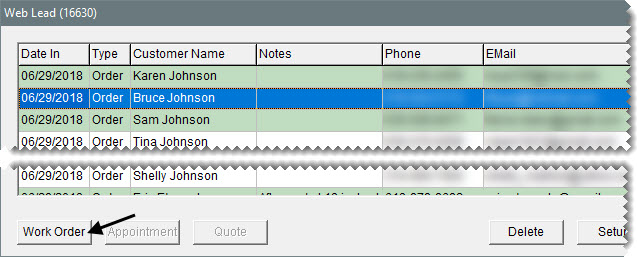
| 3. | Select the web order that you want to turn into a TireMaster work order, and click Work Order. TireMaster prompts you to look up the customer. |
| 4. | To search for the customer, edit the name if needed (for example, change the spelling or remove the first name) and click OK. |
| 5. | Depending on search results, do one of the following: |
If the customer’s name is on the Customer List, select it and click OK. Then go to step 7.
If the customer’s name is not on the list, click Cancel. Then continue with step 6.
If no matches are found, click OK to close the message. Then continue with step 6.
| 6. | When the add customer prompt appears, click Yes. |
| 7. | Update the information on the Customer Maintenance screen if needed. Then click OK. TireMaster prompts you to add the vehicle. |
| 8. | Depending on whether you want to add the vehicle, click Yes or No. |
| 9. | Close the Web Lead screen. The work order is added to the Open Work Order List. |
| 10. | Update the work order. |
| a. | Select the work order, and click Select. |
| b. | Make the needed changes. |
| c. | To close the work order, click Quit. |
When customers make appointment requests on your web site, you can retrieve the details submitted via TireConnect and use the information to add an appointment to the TireMaster scheduler.
To create an appointment with the TireConnect Interface
| 1. | If the Open Work Order List isn’t already open, click Invoicing. |
| 2. | Click Web Lead. The Web Lead screen opens, with the requests organized by type (order, email, and appointment). |
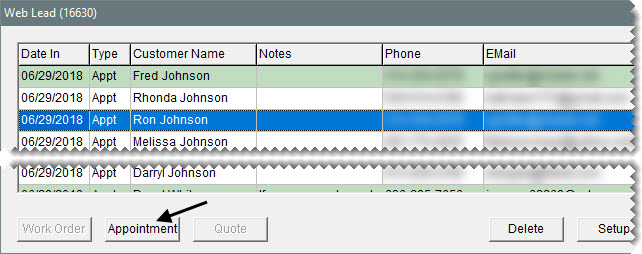
| 3. | Scroll down to the appointments. Then select the one you want to schedule in TireMaster and click Appointment. TireMaster prompts you to look up the customer. |
| 4. | To search for the customer, edit the name if needed (for example, change the spelling or remove the first name), and click OK. |
| 5. | Depending on search results, do one of the following: |
If the customer’s name is on the list, select it and click OK. Then go to step 7.
If the customer’s name is not on the list, click Cancel. Then continue with 6.
If no matches are found, click OK to close the message. Then continue with 6.
| 6. | When the add customer prompt appears, click Yes. |
| 7. | Update the information on the Customer Maintenance screen if needed. Then click OK. TireMaster prompts you to add the vehicle. |
| 8. | Depending on whether you want to add the vehicle, click Yes or No. |
| 9. | Close the Web Lead screen. |
| 10. | Add the date, time, and other details to the customer’s appointment. |
| a. | On the Open Work Order List, click Schedule. |
| b. | Select the customer’s appointment and click Edit. |
| c. | Call or email the customer, and add the appointment date, time, and other details as needed. Instructions for creating appointments are available in the TireMaster help system and user guide. |
| d. | When you’re done, save the appointment and close the open screens. |
Callback requests sent to you via TireConnect contain customer phone numbers, email addresses, or both, along with the items customers are interested in buying. You can use this information to contact customers when you’re ready to answer their questions.
To follow up on information requests
| 1. | If the Open Work Order List isn’t already open, click Invoicing. |
| 2. | Click Web Lead. The Web Lead screen opens, with the requests organized by type (order, email, and appointment). |
| 3. | Scroll down to the emails, and select the one you’re going to respond to. |
| 4. | Locate the customer’s phone number, email address or both in the upper-right corner of the screen. Then use the contact information listed to call the customer or send the customer an email. |
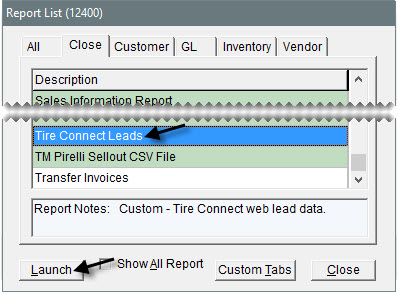
The TireConnect Leads Report lists orders and callback and appointment requests received during a user-specified date range.
To generate a TireConnect Leads Report
| 1. | Select Closing > Reports. The Report List opens. |
| 2. | Select TireConnect Leads and click Launch. TireMaster prompts you for a date range. |
| 3. | Enter the beginning and ending dates for the report date range. To generate a report for a single day, enter the same date in both the Start Date and End Date fields. Then click Print. The Report Window opens. |
| 4. | Print the report and close the Report Window. |
