Custom Inventory Lookup Screen
This help topic is applicable to the following TireMaster applications:
|
TireMaster Point of Sale |
TireMaster Plus |
TireMaster Corporate |
|---|---|---|

|
|
|
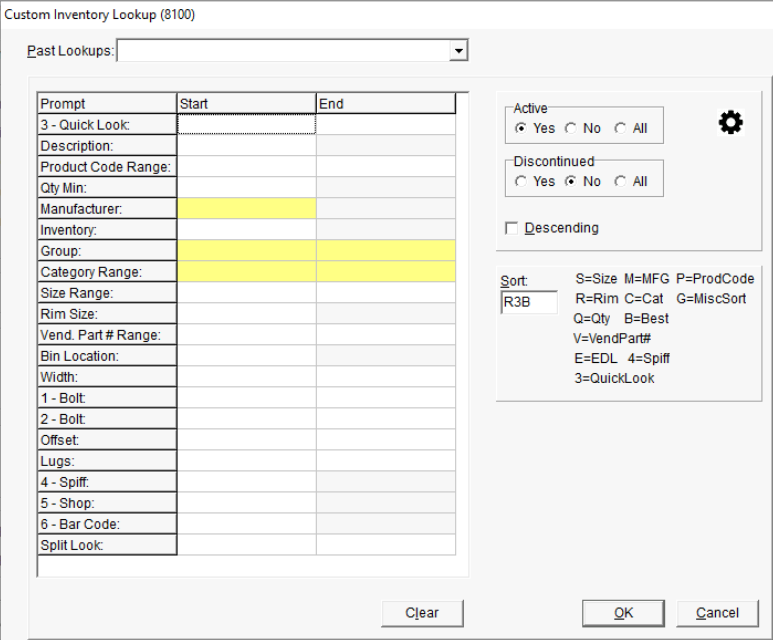
Searches for tires, parts, labor, and other items occur in the Custom Inventory Lookup screen.
The Custom Inventory Lookup screen includes various search options that you can combine to find the exact items needed.
|
Item |
Description |
|
Past Lookups |
Lets you select the codes used for a previous search from a drop-down and reuse them in a new search. |
|
Prompt |
Displays the names of the search options for the selected tab. The search options are actually various settings assigned to items, including size, product code, and bar code. |
|
Start |
Lets you type a code, number, letter, or description to use for searches: When searching for a range of items, set the beginning of the range in this column. When searching by manufacturer, group, and category, click When using the Split Look option to search for staggered fitments, type one size in this column and the other size in the End column. |
|
End |
Lets you type the code, number, letter, or description for the end of a range of items: When searching for a range of items, set the end of the range in this column (for search options that can be used to look up a range of items). When searching by group and category, click When using the Split Look search option to find staggered fitments, type one size in the Start column and the other size in this column. |
|
Active |
Lets you limit searches to active items only, inactive items only, or both. |
|
Discontinued |
Lets you limit searches to discontinued items only, current items only, or both. |
|
Descending |
Lets you display the items retrieved by the search from the highest to lowest. The items that match the primary sort order will be displayed in descending order first followed by those matching the secondary sort order, and so on. Note: Because TireMaster is designed to always display quantities on the Inventory List from highest to lowest, this check box is disabled when the letter Q is the only code entered in the Sort field.
|
|
Sort |
Lets you set the order for displaying items retrieved by a search on the Inventory List. The first code is the primary sorting method, the second code is the secondary sorting method, and so on. For example, if the primary sort order is rim size, all items with the same rim size will be sorted by the secondary sort order instead. Note: You can enter up to four sort codes. When a sort code cannot be used to perform a task or organize information on a report, it’s disabled.
|
|
Clear |
Removes codes that have been entered in the Start and End columns. |
|
OK |
Functions in one of the following ways: From the Inventory menu, begins the search for items. From the Setup menu, saves changes to the screen. |
|
Cancel |
Functions in one of the following ways: From the Inventory menu, lets you stop the search for items. From the Setup menu, lets you cancel changes to the screen. |
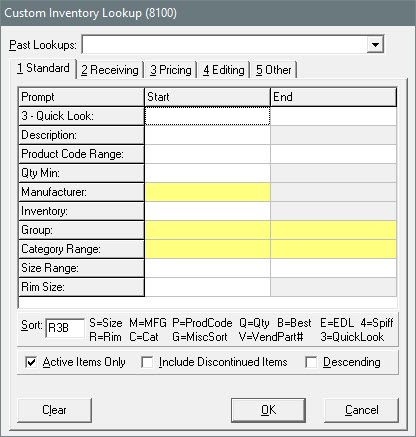
 and make a selection from a list.
 The Custom Inventory Lookup screen includes a set of customizable tabs and settings that affect the way in which items retrieved by a search are displayed. For information about the tabs, see Configure the Inventory Lookup Screen - 9.4.4 and older.
|
Item |
Description |
|
Past Lookups |
Lets you select the codes used for a previous search from a drop-down and reuse them in a new search. |
|
Prompt |
Displays the names of the search options for the selected tab. The search options are actually various settings assigned to items, including size, product code, and bar code. |
|
Start |
Lets you type a code, number, letter, or description to use for searches: When searching for a range of items, set the beginning of the range in this column. When searching by manufacturer, group, and category, click When using the Split Look option to search for staggered fitments, type one size in this column and the other size in the End column. |
|
End |
Lets you type the code, number, letter, or description for the end of a range of items: When searching for a range of items, set the end of the range in this column (for search options that can be used to look up a range of items). When searching by group and category, click When using the Split Look search option to find staggered fitments, type one size in the Start column and the other size in this column. |
|
Sort |
Lets you set the order for displaying items retrieved by a search on the Inventory List. The first code is the primary sorting method, the second code is the secondary sorting method, and so on. For example, if the primary sort order is rim size, all items with the same rim size will be sorted by the secondary sort order instead. Note: You can enter up to four sort codes. When a sort code cannot be used to perform a task or organize information on a report, it’s disabled.
|
|
Active Items Only |
Lets you include active items in the search. |
|
Include Discontinued Items |
Lets you include discontinued items in the search. |
|
Descending |
Lets you display the items retrieved by the search from the highest to lowest. The items that match the primary sort order will be displayed in descending order first followed by those matching the secondary sort order, and so on. Note: Because TireMaster is designed to always display quantities on the Inventory List from highest to lowest, this check box is disabled when the letter Q is the only code entered in the Sort field.
|
|
Name |
Lets you change the name of the selected tab. Note: This button is visible only when accessing the Custom Inventory Lookup screen from the Setup menu.
|
|
Clear |
Removes codes that have been entered in the Start and End columns. |
|
OK |
Functions in one of the following ways: From the Inventory menu, begins the search for items. From the Setup menu, saves changes to the screen. |
|
Cancel |
Functions in one of the following ways: From the Inventory menu, lets you stop the search for items. From the Setup menu, lets you cancel changes to the screen. |
You can tailor the Custom Inventory Lookup screen for your business by defining the following:
The placement of the search criteria fields (prompts) on the screen
The default sort codes for organizing search results on the Inventory List
To configure the Custom Inventory Lookup Screen
| 1. | Select Setup > Inventory Lookup. The Custom Inventory Lookup screen opens. |
| 2. | Change the field names, as needed, for one or more search criteria rows. |
| a. | Click the row whose name you want to change. |
| b. | Click  , and select a different name from the drop-down. , and select a different name from the drop-down. |
| 3. | Update the default order for inventory search results as needed. |
| a. | Type up to four codes in the Sort field. For example, to sort search results by rim size, quick look code, and best price, type R3B. The legend to the right of the Sort field shows the available sort codes. |
| b. | To display items from the highest to lowest order by default, select the Descending check box. Otherwise, leave it alone. |
| 4. | To save the screen configuration, click OK. |
The TireMaster startup database includes the following tabs: Standard, Receiving, Pricing, Editing, and Other. You can tailor each tab for the various tasks in which you search for items. For example, you can set up one tab for point of sale and another for ordering from vendors. The settings for the Custom Inventory Lookup screen can differ for each workstation.
To configure the Custom Inventory Lookup Screen
| 1. | Select Setup > Inventory Lookup. The Custom Inventory Lookup screen opens. |
| 2. | To rename a tab, click the tab and then click Name. TireMaster prompts you to name for a name. |
| 3. | Type the new name for the tab and click OK. |
| 4. | To modify the rows on a tab, click the row you want to change. Then click , and select a search option from the drop-down. |
| 5. | Repeat step 4 until the search options you want to use are listed. |
| 6. | Using the codes to the right of the Sort field, type the sort order. For example, to sort by rim size, quick look code, and best price, type R3B. |
| 7. | Select or clear the following check boxes as needed: |
To include active items in searches by default, select the Active Only check box.
To include discontinued items in searches by default, select the Include Discontinued Items check box.
To display items from the highest to lowest order by default, select the Descending check box.
| 8. | To set up the remaining tabs, repeat steps 2 through 6. |
| 9. | To save the screen configuration, click OK. |
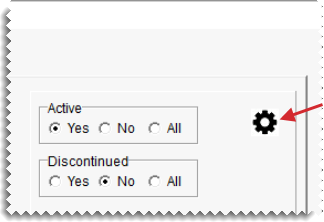
You can use color codes to help inactive and discontinued items stand out in inventory search results. This functionality is available in TireMaster 9.4.5 and newer.
To see how the color codes work, watch the video.

To define color codes to inactive and discontinued items
| 1. | Open the Custom Inventory Lookup screen using one of the following methods: |
Select Inventory > Maintenance.
Select Setup > Inventory Lookup.
| 2. | Click  . The Inventory Setup screen opens. . The Inventory Setup screen opens. |
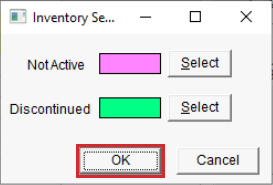
| 3. | For not active, discontinued, or both, do the following: |
| a. | Click Select to open the Color screen. |
| b. | Select the color you want to use and click OK. |
| 4. | Click OK to save your changes. |
Before you can use the Custom Inventory Lookup screen, you need to enable it in System Controls.
To enable the Custom Inventory Lookup Screen
| 1. | Select Setup > System Controls. The System Controls screen opens. |
| 2. | Click the Inventory tab. |
| 3. | Scroll down to the Custom Inventory Lookup setting and see if it is set to Yes. If it is not, press Enter and select Yes. |
| 4. | Close the System Controls screen. |