1stMile Payment Processing
This help topic is applicable to the following TireMaster applications:
|
TireMaster Point of Sale |
TireMaster Plus |
TireMaster Corporate |
|---|---|---|

|
|
|
With the integration for 1stMile payment processing, you can process credit and debit cards from within TireMaster. The 1stMile integration supports processing for:
Major credit cards
CFNA credit cards (Credit First National Association is a Bridgestone company)
Goodyear credit cards
You can also use the 1stMile integration to submit customer applications for CFNA and Goodyear credit. Optional tools for assessing credit card surcharges are available in TireMaster 9.4.7 and newer.
Added support for 1stMile's surcharge program.
May, 2012
Added support for electronically submitting CFNA credit card applications.
March, 2011
Initial release under the name Acquirint payment processing.
Before you can install the 1stMile payment processing integration, do one of the following to locate the installation program:
Access the automatically-deployed installer in the apps directory. For instructions, see Accessing Automatically-Deployed Installers.
Download the installer from the TireMaster Support site. For instructions, see Downloading the 1stMile Installer.
Once you’ve located the installer, complete the installation. For instructions, see Completing the 1stMile Installation.
If your TireMaster system is set up to download automatically-deployed installers as part of the nightly backup process, the installer for 1stMile payment processing is already available to you. Typically, installers are placed in one of the following locations:
|
c:\TireMaster\apps |
c:\TMPOS\apps |
d:\QDSTM\apps |
|
c:\QDSTM\apps |
d:\TireMaster\apps |
d:\TMPOS\apps |
To access automatically-deployed installers in Windows
| 1. | Depending on the computer's operating system, do one of the following: |
For Windows 11, right-click  and select File Explorer from the menu that appears. Then find This PC on the Home panel. If the computer's drives are not displayed, click
 ![]() to open the list.
to open the list.
For Windows 10, right-click  and select File Explorer from the menu that appears. Then scroll to This PC on the Quick Access panel. If File Explorer opened the This PC screen instead, disregard this step.
| 2. | Double-click the letter or icon for the drive in which TireMaster is installed. (Usually, it’s the c: or d: drive.) |
| 3. | Double-click the TireMaster program folder (typically named TireMaster, qdstm, or tmpos). |
| 4. | Double-click the apps folder, and locate the file TMAcquirint00000000-02020000.exe. Once you have located the installer, complete the installation. For instructions, see Completing the 1stMile Installation. |
The installer for the 1stMile payment processing integration is available for download from the TireMaster Support site. When you download the installer, save it on your TireMaster server. To log on to the TireMaster Support Site, you need your TireMaster customer number and password. If you no longer have these credentials, log a support request via the online portal, by email, or calling 800-891-7437.
To download the 1stMile Installer
| 1. | Close all applications. |
| 2. | Log on to support.tiremaster.com. |
| 3. | Type your customer number and password, and click Login. The Support Center home page opens. |
| 4. | Click Download Programs on the menu. The Download Center page opens. |
| 5. | Under Update Files, click the link for Acquirint. The download begins. If the download doesn't begin immediately, check your browser settings. |
| 6. | Move the installer from the default downloads folder to another folder (optional). |
| 7. | Exit the TireMaster Support site. Once you have finished downloading the installer, you can complete the installation. For instructions, see Completing the 1stMile Installation. |
After you’ve located the installer for 1stMile payment processing, you can complete the installation. Install 1stMile on each computer that will be used to process payment cards. The installation will occur in two parts. The interface that enables TireMaster to communicate with 1stMile will be installed first, followed by the 1stMile payment processing application itself.
To install 1stMile payment processing
| 1. | Close all other applications |
| 2. | Navigate to the location where you saved the 1stMile installer. Then right-click TMAcquirint00000000-02020000.exe, and select Run as Administrator. A confirmation message appears. |
| 3. | Install the interface that links TireMaster to 1stMile. |
| a. | On the TireMaster Installation Program screen, click OK. The TireMaster - Search Results screen opens. |
| b. | Select the TireMaster location in which you want to install the interface and click Install. When this part of the installation finishes, the First Mile MiddleWare Setup Wizard opens. |
| c. | Click Next. |

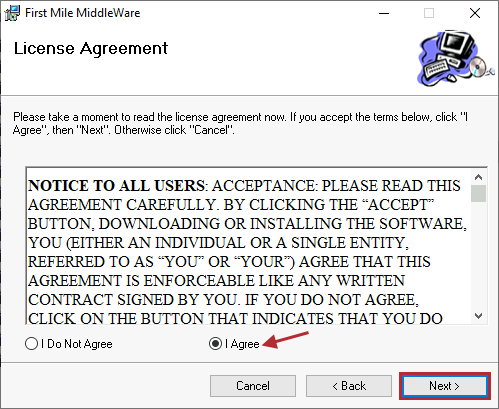
| 4. | Review and accept the 1stMile end user license agreement. |
| a. | Read the notice to all users. |
| b. | Select I Agree. |
| c. | Click Next. The installation prompts you to define desktop shortcuts. |
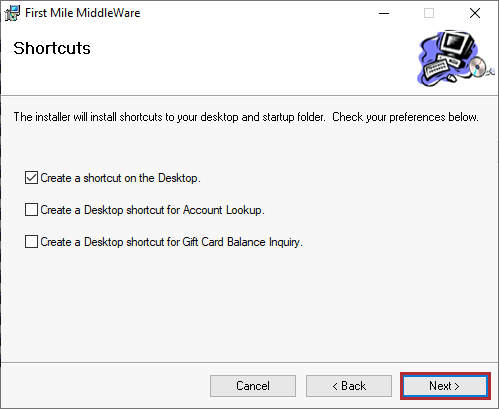
| 5. | Select or clear the shortcut check boxes for the 1stMile application and click Next. |
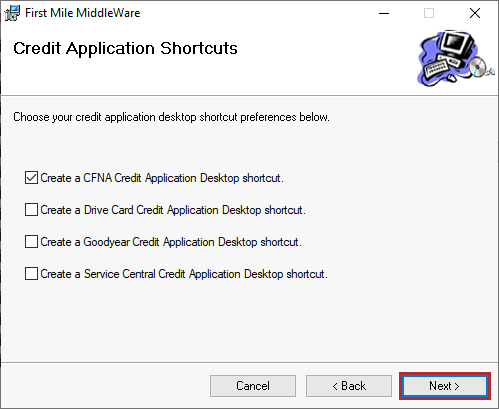
| 6. | If you accept applications for CFNA credit, Goodyear credit, or both, those shortcuts as needed. Then click Next. |
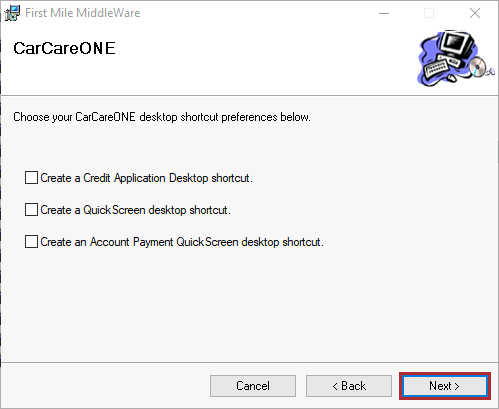
| 7. | Disregard the CarCarONE shortcut options, and click Next. |
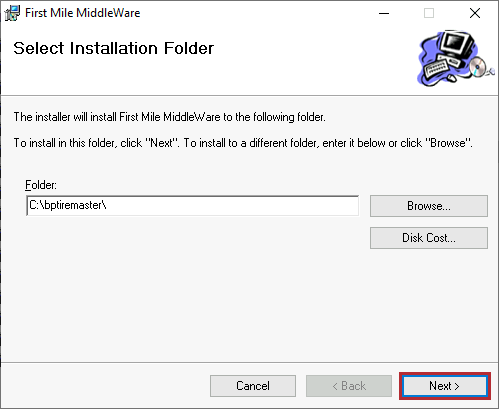
| 8. | Define the program folder for 1stMile and complete the installation. |
| a. | Leave the default Folder entry as is, or click Browse and select the installation folder. |
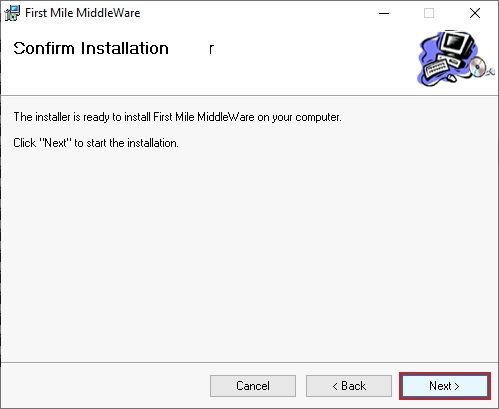
| b. | Click Next. You're prompted to confirm the installation. |
| c. | Click Next again. |
| d. | At the end of the 1stMile installation, click Close. |
| e. | When TM installation program screen opens, click Finish. |
Before you can process payment cards with 1stMile, you need to complete settings that give you authorization to do business with this card processor. The settings for 1stMile payment processing need to be completed on each computer that will be used to process credit and debit cards.
To set up 1stMile payment processing
| 1. | Plug the card-swiping device you'll be using into the computer. |
| 2. | If TireMaster isn’t already running, start it and log in. |
| 3. | Open the 1stMile setup screen. |
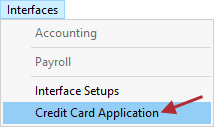
| a. | Select Interfaces > Credit Card Application. |
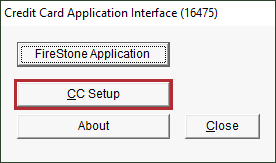
| b. | Click CC Setup. The Configuration screen opens. |
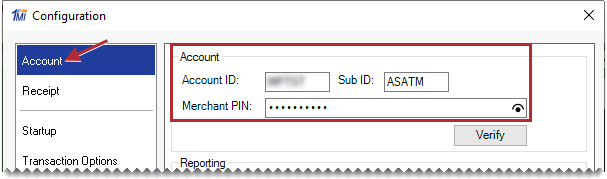
| 4. | Make sure Account is selected. Then type the account number and merchant PIN provided to you by 1stMile. The Sub ID can be left blank. |
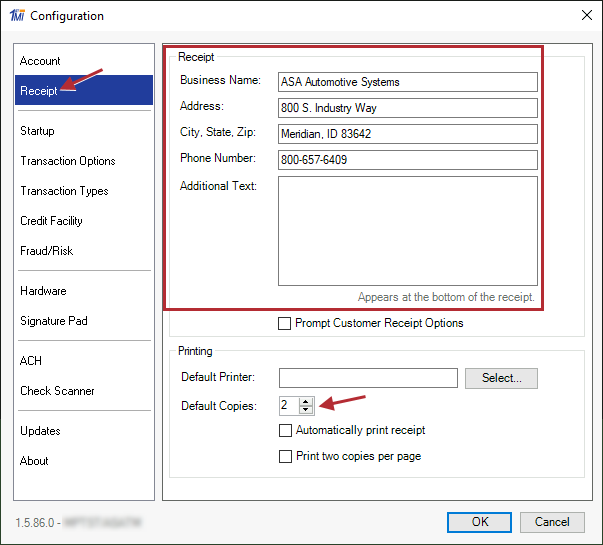
| 5. | Click Receipt. Then add your contact information at the top of the screen, and define the default number of copies in the print settings. |
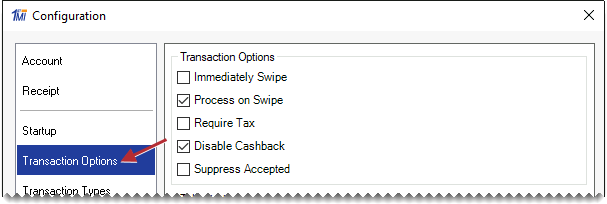
| 6. | Click Transaction Options and select the check boxes for functions you want to use. |
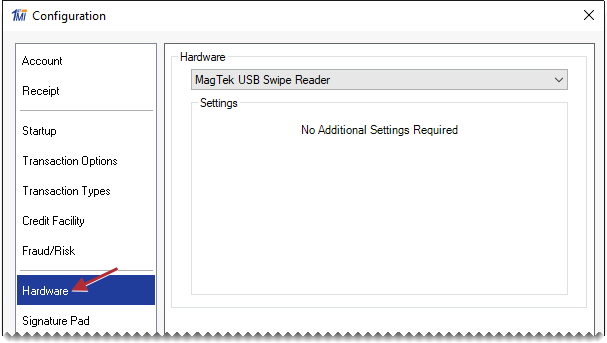
| 7. | Click Hardware. Then make sure that the card-swiping device listed from the drop-down list matches the device plugged into your computer. Depending on the device you’re using, you might be prompted download and install an additional application. |
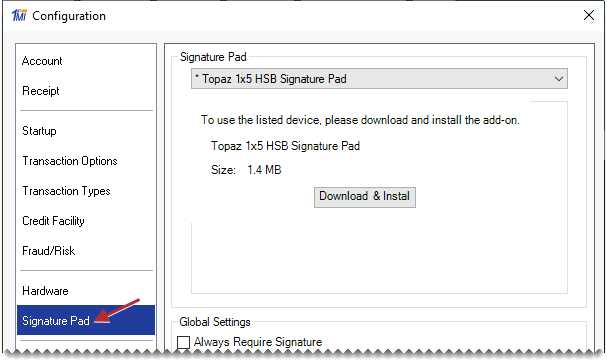
| 8. | If you collect signatures electronically, click Signature Pad. Then select your signature-capturing device from the drop-down. Depending on the device you’re using, you might be prompted download and install an additional application. |
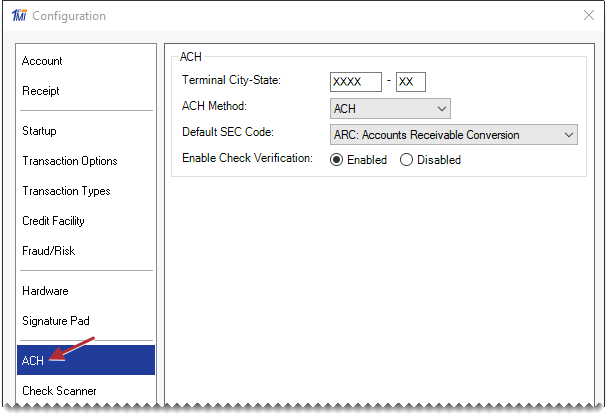
| 9. | If you use Automated Clearing House processing, click ACH. Then add the terminal city and state, select the ACH method and default SEC code, and define whether check verification is enabled. |
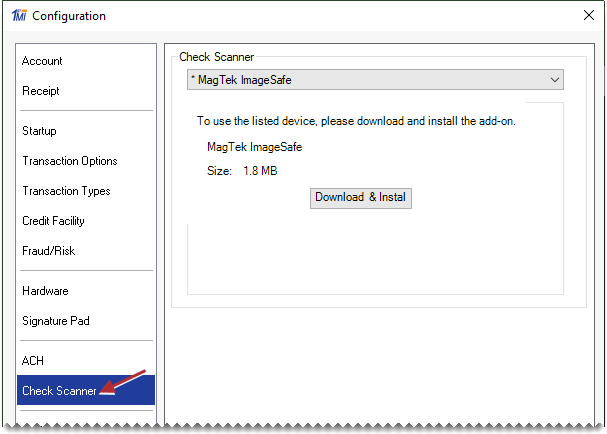
| 10. | If you use a check scanner, click Check Scanner. Then select your check-scanning device from the drop-down. |
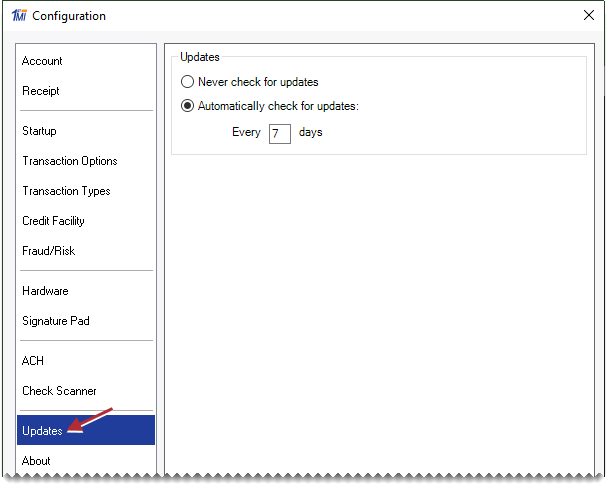
| 11. | Click Auto-Update. Then define whether you want your card-processing system to automatically check for updates from 1stMile, and if so, how often. |
| 12. | To save your settings, click OK. |
If you no longer use a computer to process payment cards, you can remove the 1stMile application from it.
To remove 1stMile payment processing
| 1. | Locate the installer for the installer for 1stMile payment processing. If it isn’t in the apps directory for your TireMaster folder, you can download it from the TireMaster Support site. |
| 2. | Navigate to the location where you saved the Acquirint installer, and double-click TMAcquirint00000000-02020000.exe. The TireMaster - Installation Program screen opens. |
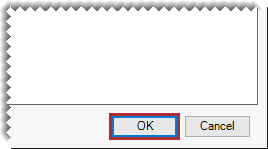
| 3. | Click OK. The TireMaster - Search Results screen opens |
| 4. | Make sure the location for your TireMaster program directory is selected, and click Install. The ATS Secure PostUI_Net screen opens. |
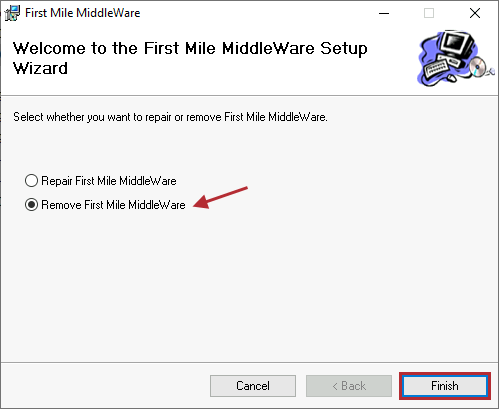
| 5. | Select Remove ATS Secure PostUI_Net and click Finish. |
| 6. | When the removal is complete, close the ATS Secure PostUI_Net screen. The TireMaster - Installation Program screen opens. |
| 7. | Click Finish. |
When a customer presents a credit or debit card for payment, you can launch the payment process in TireMaster, seamlessly move to 1stMile payment processing to capture the card information, and return to TireMaster to complete the invoice.
To process a sale with 1stMile
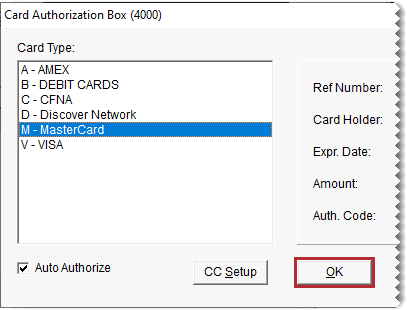
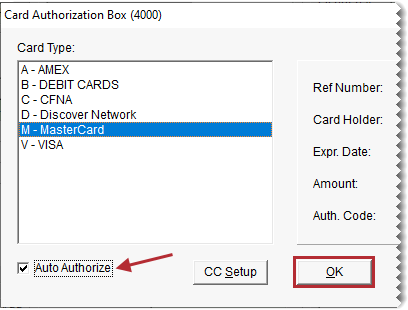
| 1. | Select the first Credit/Debit row on the completion screen for an invoice, deposit, or ROA. Then press  to fill in the exact invoice amount, or type the amount being paid with the card and press Enter. The Card Authorization Box opens. to fill in the exact invoice amount, or type the amount being paid with the card and press Enter. The Card Authorization Box opens. |
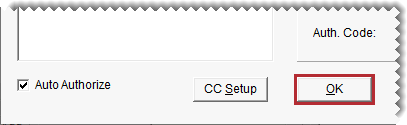
| 2. | Select the card type and make sure the Auto Authorize check box in the lower-left corner of the screen is selected. |

| 3. | Click OK. The 1stMile Credit Card Sale screen opens. |
| 4. | Click Swipe. |
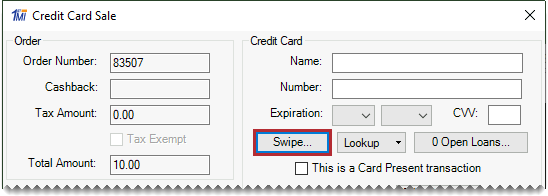
| 5. | Tell the customer to swipe their card. The customer’s name and card information fills in. |
| 6. | Click Process. The Receipt Options screen opens. |

| 7. | Print or email a terminal receipt for the customer (optional). A transaction status message appears. |
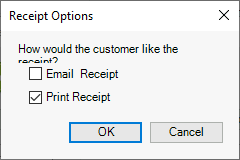
| 8. | Do the following as needed: |
To see information about the sale and finish processing, click Details.
To finish processing, click OK.
For a copy of a terminal receipt, click Print Receipt.
| 9. | Complete and print the invoice, deposit, or ROA in TireMaster. Then have the customer sign the printed document. |
When a customer returns an item that was originally purchased with a credit or debit card, you need to perform a return sale in TireMaster and process the refund to the card holder with 1stMile. The manner in which you process the refund depends on whether card processing for the original sale was handled by 1stMile.
If card processing for the original sale was handled by 1stMile, you can process the return sale and the card holder’s refund directly from TireMaster. The majority of your credit and debit card refunds will be handled in this manner.
To process refunds for sales originally handled by 1stMile
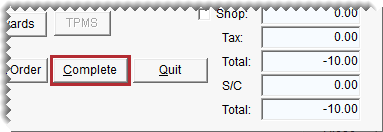
| 1. | Start a work order, adding each item that’s being returned at a negative quantity. For more information, see Create a Regular Work Order. |
| 2. | Click Complete. The Invoice Completion screen opens. |
| 3. | Select the first Credit/Debit row. Then press to fill in the exact invoice amount, or type the amount being refunded and press Enter. The Card Authorization Box opens. |
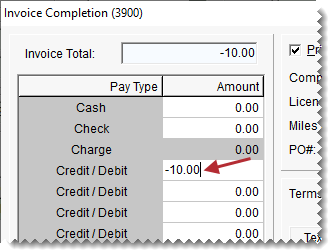
| 4. | Select the card type, and make sure the Auto Authorize check box is selected. |
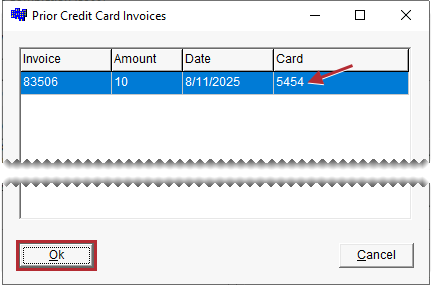
| 5. | Click OK. The Prior Credit Card Invoices screen opens. |
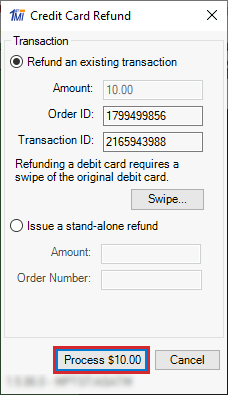
| 6. | Make sure the original invoice is selected, and click OK. The Credit Card Refund screen opens. |
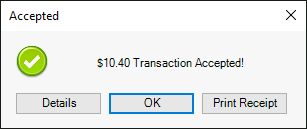
| 7. | If the customer originally paid with a credit card, click Process. If the customer originally paid with a debit card instead, click Swipe Debit Card and ask the customer to swipe their card. Then click Process. A transaction status message appears. |
| 8. | Do the following as needed: |
To see information about the refund and finish processing, click Details.
To finish processing, click OK.
For a copy of a terminal receipt, click Print Receipt.

| 9. | Complete and print the refund invoice in TireMaster. |
When the credit or debit card payment for a customer’s purchase was processed manually or with a previous payment processor, you can use the 1stMile desktop application to issue a stand-alone refund. (Stand-alone refunds are also referred to as wild refunds.) In this scenario, you'll be prompted to swipe the customer's payment card because 1stMile won't have the card on file.
To issue a stand-alone refund for a manually processed card
| 1. | Start the return in TireMaster: |
| a. | Add the items being returned to a work order at a negative quantity. |
| b. | Click Complete. The Invoice Completion screen opens. |
| c. | Select the first Credit/Debit row. Then press to fill in the exact invoice amount, or type the amount being refunded and press Enter. The Card Authorization Box opens. |
| d. | Select the card type and make sure the Auto Authorization check box is clear. |
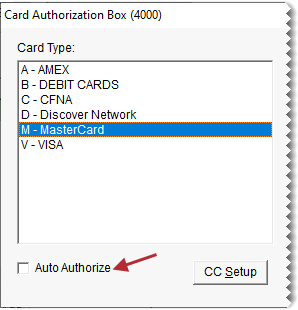
| 2. | Open 1stMile MiddleWare from the start menu or the computer's desktop. |
| 3. | Click Cancel to close the Credit Card Sale screen. When the prompt to process another transaction appears, click Cancel (again). |
| 4. | Process the refund with the desktop application. |
| a. | Select File > Credit Card > Refund. |
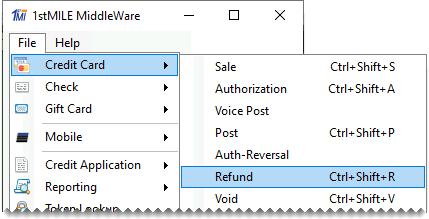
| b. | Select Issue a stand-alone refund. |
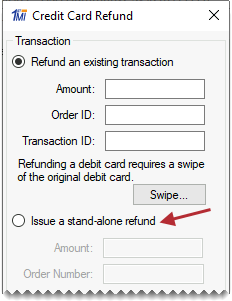
| c. | Enter the following information: |
The refund amount
The original order (invoice) number
The customer's name, card number, and expiration date
| d. | Click Process. |

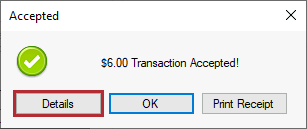
| e. | At the prompt for an override PIN, type it and click OK. |
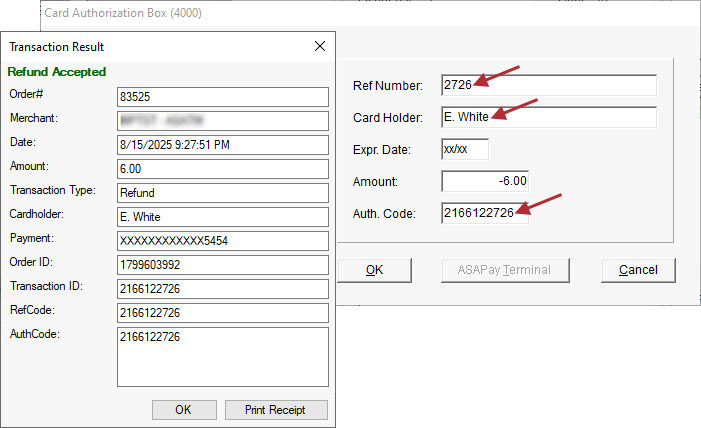
| f. | When the transaction accepted message appears, click Details. The Transaction Result screen opens. |
| g. | Copy and paste the following into the TireMaster authorization screen. |
Reference number (last four digits)
Card holder's name
Authorization codes
| 5. | In TireMaster, click OK and complete the invoice. |
| 6. | In 1stMile MiddleWare, print the receipt and then finish processing the refund. |
If your business accepts CFNA or Goodyear credit cards, you can use 1stMile to submit customers’ applications for these payment methods. 1stMile's program for submitting CFNA and Goodyear card applications can be accessed from within TireMaster and the computer’s desktop.
To submit credit card applications
| 1. | Open the credit card application program screen using one of the following methods: |
From the TireMaster menu, select Interfaces > Credit Card Application Interface. Then click Firestone Application.
On the TireMaster Invoice Entry screen, click CC Application. Then click Firestone Application.
On the computer's desktop, double-click the Credit Facility Launcher icon.
From the Windows Start menu, select Credit Facility Launcher.
| 2. | Depending on the application method you're using, select Text To Apply or In Shop. |
| 3. | Select the type of card for which the customer is applying. |
| 4. | Fill out the required fields and click the buttons at the bottom of the screen to move through the application. |
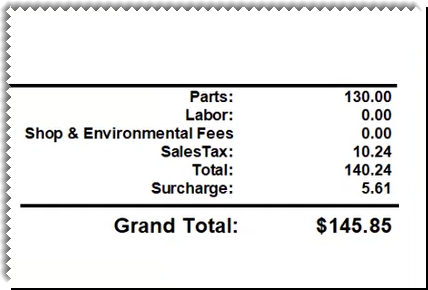
By using 1stMile's surcharging tools, you can simplify calculating credit card surcharges and maintain fee transparency with your customers. When surcharging is enabled, 1stMile manages the surcharge rate and provides TireMaster with that data so estimated surcharges can be calculated for pending sales. Surcharge amounts are displayed on screen and they print on work orders and sale invoices.
1stMile surcharging calculates fees for sale invoices, work order deposits, and received on account payments. When you use 1stMile to handle surcharges in TireMaster:
The rate is always current, because TireMaster retrieves rate information daily. Rate downloads occur the first time you click Invoicing and when you complete invoices.
The software handles the surcharge calculations.
Estimated surcharges are calculated for work orders and are updated as items are added or removed. Sales tax affects the surcharge amount.
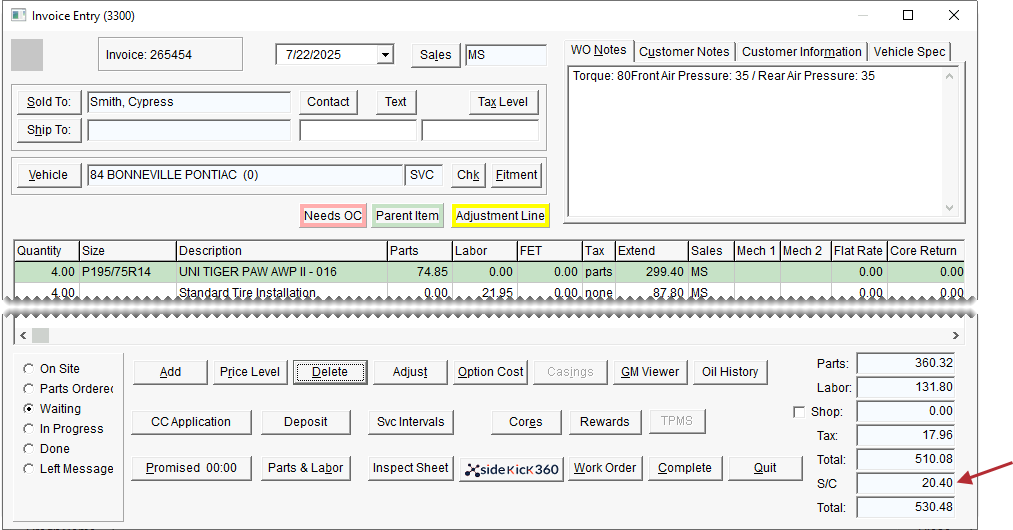
The Invoice Completion and ROA/Deposit Screens display two totals. One is for the total amount before the surcharge and the other includes the surcharge.
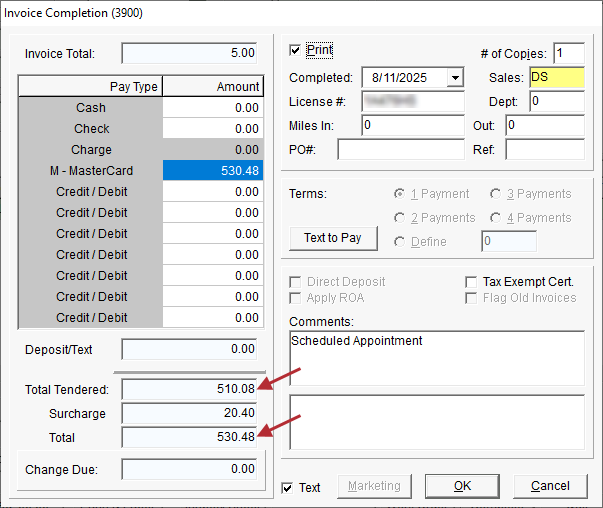
Customers have the option to accept or decline the surcharge.
A separate surcharge amount prints on TireMaster documents, formatted to comply with regulations established by 1stMile.
Before you can asses surcharges in TireMaster, ASA and 1stMile need to complete the following tasks:
1stMile needs to add surcharging to your payment processing account and define your surcharge rate.
ASA needs to activate surcharging in TireMaster
If your business uses custom forms for work orders, invoices, ROAs, or deposits, ASA also needs to update them to allow surcharges to print.
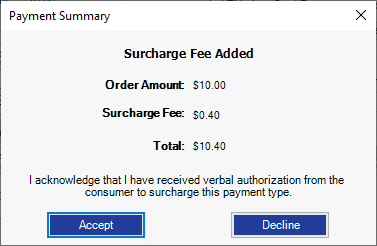
When surcharging is enabled, you will be prompted for verbal approval of the fee when a customer uses one or more credit cards to pay invoices, deposits, and ROAs.
To authorize a credit card surcharge
| 1. | On the transaction completion screen, do one of the following: |
Press to insert the full invoice amount.
Type the payment amount in the first Credit/Debit card field and press Enter.
The Card Authorization Box opens.
| 2. | Select the card type and make sure the Auto Authorize check box in the lower-left corner of the screen is selected. |
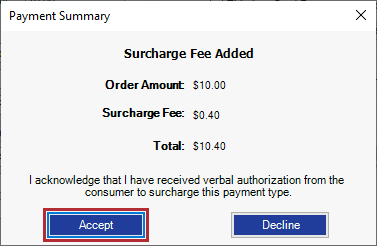
| 3. | Instruct the customer to swipe the card or enter the information manually. A prompt to approve the surcharge appears. |
| 4. | To proceed with the credit card payment, click Accept. |
| 5. | Process the payment. |
| 6. | Print or email a terminal receipt (optional). |
| 7. | If the customer is using additional cards, repeat steps 1 through 6. |
| 8. | To finalize the invoice, ROA, or deposit, click OK. Then complete and print the invoice. |