Sites
This help topic is applicable to the following TireMaster applications:
The site number identifies each of your stores. In TireMaster Plus and TireMaster Corporate systems, it's also used in GL account numbers to identify where transactions have taken place.
Set Up Sites
When you set up a site, you define information that prints on various documents, such as quotes and invoices. The site settings also include fields for recording contact information and ID numbers for government agencies.
Note: If need to add a site for your TireMaster Corporate system, contact ASA Support for assistance.
To set up a site
|
1.
|
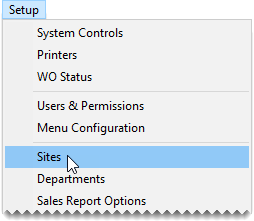
Select Setup > Sites. The Site List opens. |
|
2.
|
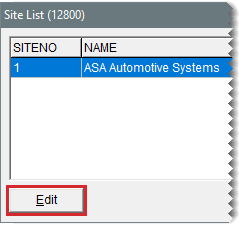
Click Edit. The Site Identification Maintenance screen opens. |
|
3.
|
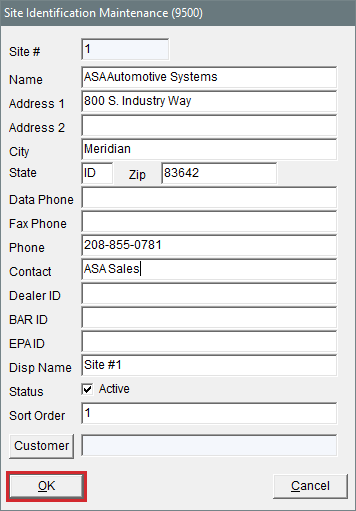
Type the name, address, city, state, and zip code for the site. |
Tip: Use the physical address in the Address 1 field and the mailing address in the Address 2 field. If the mailing address and the physical address are the same, leave the Address 2 field blank.
|
4.
|
Type the data phone, fax, and phone numbers for the site. |
Tip: The field for the data phone can be used to record information about the site’s Internet connection.
|
5.
|
Type the name of the person ASA Support should talk to in the Contact field. |
|
6.
|
Type your dealer number, if any. |
|
7.
|
Type the number assigned to you by the Bureau of Auto Repair or another consumer agency in the BAR ID field. |
|
8.
|
In the EPA ID field, type in the number assigned to you by the Environmental Protection Agency. |
|
9.
|
To save the site information, click OK. |
Note: Disregard setting the
Active check box and defining the display name, sort order, and customer. These settings are used when the Data Exchange program is installed or by other sites (in
TireMaster Corporate) that want to include your store's on‑hand quantities on the Inventory List. For more information, see
Define Site-Specific Quantity Information.


