Payment Accounts
This help topic is applicable to the following TireMaster applications:
Multiple bank accounts, referred to as payment accounts, can easily be added and updated in TireMaster. When you set up a payment account, you need to define the following:
The GL account to which payment activity will post
Whether the payment account will be included on the screens used for processing payments
Once you’ve added all of your payment accounts, you also need to identify which one will be selected by default when you open various payment processing screens (the AP Payments screen, the easy checks screens, and the Check Reconciliation screen).
 Add a Payment Account
You can set up one or more payment accounts in TireMaster. If you set up multiple accounts, name them in a manner that describes the purpose of each account. (For example, Checking, Savings, Payroll, and ACH Payments.)
To add a payment account
|
1.
|
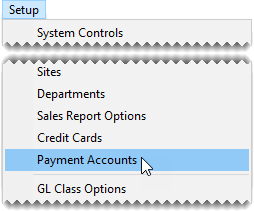
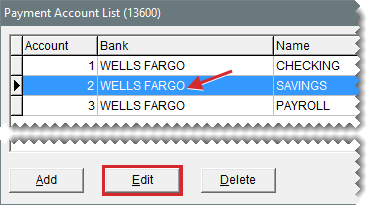
Select Setup > Payment Accounts. The Payment Account List opens. |
|
2.
|
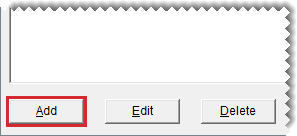
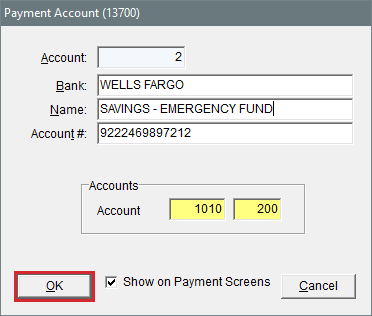
Click Add. The Payment Account screen opens. |
|
3.
|
If you're running TireMaster Corporate, click Site and select the site that will use the payment account. Otherwise, disregard this step. |
|
4.
|
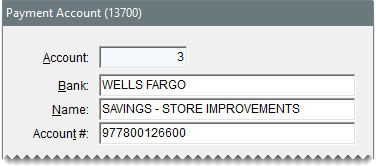
Enter the following information: |
|
a.
|
The name of the bank where the account was opened. |
|
b.
|
A name for the account (such as Checking, Savings, Payroll, or ACH Payments). |
|
c.
|
The account number assigned by the bank. |
|
5.
|
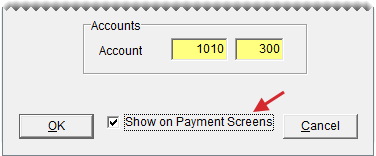
Assign a GL account to the new payment account. To assign an account, click the GL Account field, press  , and select an account from the list that appears. , and select an account from the list that appears. |
|
6.
|
To include the payment account on payment processing screens (the AP Payments screen, the Check Reconciliation Add screen, and easy check screens), make sure the Show on Payment Screens check box is selected. To exclude the payment account from the payment processing screens, clear the check box. |
|
7.
|
To save the new account, click OK. |
|
8.
|
Close the Payment Account List or repeat steps 2 through 6 add another payment account. |
 Set the Default Checking Account
The default checking account is the bank account that’s typically used for paying bills. When you begin the process of making a payment or recording payment information, the default checking account is automatically selected for you. This setting also defines which GL account till deposits and direct deposit ROAs post to when performing he day-end close.
To set the default checking account
|
1.
|
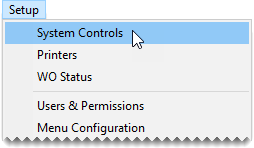
Select Setup > System Controls. The System Controls screen opens. |
|
3.
|
Select Default Checking Account and press Enter. |
|
4.
|
Select the account that you want to use as the default checking account, and click OK. |
|
5.
|
Close the System Controls screen. |
 Update a Payment Account
You can update the settings for a payment account, including the bank name and general ledger account number.
To update a payment account
|
1.
|
Select Setup > Payment Accounts. The Payment Account List opens. |
|
2.
|
Select the account you want to update and click Edit. The Payment Account screen opens. |
|
3.
|
If you're running TireMaster Corporate and want to assign the account to a different site, click Site and choose a site from the list. Otherwise, disregard this step. |
|
4.
|
Change the bank name, account name, and the bank assigned account number if needed. |
|
5.
|
Assign a different GL account if needed. To assign an account, click the GL Account field, press  , and select an account from the list that appears. , and select an account from the list that appears. |
|
6.
|
To include the payment account on payment processing screens (the AP Payments, the Check Reconciliation Add, and easy check screens), make sure the Show on Payment Screens check box is selected. To exclude the payment account from the payment processing screens, clear the check box. |
|
7.
|
To save your changes, click OK. |
|
8.
|
Close the Payment Account List. |
 Delete a Payment Account
You can delete payment accounts that have never been used.
To delete a payment account
|
1.
|
Select Setup > Payment Accounts. The Payment Account List opens. |
|
2.
|
Select the account you want to delete, and click Delete. A confirmation message appears. |
|
3.
|
Click Yes. The account is removed from the list. |


 , and select an account from the list that appears.
 , and select an account from the list that appears.