Open Work Order List
This help topic is applicable to the following TireMaster applications:
|
TireMaster Point of Sale |
TireMaster Plus |
TireMaster Corporate |
|---|---|---|

|

|

|
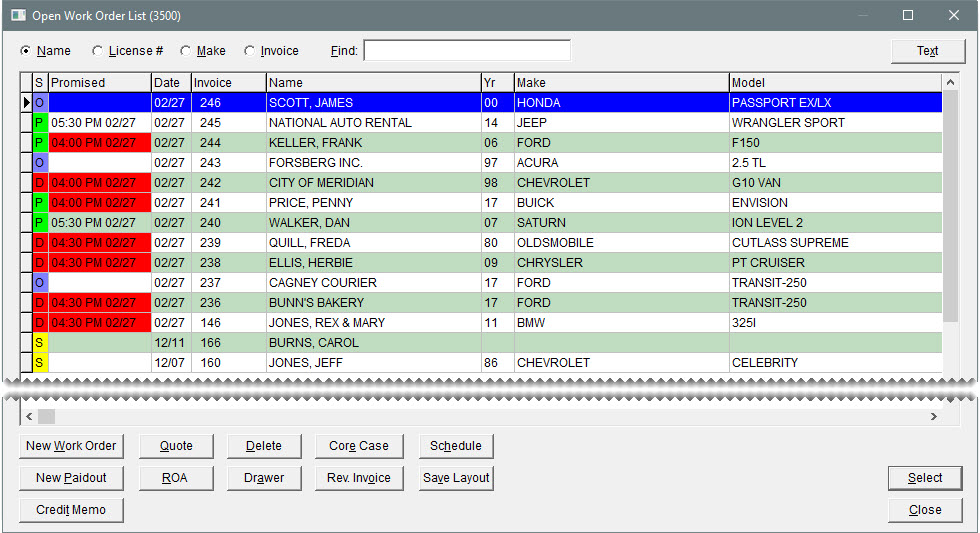
All customer transactions can be started on the Open Work Order List.
The Open Work Order List includes the following properties.
|
Item |
Description |
|
Name |
Lets you look up a work order by customer name. |
|
License # |
Lets you look up a work order by license plate number. |
|
Make |
Lets you look up a work order by the vehicle make. |
|
Invoice |
Lets you look up a work order by invoice number. |
|
Find |
Lets you enter a customer’s name, license plate number, or vehicle manufacturer and searches for the closest match. |
|
S |
Identifies the status of a job by displaying the color and the letter or number that represent a status. Examples of statuses include On Site, In Progress, and Done. For more information, see Work Order Status Indicator. |
|
Promised |
Displays the date and time when a customer was promised that the vehicle would be ready for pickup. Color coding indicates whether the promised time for a job is approaching or has passed. If the promised time is within an hour, the entry in the Promised column is yellow. For jobs whose promised time has passed, the entry is red. |
|
Date |
Displays the date the work order was started. |
|
Invoice |
Displays the work order’s document number. |
|
Name |
Displays the name of the customer associated with a work order. |
|
Yr |
Displays the year for a vehicle. This column is blank if no vehicle is selected. |
|
Make |
Displays the make of a vehicle. This column is blank if no vehicle is selected. |
|
Model |
Displays the model of a vehicle. This column is blank if no vehicle is selected. |
|
License |
Displays a vehicle’s license plate number. This column is blank if no vehicle is selected or if no license number has been entered for the vehicle. |
|
Unit |
Displays the unit number for a vehicle. This column is blank if no vehicle is selected or if no unit number has been entered for the vehicle. |
|
Sales |
Displays the starting salesperson for a work order. |
|
Phone |
Displays the customer’s phone number. |
|
Site# |
Displays the site where the work order or quote was started. In TireMaster Plus and TireMaster Point of Sale systems, this number is always 1. |
|
Reference |
Displays the reference number, if any, entered on a work order. |
|
PO# |
Displays the purchase order number, if any, entered on a work order. |
|
Mod |
Displays a document type code. No code is displayed for work orders created for normal sales. |
|
Comments |
Displays the notes, if any, entered on a work order. |
|
Total |
Displays the total of all the items, plus sales tax, on a work order. |
|
Contact |
Displays the phone number or email at which the client can be reached. |
|
New Work Order |
Lets you create a new work order. |
|
Quote |
Lets you create a new quote or look up a quote that has already been started. |
|
Delete |
Lets you deleted work orders. |
|
Core Case |
Lets you access Casing Manager or the Core Manager if one of those features are enabled. |
|
Schedule |
Lets you schedule appointments for customers. |
|
New Paidout |
Lets you pay an expense from the till. |
|
ROA |
Lets you process a payment from a customer. |
|
Drawer |
Opens the till drawer. Note: The till drawer must be set up on the Printer Selection screen for this button to work.
|
|
Rev. Invoice |
Lets you reverse a completed invoice. |
|
Save Layout |
Lets you save your changes after you rearrange the columns on the screen. |
|
Credit Memo |
Lets you issue a credit memo to a customer. |
|
Select |
Lets you open the highlighted work order. |
|
Close |
Closes the screen. |
You can customize the layout of the Open Work Order List by moving and resizing the columns.
To move and resize Inventory List columns
| 1. | To move a column, click the column heading. When the thick, black line appears, drag the column to a different position. |
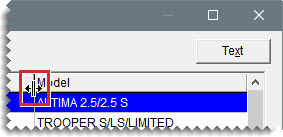
| 2. | To resize a column, move the pointer ( ) to the boundary for the column heading. When the pointer turns into ) to the boundary for the column heading. When the pointer turns into  , drag the boundary to the new width. , drag the boundary to the new width. |
| 3. | When you’re done moving and resizing the columns, click Save Layout. |
The Open Work Order List columns will be displayed in the new arrangement until their positions are changed.


