Organize Contact Information
This help topic is applicable to the following TireMaster applications:
|
TireMaster Point of Sale |
TireMaster Plus |
TireMaster Corporate |
|---|---|---|

|

|

|
Contact information can be organized on the Customer Maintenance and Vendor Maintenance screens in one of the following ways:
The order can differ for each customer and vendor. For example, for some vendors you might list the business number first and for others the cell phone would be first.
A global order for displaying phone numbers and email addresses can be used for all customers, and another global order can be used for all vendors. For example, for customers, you could always list the cell phone first, followed by home phone, email address, business phone, and fax number.
The way in which you define the order depends on which method you use:
To use the same order for everyone, define a position (1 through 5) in the settings for up to five contact types. For instructions, see Organize Contact Information Globally .
To set the order on an individual basis, make sure the position is 0 for all contact types. Then arrange the contact information on the customer’s or vendor’s Contact List. For instructions, see Organize an Individual’s Contact Information.
With global ordering, contact information for all of your customers is listed in the same order on the Customer Maintenance screen and contact information for all of your vendors is listed in the same order on the Vendor Maintenance screen. Global ordering is defined in the settings for contact types. Therefore, when the customer order or vendor order for a type is assigned to position 1, 2, 3, 4, or 5, it’s put in the corresponding spot on the applicable maintenance screen. If a contact type is not assigned a position, it’s set to 0 and is displayed on the maintenance screens wherever a spot is available.
To globally organize contact information
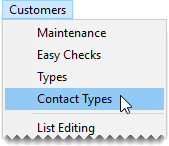
| 1. | Select Customers > Contact Types. The Contact Type screen appears. |
| 2. | For each contact type, do the following: |
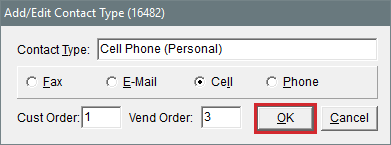
| a. | Select the type and click Edit. The Add/Edit Contact Type screen appears. |
| b. | For customers, type the number that corresponds with the position you want to assign in the Cust Order field. For example, type 1 to list the contact type first on the Customer Maintenance screen. |
| c. | For vendors, type the number that corresponds with the position you want to assign in the Vend Order field. The position can be the same as the one used for customers or it can be different. |
| d. | Click OK. |
| 3. | When you’re done assigning positions, close the open screens. |
Contact information can be organized on a customer-by-customer or vendor-by-vendor basis, instead of using the same order for everyone. With this method, you define how phone numbers and email addresses for individual customers or vendors are ordered on the maintenance screens by changing their placement on the Contact List. Therefore, if you move up a phone number down on a customer’s Contact List, it also moves to the corresponding spot on the customer’s maintenance screen.
When you organize phone numbers and email addresses on an individual basis, the following occurs:
The contact method designated as primary moves to the top of the list. For customers, the primary contact method is used by default on work orders.
The alternate contact method is shown beneath the primary contact method. Therefore, it’s the second phone number or email address listed.
The remaining numbers and email addresses, if any, are below the primary and alternate contact information.
When customers and vendors have more than five phone numbers and email addresses, the additional contact information is available only on the Contact List.
To organize contact information differently for each customer and vendor, the position needs to be set to 0 in the settings for all contact types. To verify that the position is 0 for all contact types go to Customers > Contact Types and review the entries in the Position column.
To organize an individual’s contact information
| 1. | Look up the customer or vendor whose contact information you want to organize. For more information, see Customer Searches or Vendor Searches. |
| 2. | On the Customer Maintenance or Vendor Maintenance screen, make sure the General tab is selected. Then click Phone & E‑Mail. The Contact List opens. |
| 3. | Define the primary contact method. If you don’t need to change the primary contact method, disregard this step. |
| a. | Select the row for the phone number or email address you want to designate as the primary contact method. |
| b. | Click Move Up repeatedly, until the phone number or email address is at the top of the list and the word Primary is shown next to it. |
| 4. | Define the alternate contact method. If you don’t need to change the alternate contact method, disregard this step. |
| a. | Select the row for the phone number or email address you want to designate as the alternate contact method. |
| b. | Click Move Up repeatedly, until the phone number or email address is on the second row of the list and the word Alternate is shown next to it. |
| 5. | Define the position for the customer’s remaining phone numbers and email addresses. |
| a. | Select the row for the contact method you want to move. |
| b. | Click Move Up or Move Down repeatedly, until the phone number or email address is where you need it to be. |
| 6. | Close the Contact List. |


