Vendor Maintenance Screen
This help topic is applicable to the following TireMaster applications:
|
TireMaster Point of Sale |
TireMaster Plus |
TireMaster Corporate |
|---|---|---|

|

|

|
The Vendor Maintenance screen is used for adding vendors and storing vendor account information.
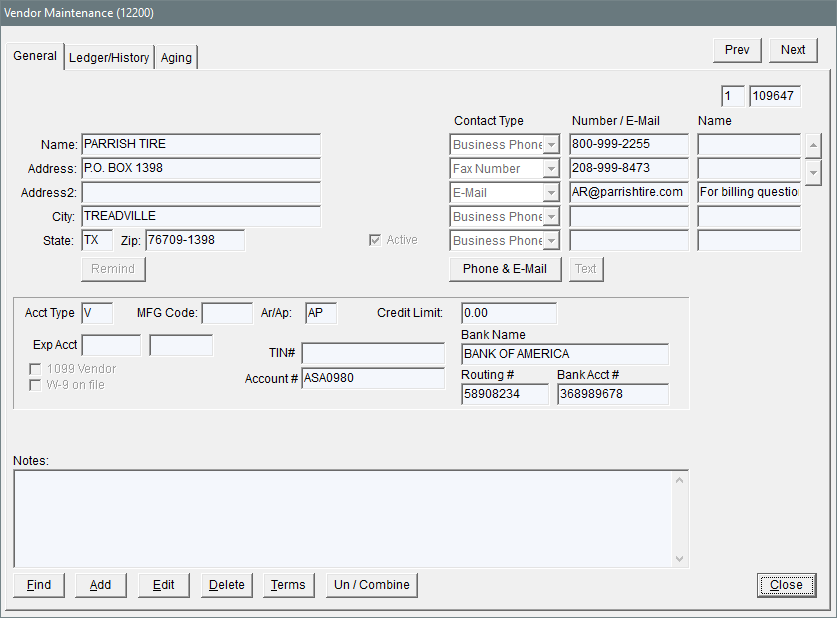
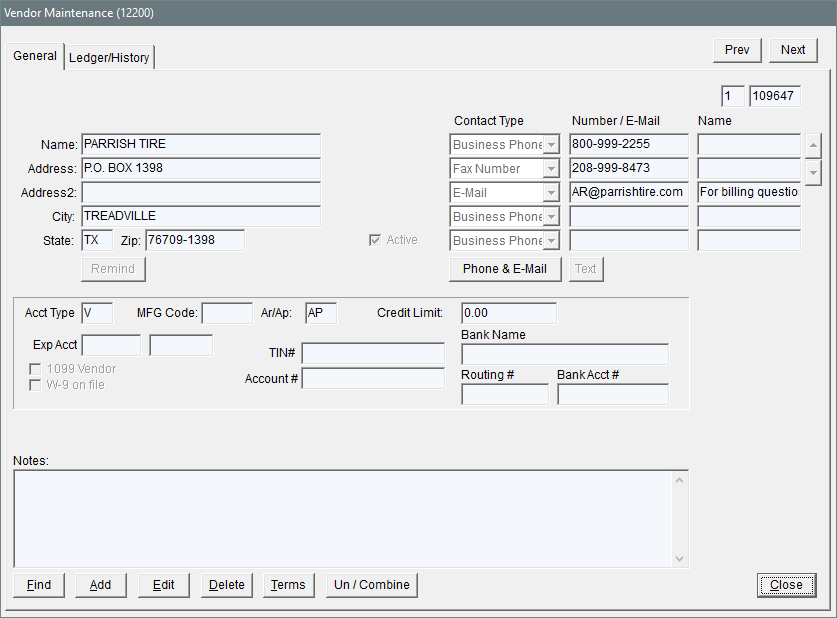
The General tab contains basic information about the selected vendor. This is where you can add, edit, and delete vendor records. If you’re running TireMaster Plus or TireMaster Corporate, you can also access the selected vendor's payment terms.
To see the General tab for TireMaster Plus and TireMaster Corporate, click the following image.
To see the General tab for TireMaster Point of Sale, click the following image.
|
Item |
Description |
|
Prev |
Lets you move to the record for the previous vendor on the Vendor List. Note: This button is available for the General tab only. The shortcut key for this button is PageUp.
|
|
Next |
Lets you move to the record for the next vendor on the Vendor List. Note: This button is available for the General tab only. The shortcut key for this button is PageDown.
|
|
Name |
Displays the vendor’s name. |
|
Address |
Displays the vendor’s street address or P.O. box (if the vendor only has a P.O. box number). |
|
Address2 |
Displays the vendor’s P.O. box number. |
|
City |
Displays the vendor’s city. |
|
State |
Displays the vendor’s state. |
|
Zip |
Displays the vendor’s zip code. |
|
Unlabeled |
Displays the system-assigned vendor number. The prefix identifies the site where the vendor was added. |
|
Primary Phone |
Displays the vendor’s preferred phone number. |
|
Alternate Phone |
Displays an alternate number for contacting the vendor. |
|
Phone Numbers |
Lets you enter one or more phone numbers for the vendor. For more information, see . |
|
Contact Type Fields |
Does the following: Identifies the contact method assigned to the selected vendor’s phone numbers, email addresses, or both. Lets you define the contact method for phone numbers, email addresses, or both (in add and edit modes). |
|
Number/E-Mail Fields |
Does the following: Identifies the phone numbers, email addresses, or both assigned to vendors. Lets you define the phone numbers, email addresses, or both assigned to vendors (in add and edit mode). |
|
Name Fields |
Does the following: Identifies the person to whom an email address or phone number is assigned. This entry can also be a description, such as Main Phone. Lets you define the name or description that you want to assign to phone numbers, email addresses, or both (in add and edit mode). |
|
|
Lets you move to the previous contact. Available in TireMaster 9.4.0 and newer. |
|
|
Let’s you move to the next contact. Available in TireMaster 9.4.0 and newer. |
|
Phone & E-Mail |
Lets you access the vendor’s contact list, which includes both phone numbers and email addresses. |
|
Text |
Lets you access the screen for sending text messages to the vendor. |
|
Acct Type |
|
|
MFG Code |
Not used. |
|
AP/AR |
Defines whether this is an AP (vendor) or AR (customer) account. |
|
Credit Limit |
Lets you enter the maximum amount you can charge from the vendor. Note: This value is only a visual reminder for you. It does not affect the amounts you charge to a vendor.
|
|
Exp Acct |
Note: If you need to remove this setting, click the Exp Acct field and press
 . When the Chart of Accounts appears, click Cancel. Then, click Yes to verify that you want to remove the account from the vendor’s record. . When the Chart of Accounts appears, click Cancel. Then, click Yes to verify that you want to remove the account from the vendor’s record. |
|
1099 Vendor |
|
|
W-9 On File |
|
|
TIN# |
|
|
Account # |
|
|
Bank Name |
|
|
Routing # |
|
|
Bank Acct # |
|
|
Notes |
Lets you include additional information about the vendor account. |
|
Find |
Lets you look up a vendor. |
|
Add |
Lets you add a new vendor. |
|
Edit |
Lets you update a vendor’s information. |
|
Delete |
Lets you remove a vendor from the database if that vendor has never been used on a purchase order or receiving document. |
|
Terms |
Displays the payment terms the vendor has given you |
|
Un/Combine |
Lets you do the following: Select one or more other vendors to inactivate and combine with the current vendor. This option combines the history and ledgers of the selected vendor with those of the current vendor (which is referred to as the master vendor). Separate the selected vendor from the master vendor record that it was previously combined with. This functionality is available in TireMaster 9.4.0 and newer. |
|
OK |
Lets you save changes and exit the screen. This button only appears in add and edit mode. |
|
Cancel |
Lets you exit the screen without saving any changes. This button only appears in add and edit mode. |
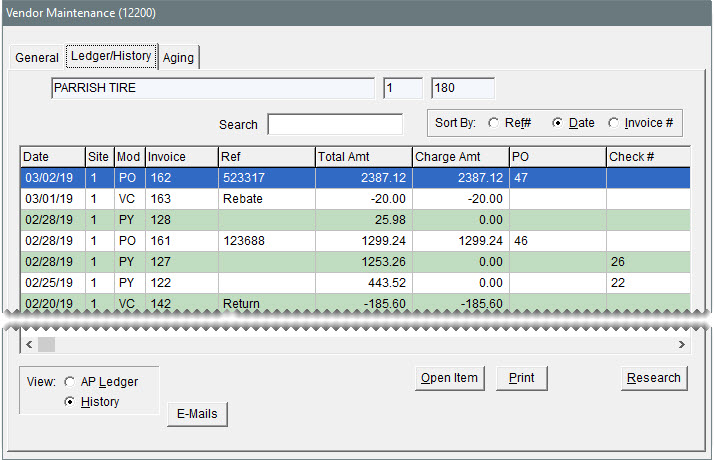
The Ledger/History tab displays the vendor’s transactional activity. In TireMaster Plus and TireMaster Corporate, this activity includes purchases, returns, payments, and vendor charges. In TireMaster Point of Sale, the ledger/history lists only purchases and returns.
To see the Ledger/History tab for TireMaster Plus and TireMaster Corporate, click the following image.
To see the Ledger/History tab for TireMaster Point of Sale, click the following image.
|
Item |
Description |
|
(first unlabeled field) |
Displays the vendor name. |
|
(second and third unlabeled fields) |
Displays the system-assigned vendor number. The prefix identifies the site where the vendor was added. |
|
Search |
Lets you retrieve documents with a specific invoice number, reference number, PO number, check number, or amount. Full and partial entries are allowed. You can define how vendor history searches work by setting the system control Active Search - show search button on history (Other tab): Enabling the control adds a Search button to the screen. In this scenario, you need to type your search criteria and then click the button to start the search. Disabling the control removes the button from the screen. When there is no button, TireMaster begins searches as soon as the first letter or number in the criteria is typed in the Search field. If additional letters or numbers are added, the search restarts as each character is added. |
|
Sort By: |
Lets you display documents by the transaction reference number, transaction date, or invoice number. When Invoice # is selected in TireMaster Corporate, sorting by site number also occurs.
|
|
Number of Documents: First radio button |
Lets you limit the number of historical documents to the number shown. Note: To define the number of documents displayed when selecting this radio button, set the System Control Grid Control - Limit 1. For more information, see Grid Control - Limit 1.
|
|
Number of Documents: Second radio button |
Lets you limit the number of historical documents to the number shown. Note: To define the number of documents displayed when selecting this radio button, set the System Control Grid Control - Limit 2. For more information, see Grid Control - Limit 2.
|
|
Number of Documents: All |
Let you display all historical documents. |
|
Date |
Displays the transaction date. |
|
Site |
Displays the site where the transaction took place. |
|
Mod |
Displays the type of document produced by the transaction. |
|
Invoice |
Displays the document number for the transaction. |
|
Ref |
Displays the reference number or code entered at the time of the transaction. Note: When the selected transaction is a vendor credit resulting from a national account or government support sale, this column displays a memo number
|
|
Total Amt |
Displays the total amount of the transaction (only when History is selected). |
|
Charge Amt |
Displays the portion of the transaction that the vendor charged you. Note: In most cases, this amount is equal to the value in the Total Amt field. If you pay part of a vendor invoice with cash or check and charge the remainder, this field displays the amount charged instead.
|
|
Charge Amt |
|
|
PO |
Displays the vendor invoice document number for a purchase. |
|
Check# |
|
|
AP Ledger |
|
|
History |
Displays all transactions that have affected this vendor’s account. |
|
E-Mails |
Lets you email one or more selected documents to the vendor. |
|
Open Item |
Displays the open item ledger, which is used for viewing and applying payments to outstanding invoices |
|
|
Lets you reprint the selected documents or a report listing the vendor’s history. |
|
Research |
Lets you view journal entries related to the selected transaction line. |
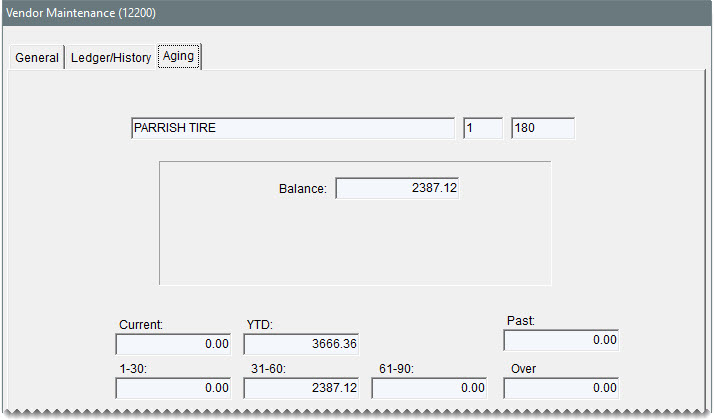
The Aging tab displays the balance you owe to the vendor, along with any past-due balances.
|
Item |
Description |
|
Balance |
Displays the total amount you owe the vendor. |
|
Current |
Displays the amount you owe the vendor now. |
|
YTD |
Displays the total amount of purchases from and charges to the vendor’s account for the current year. |
|
1-30 |
Displays the amount due to the vendor from tomorrow to 30 days from now. |
|
31-60 |
Displays the amount due to the vendor in 31 to 60 days. |
|
61-90 |
Displays the balance due to the vendor in 61 to 90 days. |
|
Over |
Displays any balances due to the vendor after 90 days. |
|
Past |
Displays any balance that is past due. |


