Warehouse Connections Center
This help topic is applicable to the following TireMaster applications:
|
TireMaster Point of Sale |
TireMaster Plus |
TireMaster Corporate |
|---|---|---|

|

|

|
Warehouse Connections Center is an application that links TireMaster to your vendor’s warehouse. With Warehouse Connections Center, you can view item quantities and prices and place orders with the vendor directly from TireMaster.
Initial Release, January 2017.
To use Warehouse Connections Center, you need the following:
TireMaster 9.1.0 or a newer version installed on your computers.
An internet connection
An online account with E-Solution Professionals
When you install Warehouse Connections Center, run the installation on both the server and your workstations.
Before you can install Warehouse Connections Center, do one of the following to locate the installation program:
Access the automatically-deployed installer in the apps directory. For instructions, see Access Automatically-Deployed Installers.
Download the installer from the TireMaster Support site. For instructions, see Download the Warehouse Connections Center Installer.
Once you’ve located the installer, complete the installation. For instructions, see Complete the Warehouse Connections Center Installation.
If your TireMaster system is set up to download automatically-deployed installers as part of the nightly backup process, the installer for Warehouse Connections Center is already available to you. Typically, installers are placed in one of the following locations:
|
c:\TireMaster\apps |
c:\TMPOS\apps |
d:\QDSTM\apps |
|
c:\QDSTM\apps |
d:\TireMaster\apps |
d:\TMPOS\apps |
To access automatically-deployed installers
| 1. | Right-click  and select File Explorer from the menu that opens. and select File Explorer from the menu that opens. |
| 2. | In the Quick Access navigation pane, scroll to This PC. |
| 3. | Double-click the letter or icon for the drive that TireMaster is installed in. (Usually, it’s the c: or d: drive.) |
| 4. | Double-click the TireMaster, qdstm, or tmpos program folder. |
| 5. | Double-click the apps folder, and locate the file tmesp00000000-01060000.exe. Once you have located the installer, complete the installation. For instructions, see Complete the Warehouse Connections Center Installation. |
The installer for Warehouse Connections Center is available for download from the TireMaster Support site. When you download the installer, save it on your TireMaster server. To log on to the TireMaster Support Site, you need your TireMaster customer number and password. If you no longer have that information, log a support request via the online portal, by email, or calling 800-891-7437.
To download the Warehouse Connections Center Installer
| 1. | Close all applications. |
| 2. | Log on to support.tiremaster.com. |
| 3. | Type your customer number and password, and click Login. The Support Center home page opens. |
| 4. | Click Download Programs on the menu. The Download Center page opens. |
| 5. | Under Update Files, click the link for Warehouse Connections Center. You’ll be prompted to save the file and possibly run the installation, depending on your browser. |
| 6. | Save the installer on your computer. |
| 7. | Exit the TireMaster Support site. |
| 8. | Once you have finished downloading the installer, you can complete the installation. For instructions, see Complete the Warehouse Connections Center Installation. |
After you’ve located the installer for Warehouse Connections Center, you can complete the installation. Install the applications on the TireMaster server and workstations.
To install Warehouse Connections Center
| 1. | Right-click tmesp00000000-01060000.exe, and select Run as Administrator. A confirmation message appears. |
| 2. | Click Yes. The TireMaster - Installation Program screen opens. |
| 3. | Click OK. The TireMaster - Search Results screen opens. |
| 4. | Select the TireMaster location in which you want to install the interface, and click Install. |
| 5. | At the end of the installation, click Finish. |
Before you can use Warehouse Connections Center to view items and place orders with a vendor, you need to complete settings that allow TireMaster to communicate with E-Solution Professionals and the vendor.
Before you can order from vendors with Warehouse Connections Center, vendor records for those suppliers must exist TireMaster. If they haven’t been created already, add them. Information about adding vendors is available in the TireMaster help system.
If reconciliation codes for your Warehouse Connections Center (WCC) vendors do not already exist in TireMaster, add them. Reconciliation codes for WCC vendors serve two purposes:
They’re used to identify the vendors in the Warehouse Connections Center ordering configuration
They allow Warehouse Connections Center to identify which vendor part number to use for inventory searches (when items are assigned multiple vendor part numbers in TireMaster.
Information about creating reconciliation codes is available in the TireMaster help system.
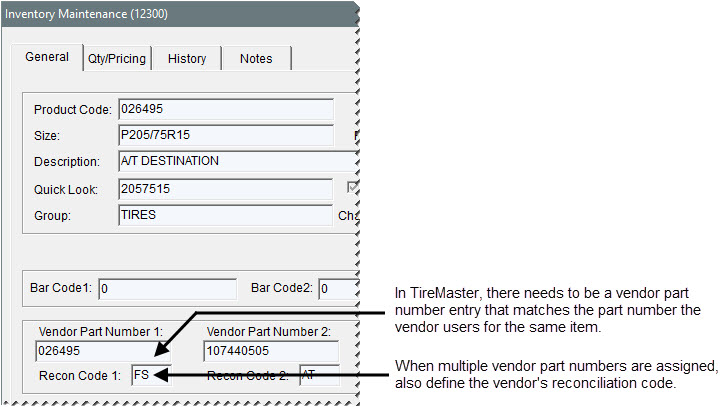
To retrieve item quantities and prices and electronically place orders with a vendor via the Warehouse Connections Center, the vendor part numbers assigned to items in TireMaster must match the part numbers used by the vendor. If the part number for an item in TireMaster is different than the one the vendor uses for the same item, update the entry in one of the vendor part number fields in TireMaster.
When multiple vendor part numbers are assigned to an item in TireMaster, the reconciliation code for the applicable vendor must be assigned as well. The reconciliation code allows the integration to identify which vendor part number to use.
When you establish an account to electronically access a vendor’s inventory via Warehouse Connections Center, you’ll be assigned credentials that allow TireMaster to communicate with the vendor. Complete these settings in TireMaster.
The vendor that you’ll be ordering from needs to have at least one reconciliation code. The reconciliation code is used by Warehouse Connections Center to identify the vendor and define which vendor part number to use for an item (when multiple vendor part numbers are assigned).
To define your Warehouse Connections Center credentials
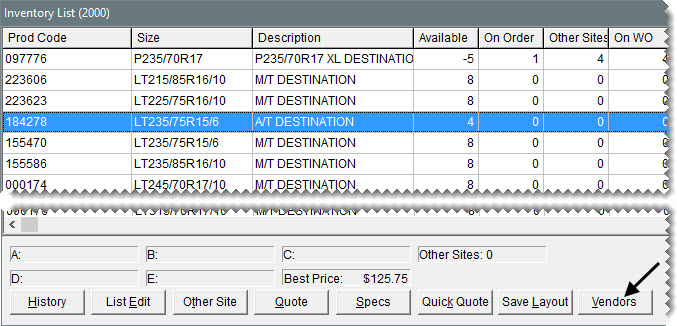
| 1. | Look up an item. The Inventory List opens. |
| 2. | Click Vendors. The TireMaster - WCC Setup screen opens. |
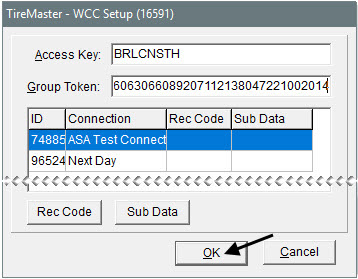
| 3. | Type the access key and group token and click OK. The setup screen closes. |
| 4. | To re-open the TireMaster- WCC Setup screen, click Setup. The vendors you’ll order from via the Warehouse Connections Center are listed. |
| 5. | Assign a reconciliation code and the sub data code (if one was provided) for each vendor. |
| a. | Select the vendor you want to work with. |
| b. | Click Rec Code, and make a selection from the list that opens. Then click OK. |
| c. | If the vendor uses sub data, click Sub Data. Then type the code that appears and click OK. |
| 6. | Click OK to save your changes and close the TireMaster - WCC Setup screen. |
Warehouse Connections Center simplifies inventory management by helping you to easily locate and order items from one or more suppliers.
With Warehouse Connections Center, you can see whether a vendor has an item on hand and how much it’ll cost.
To check quantity and price information
| 1. | Look up the item for which you need quantity and price information. |
| 2. | On the Inventory List, select the item and click Vendors. The TireMaster - WCC Interface screen opens. |
| 3. | If the vendor’s name isn’t listed in the Connections field, select it from the drop-down and click Yes when you’re prompted to recheck the item. |
| 4. | Review the item’s status: |
**Success** indicates that information about the item was retrieved from the vendor and you can view its price and availability.
**No success** indicates that information about the item cannot be retrieved, because the item’s vendor part number in TireMaster does not match the part number used by the vendor. For more information, see Update Vendor Part Numbers.
| 5. | Take note of the item’s available quantity and cost. If the vendor doesn’t have the item on hand, you can look up similar items. For more information, see Search for Similar Items. |
| 6. | When you’re finished, close the open screens. |
To view item quantities and prices and electronically place orders via Warehouse Connections Center, the vendor part numbers assigned to items in TireMaster must match the part numbers used by the Warehouse Connections Center vendors. When an item’s part numbers match in both TireMaster and Warehouse Connections Center, its status is set to **Success.**
You can use the Warehouse Connections Center integration to update the vendor part numbers assigned in TireMaster:
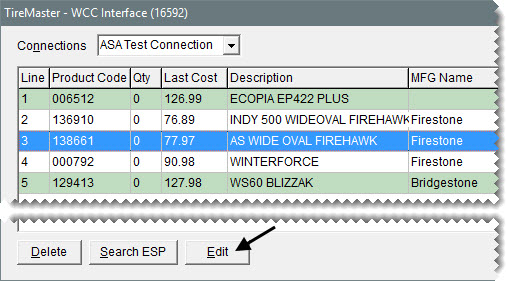
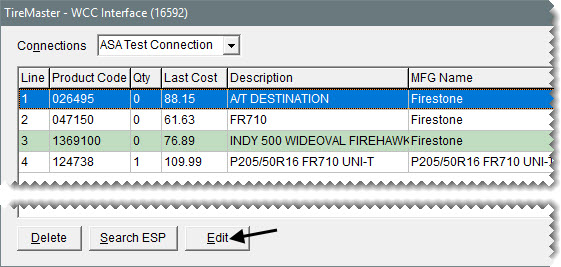
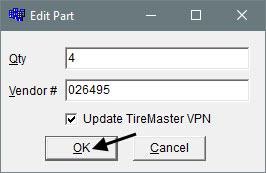
Select the item on the TireMaster - WCC Interface screen, and click Edit. When the Edit Part screen opens, type the vendor’s part number, make sure the Update TireMaster VPN check box is selected, and click OK.
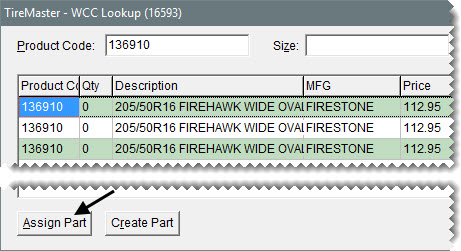
If you searched for an item with the TireMaster - WCC Lookup screen, select the item and click Assign Part. For more information, see Search for Similar Items.
If a Warehouse Connections Center vendor doesn’t have an item on hand, you can see if that supplier carries a similar item. Depending on the circumstances, you can update the vendor part number assigned in TireMaster or add a new item carried by the Warehouse Connections Center vendor to your inventory.
To search for a similar item
| 1. | On the TireMaster - WCC Interface screen, click Search ESP. The TireMaster - WCC Lookup screen opens. |
| 2. | Delete the entry in the Product Code field. (This entry is the vendor part number assigned to the item in TireMaster). |
| 3. | Type the one of the following in the Product Code field, and click Search: |
The part number a manufacturer uses to identify the item
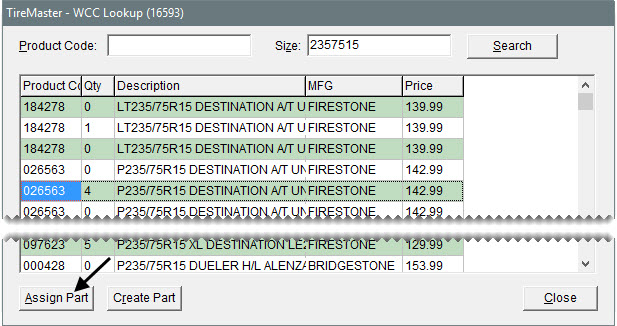
The item’s size without letters or slashes
| 4. | Do the following if needed. Otherwise disregard this step. |
If the search retrieved an item that’s in your inventory, you can use Warehouse Connections Center to update the vendor part number assigned in TireMaster. To do this, select the item and click Assign Part.
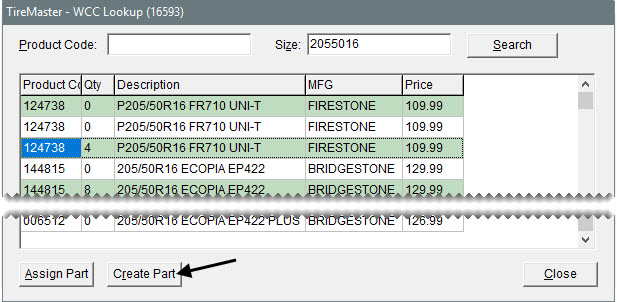
If you want to add an item retrieved by the search to your inventory and order it at the same time, select it and click Create Part.
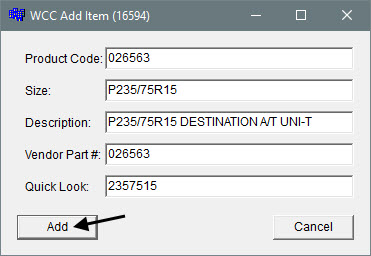
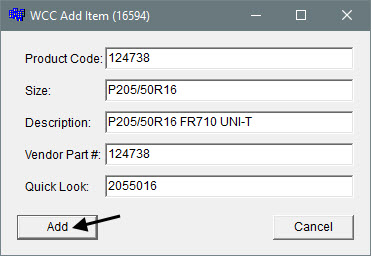
Then enter information about the item on the WCC Add Item screen, and click Add. To verify that the item was added, search for it.
| 5. | Close the open screens. |
You can search for a vendor’s items and create an order with Warehouse Connections Center.
To order items with Warehouse Connections Center
| 1. | Search for one or more items you want to order. |
| a. | Click Inventory. The Custom Inventory Lookup screen opens. |
| b. | Enter criteria for the search, and click OK. The Inventory List opens. |
| c. | Select one or more items. For multiple items, press the Ctrl key and select each item. |
| d. | Click Vendors. The TireMaster - WCC Interface screen opens and displays the status for each of the items. |
**Success** indicates that information about an item was retrieved from the vendor and it can be ordered.
**No success** indicates that information about an item cannot be retrieved, because the item’s vendor part number in TireMaster does not match the part number used by the vendor. If you need to update an item’s vendor part number, see Update Vendor Part Numbers.
| 2. | Make sure the name of the vendor you want to order from is selected from the Connections drop-down. If you select a different vendor, click Yes when you’re prompted to recheck the items. |
| 3. | If the vendor doesn’t have an item in stock, look up a similar item and place it on the order as needed. Otherwise, disregard this step. |
| a. | Select the item for which the vendor has none available, and click Search ESP. The TireMaster - WCC Lookup screen opens. |
| b. | Delete the entry in the Product Code field. |
| c. | Type the item’s size (without letters and slashes) and click Search. |
| d. | Select one of the items on the list and click Create Part. The WCC Add Item screen opens. |
| e. | Type the item’s size, along with the vendor part number and quick look code you want to use in TireMaster. Then click Add. |
One of the following occurs:
If you do not carry the item, it’s added to your TireMaster inventory and the order.
If the item is already in your TireMaster inventory, you’re prompted to continue. In this scenario, click Yes. The item is added to the order.
| 4. | Define the quantity to order for each item. |
| a. | Select the item and click Edit. The Edit Part screen opens. |
| b. | Type the quantity and click OK. The quantity on the TireMaster - WCC Interface screen updates. |
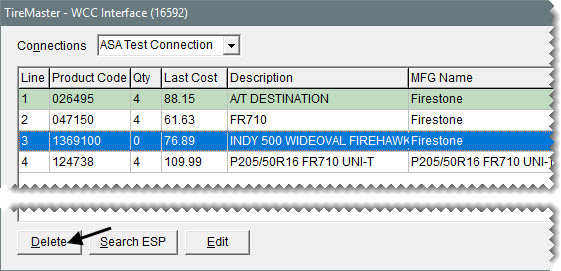
| 5. | For each item you need to remove from the order, select the item and click Delete. When the confirmation message appears, click Yes. |
| 6. | Place the order. |
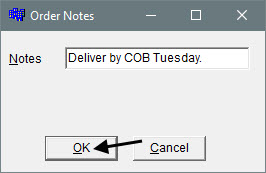
| a. | Click Order. The Order Notes screen opens. |
| b. | Type a brief note for the vendor (such as shipping instructions) if needed, and click OK. A confirmation message appears. |
| c. | Click Yes. TireMaster prompts you to use the default vendor (referred to as the reconciliation code vendor, which was assigned in the Warehouse Connections Center configuration). |
| 7. | Do one of the following: |
To order from the default vendor, click Yes. The TireMaster - WCC Interface screen closes
To order from a different vendor, click No. Then look up the name of the vendor. Close the open inventory screens.
| 8. | To view the newly-created purchase order, open the TireMaster PO System screen. Make sure the Purchase Orders tab is selected and the Status is set to Ordered. Then select the order and click Edit. |
With Warehouse Connections Center, you can add items to a PO and place the order electronically.
To add items to a purchase order with Warehouse Connections Center
| 1. | Start a purchase order for your vendor. For information about creating purchase orders, refer to the TireMaster help system. |
| 2. | Add the items you want to buy, along with the quantities. |
| 3. | Click Vendor. The TireMaster - WCC Interface screen opens. |
| 4. | Review the status for each item: |
**Success** indicates that information about the item was retrieved from the vendor and it can be ordered.
**No success** indicates that information about the item cannot be retrieved, because the item’s vendor part number in TireMaster does not match the part number used by the vendor.
| 5. | Update the TireMaster vendor part number for each item with the status **No success.** If information for all of the items was successfully retrieved, disregard this step. For more information, see Update Vendor Part Numbers. |
| 6. | Click Order. The Order Notes screen opens. |
| 7. | Type the a brief message for the vendor (such as shipping instructions), and click OK. A confirmation message appears. |
| 8. | Click Yes. When the order is done processing, the TireMaster - WCC Interface screen closes. |
| 9. | Close the Purchase Order screen. |
