WebLink
This help topic is applicable to the following TireMaster applications:
|
TireMaster Point of Sale |
TireMaster Plus |
TireMaster Corporate |
|---|---|---|

|
|
|
With WebLink, your customers can go online to see the items you have in stock and order the products they want to buy. When an online order is submitted, a work order is generated in TireMaster and you can complete the sale.
Update, November 2017
Redesigned to use web services for handling orders and managing inventory data. Version number reset to 1.0.0.0.
The following front end changes were implemented:
Routing of online orders to the Work Order Entry module, which eliminated the need to manually add online orders to TireMaster.
Setup screen access became available within TireMaster.
Status addition for the WebLink Orders Report, to show whether TireMaster work orders were created from online orders.
Update, June 2015.
Backend processing changes added. No user interface revisions.
Original Release, May 2010.
To use WebLink, you need the following:
TireMaster 9.4.0 or newer installed on your computers
An internet connection
A business web site
A link on your business web site that connects customers to your WebLink ordering web site0
Before you begin using WebLink, you should already know how to do the following in TireMaster:
Look up customers
Update work orders
Complete invoices
WebLink installations are performed by ASA Professional Services representatives. Before the installation, have your computer technician do the following:
Obtain a static IP address from your internet service provider (for your location), if there already isn’t one.
Assign a different static IP address to your WebLink server (for the local area network).
Forward port 8086 to the IP address for your TireMaster server.
Provide ASA with the IP address and port information.
Once WebLink is installed, you need to complete the following tasks before you can process online orders:
You can provide ASA with an image, such as a company logo, to add to your ordering web site. Including a logo ensures that customers will know they’ve found your business.
For the best results, your image should meet these specifications:
File format: jpg
Dimensions: 2000 x 400 pixels, 100–400 DPI, 24 bit color depth
Both black and white and color images are accepted. You can send the logo to the Professional Services representative who is assisting you.
Setting up WebLink includes defining the following :
Your company information
The URL (address) for your ordering web site
The items you’ll sell online
The sites whose items will be included in available quantity counts
The customer types allowed to buy items online
How to handle customer passwords
The stores that are allowed to sell items online
To set up WebLink
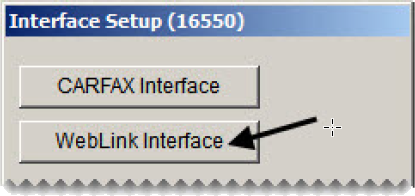
| 1. | Open the WebLink Setup screen. |
| a. | Select Interface Setups from the Interfaces menu. The Interface Setup screen opens. |
| b. | Click WebLink Interface. The WebLink Setup screen opens. |
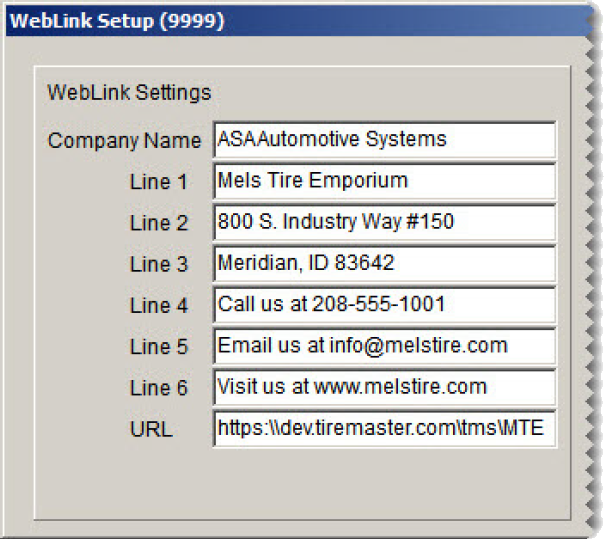
| 2. | Add your company information: |
| a. | Type your company name. This entry is used as the name of the image (such as a company logo) on the ordering web site. |
| b. | Type information such as your company name (again), phone number, email address, or a message for customers in the line fields. This information will be displayed at the top of the ordering web site. You are not required to use all of the lines. |
| c. | Type the address for your ordering web site in the URL field. The URL is provided by ASA. |
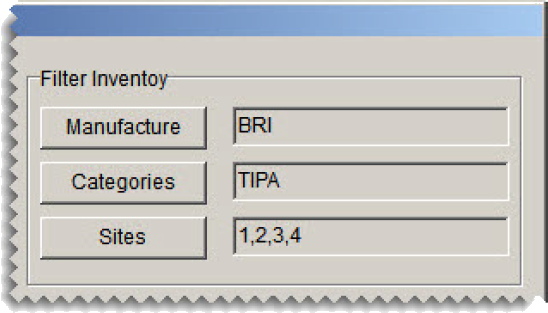
| 3. | Define which items you’ll sell online. |
| a. | Click Manufacture. Then select one or more manufacturers whose items you’ll sell, and click OK. For items from all manufacturers, leave this field blank. |
| b. | Click Categories. Then select the one or more categories for the types of items you’ll sell, and click OK. For items assigned to all categories, leave this field blank. |
| c. | Click Sites. Then select the sites whose items will be included in the available quantity count. For all sites, leave this field blank. |
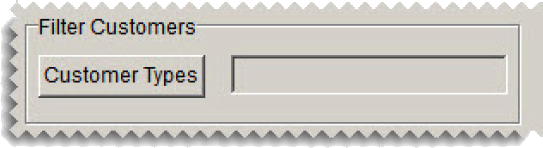
| 4. | Click Customer Types. Then select the kinds of customers who will be allowed to order items online. For all customers, leave this field blank. |
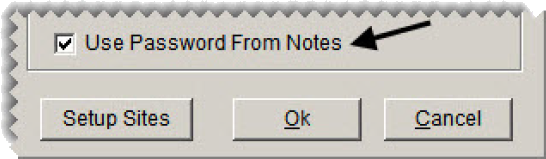
| 5. | To implement the ability to assign passwords in the Notes field on the TireMaster Customer Maintenance screen, select the Use Password From Notes check box. Otherwise, leave it alone. For more information, see Create Customer Accounts and Credentials (below). |
| 6. | Define which sites can sell online and how their names will be displayed on the ordering web site. |
| a. | Click Setup Sites. The Site Setup screen opens. |

| b. | If you want to use a different name for a store on the ordering web site, select the site and click Rename. When the text-entry box opens, type the new name and click OK. |

| c. | To allow or disable a site’s ability to sell online, select the site and click Toggle On/Off. |
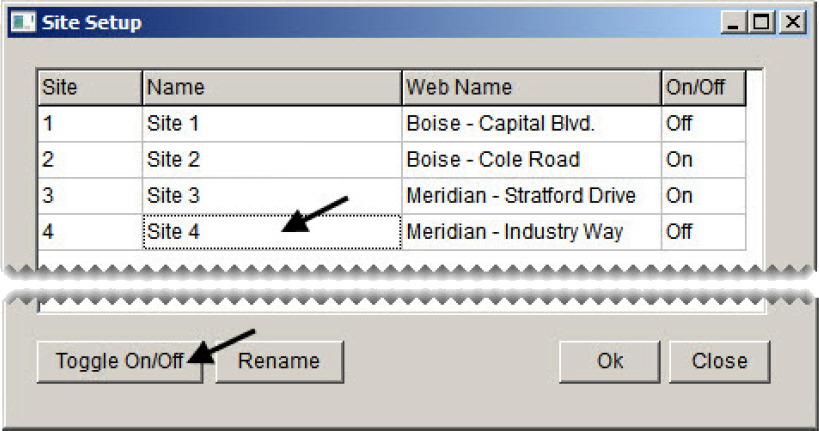
| d. | When you’re done making your changes, click OK. |
Before your customers can access the online inventory listing and place orders, you need to create customer records for them in TireMaster (if they don’t already exist). For instructions, see Add and Manage Customers.
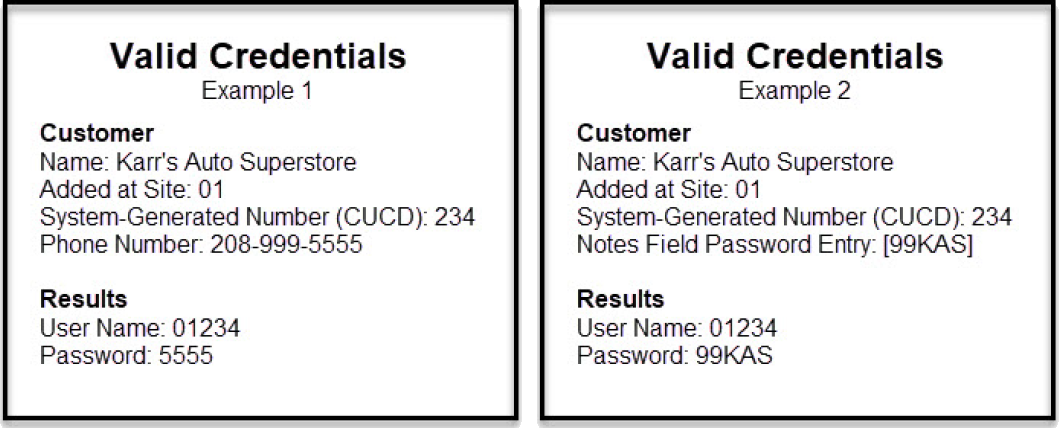
Once the customers are in place, you can then issue credentials for accessing the ordering site. First, create a WebLink user name for a customer by combine the following:
The number for the site (store) where the customer was added to TireMaster.
Unless you’re running a multi-store TireMaster system, this number will always be 01. You can find the site number in the upper-right corner of the Customer Maintenance screen.
The system-generated customer number that’s assigned to the customer by TireMaster.
This number is called a CUCD. This portion of the user name will be different for each of your customers. You can also find the system-generated customer number (CUCD) in the upper-right corner of the Customer Maintenance screen.
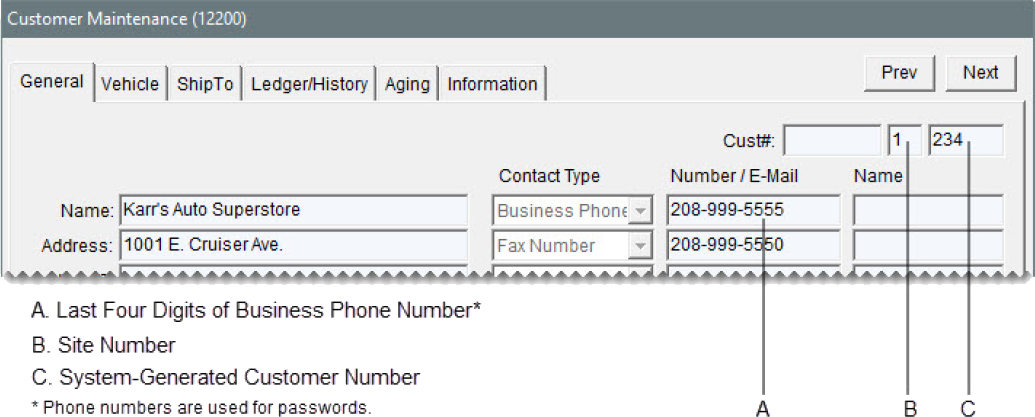
In addition to the user name, customers also need a password to access WebLink.
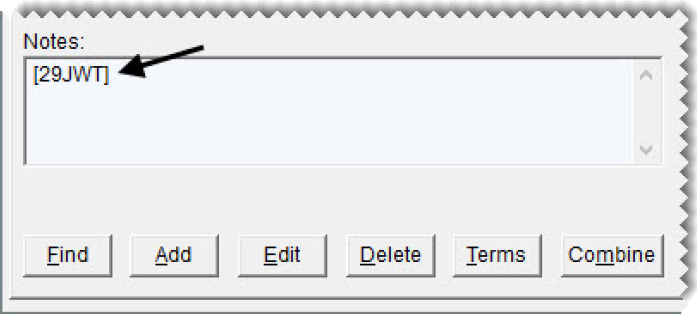
The password is either the last four digits of the customer’s business phone number or a code that is enclosed in a pair of brackets ([ and ]) in the Notes field on the Customer Maintenance screen. Passwords set up in the Notes field must be at least four characters long, and they can include both letters and numbers.
Here are two examples of how to create valid user names and passwords.
Add a link to your business web site that your customers can use to access your ordering web site.
When customers want to look at your inventory and place orders, they can log on to your ordering web site from desktop computers, tablets, and smart phones. WebLink is compatible with the following browsers:
Mozilla FireFox
Google Chrome
Microsoft Edge
To access your ordering web site, customers will typically click a link on your business web site. When the WebLink login prompt appears, they can enter the credentials you’ve given them and click Login.
If your customers need help looking up items once they access your ordering web site, provide them with the following information.
To search for items with WebLink
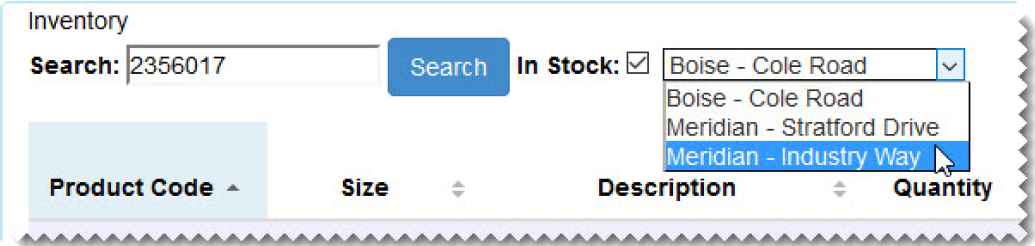
| 1. | Type one of the following in the Search field. Both full and partial entries are accepted: |
The item’s size
The tire’s size without letters or slashes (This is the item’s quick look code from TireMaster.)
The item’s description
The manufacturer’s product code for the item
| 2. | To limit the search to items that are on hand, select the In Stock check box. |
| 3. | Use the drop-down to select the name of the store you want to order from. |
| 4. | Do the following as needed: |
Click the arrows next to a column name to arrange the items from ascending to descending order (or the other way around).

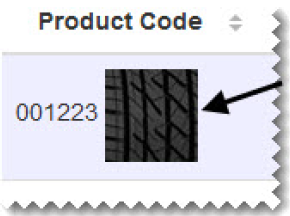
Click the tread image in the Product Code column to see a picture of an item and a list of features, benefits, and specifications.
Click the numbers in lower-left corner of the screen to move to the previous or next page of the search results.
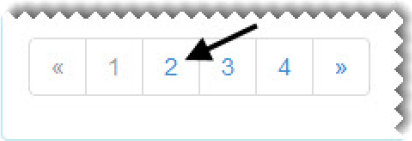
Click the numbers in the lower-right corner of the screen to change the number of items displayed.

If your customers need help placing orders online, provide them with the information below.
To place orders with WebLink
| 1. | Search for an item you want to buy. For more information, see Inventory Searches. |
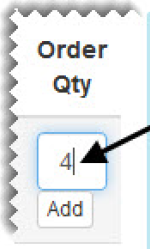
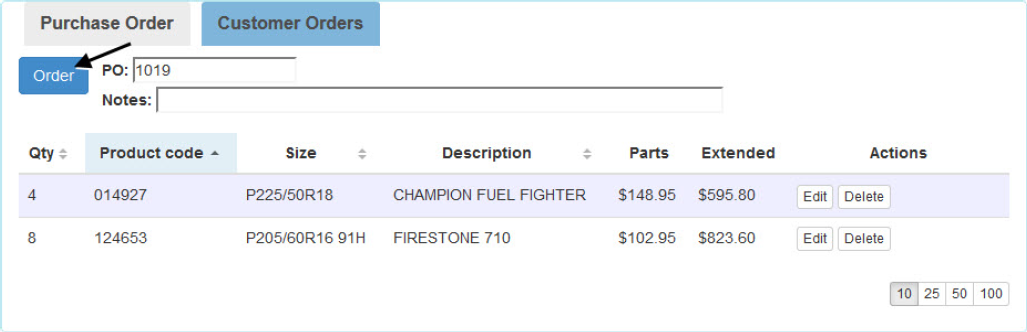
| 2. | Type the quantity in the item’s Order Qty field, and click Add. The item is added to the Purchase Order tab. |
| 3. | To order additional items, repeat steps and . |
| 4. | Add the following as needed: |
A PO number
Notes about the order
| 5. | To place the order, click Order. A confirmation message appears. |
| 6. | Close the confirmation message. |
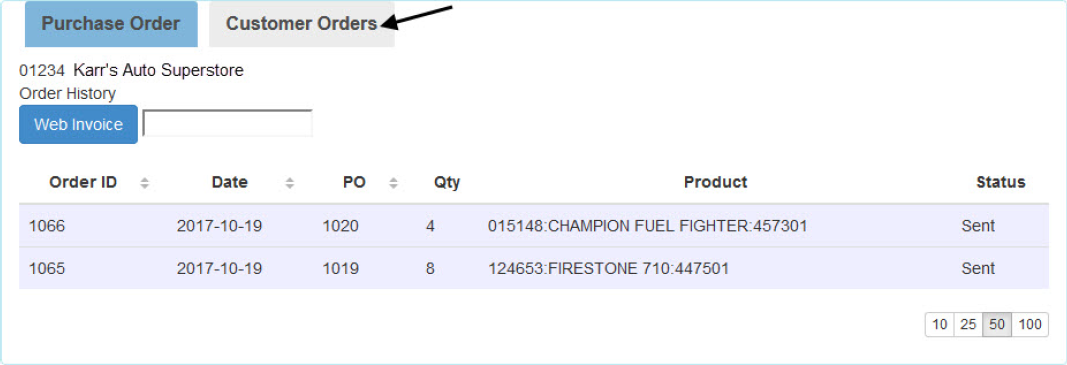
Once the order is placed, it’s listed under the Customer Orders tab, along with its status. To see all of the items included on a specific order, click the row for the order. When you’re finished looking at the order detail, click an order row to hide it.
Orders that are placed online can be accessed from the Open Work Order List and processed in the same manner as work orders that are created for customers who visit your store in person.
To process a web order
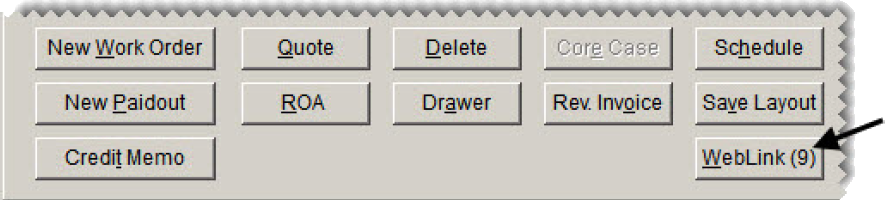
| 1. | If the Open Work Order List isn’t already open in TireMaster, click Invoicing. |
| 2. | Click WebLink. A list of pending web orders opens. |
| 3. | Select the order you want to work with, and click Create WO. |
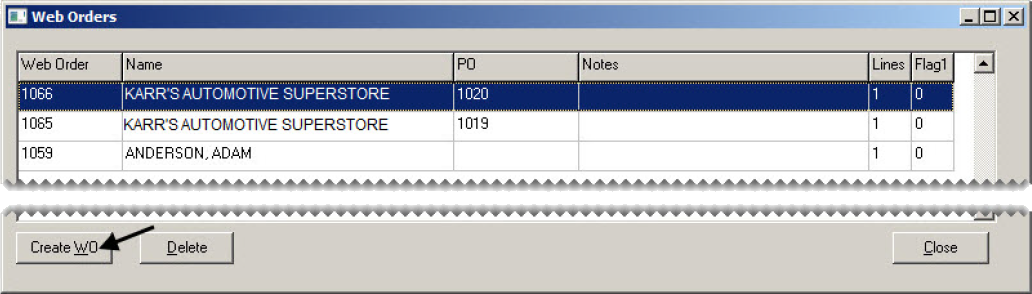
| 4. | Close the Web Orders screen. The work order created for the online order is now on the Open Work Order List. You can access, update, and invoice the new work order in the same manner as work orders started in TireMaster. For more information, see Work Orders and Invoices. |
Once the sale for an online order is completed, customers can use invoice numbers to retrieve the invoices associated with those orders. If they have questions about retrieving web invoices, provide them with the following information.
To retrieve a web invoice
| 1. | Log in to WebLink, if you haven’t already. For more information, see Access WebLink. |
| 2. | Click the Customer Orders tab. |
| 3. | Type the invoice number in the Web Invoice field. Then click the Web Invoice button. The invoice opens in a separate browser tab. |

The WebLink Order Report lists the web orders placed during a user-defined date range or orders for a specific customer, along with the following information:
The items ordered and the order quantity
The notes (if any) included on the web orders
The status of whether a corresponding TireMaster work order has been created
To generate a WebLink Order report
| 1. | Click Reports. |
| 2. | Click the Inventory tab. |
| 3. | Select WebLink Order Report and click Launch. |
| 4. | Do one of the following: |
For a list of web orders placed during a date range, select the beginning and ending dates.
For a list of web orders placed on a specific day, select the same date for both the beginning and ending dates.
For a list of web orders placed by a specific customer, click in the Customer field and press  . Then select the customer’s name from the list that appears.
| 5. | Click Print. The Report Window opens. |
| 6. | Print the report and close the Report Window. |