Firestone National Accounts Integration
This help topic is applicable to the following TireMaster applications:
|
TireMaster Point of Sale |
TireMaster Plus |
TireMaster Corporate |
|---|---|---|

|
|
|
The Firestone National Accounts Integration (FNA) Integration links TireMaster and TreadNet, the platform used for processing Firestone’s national account claims. With this integration, you can electronically submit claims and reconcile credits for Firestone national account sales.
This section describes the changes made to the Firestone National Accounts Integration.
Update, March 10, 2025
Version 7.0.0 includes the following changes:
Compatibility with Bridgestone's TreadNet self-service e-commerce platform.
Functionality for receiving rejection files electronically.
Functionality for correcting price conflicts.
Support for TreadNet account numbers. For more information, see TreadNet Account Numbers.
Update, June 2019
Version 6.6.0 includes following changes:
The credits you receive for Firestone sales are loaded into the FNA Integration and can be reconciled electronically.
Requirement field entries are saved when Save & Continue is clicked on the requirements screen. Previously, some entries disappeared although the button was clicked.
The Skip Electronic Submission button is available on the requirements screen only during the invoice completion process.
The reconciliation screen includes sorting and filtering options.
You can print a list of the claims displayed on the reconciliation screen.
You can update requirements information for unsent and sent claims.
The reconciliation screen includes a Request & Submit button for manually sending and retrieving Firestone credits.
Update, November 2013
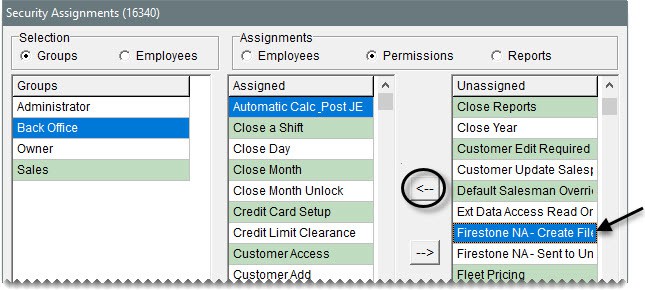
Two permissions are available in version 3.1.0:
Firestone NA - Create File, which allows users to create and send claims submission files manually
Firestone NA - Sent to Unsent, which allows users to change the status of a claim from Sent to Unsent
Update, April 2013
The most significant changes in version 3.0.0 are:
Automated electronic claims submission has been introduced, eliminating the need to create claims submission files.
You no longer need to retrieve and load input files with customer information.
FNA screens have been moved inside of TireMaster, Therefore, it's not longer necessary to run the integration as a separate program.
The following functionality has also been added:
A permission allowing users to skip electronic submission
A log file listing the status of claims submissions and invoices with missing requirements
The means to finish adding a customer's required information before completing an invoice
The means to update fields on unsent claims
The means to submit claims manually
Security for the Firestone Customer Report (Therefore, you need to define which user groups are allowed to print it.)
Initial Release, April 2011
To install and user the Firestone National Accounts Integration Integration, your TireMaster version must be 9.4.0 or newer.
To use the Firestone National Accounts Integration, you should be familiar with performing the following tasks:
Starting work orders
Completing invoices
Adding and maintaining customer records
Adding and maintaining reconciliation codes for national account vendors
Reconciling credits issued by vendors for national account sales
Before you can install Firestone National Accounts Integration, do one of the following to locate the installation program:
Access the automatically-deployed installer in the apps directory. For instructions, see Access Automatically-Deployed Installers.
Download the installer from the TireMaster Support site. For instructions, see Download the Installer for the Firestone National Accounts Integration.
Once you’ve located the installer, complete the installation. For instructions, see Complete the Firestone National Accounts Installation.
If your TireMaster system is set up to download automatically-deployed installers as part of the nightly backup process, the installer for the Firestone National Accounts Integration is already available to you. Typically, installers are placed in one of the following locations:
|
c:\TireMaster\apps |
c:\TMPOS\apps |
d:\QDSTM\apps |
|
c:\QDSTM\apps |
d:\TireMaster\apps |
d:\TMPOS\apps |
To access automatically-deployed installers in Windows
| 1. | Depending on the computer's operating system, do one of the following: |
For Windows 11, right-click  and select File Explorer from the menu that appears. Then find This PC on the Home panel. If the computer's drives are not displayed, click
 ![]() to open the list.
to open the list.
For Windows 10, right-click  and select File Explorer from the menu that appears. Then scroll to This PC on the Quick Access panel. If File Explorer opened the This PC screen instead, disregard this step.
| 2. | Double-click the letter or icon for the drive in which TireMaster is installed. (Usually, it’s the c: or d: drive.) |
| 3. | Double-click the TireMaster program folder (typically named TireMaster, qdstm, or tmpos). |
| 4. | Double-click the apps folder, and locate the file firestone00000000-07000000.exe. Once you have located the installer, complete the installation. For instructions, see Complete the Firestone National Accounts Installation. |
The installer for Firestone National Accounts Integration is available for download from the TireMaster Support site. When you download the installer, save it on your TireMaster server. To log on to the TireMaster Support Site, you need your TireMaster customer number and password. If you no longer have these credentials, log a support request via the online portal, by email, or calling 800-891-7437.
To download the Firestone National Accounts Installer
| 1. | Close all applications. |
| 2. | Log on to support.tiremaster.com. |
| 3. | Type your customer number and password, and click Login. The Support Center home page opens. |
| 4. | Click Download Programs on the menu. The Download Center page opens. |
| 5. | Under Update Files, click the link for the Firestone National Accounts Integration. The download begins. If the download doesn't begin immediately, check your browser settings. |
| 6. | Move the installer from the default downloads folder to another folder (optional). |
| 7. | Exit the TireMaster Support site. Once you have finished downloading the installer, you can complete the installation. For instructions, see Complete the Firestone National Accounts Installation. |
After you’ve located the installer for the Firestone National Accounts Integration, you can complete the installation. Install the applications on the TireMaster server and workstations.
To install the Firestone National Accounts Integration
| 1. | Right-click firestone00000000-07000000.exe and select Run as Administrator. A confirmation message appears. |
| 2. | Click Yes. The TireMaster - Installation Program screen opens. |
| 3. | Click OK. The TireMaster - Search Results screen opens. |
| 4. | Select the TireMaster location in which you want to install the interface, and click Install. |
| 5. | At the end of the installation, click Finish. |
You’ll be prompted to register the Firestone National Accounts Integration the first time you log in to TireMaster after the installation. When the Interface Registration screen opens, click Register.
Once the Firestone National Accounts Integration is installed, you need to configure it. Then you need to ensure that the Firestone customers, vendors, and inventory items set up in TireMaster include required settings for handling Firestone national account sales.
Before you can use the Firestone National Accounts Integration to submit claims, you need to complete various settings that allow TireMaster to communicate with Firestone. If you’re using the integration to access Firestone’s product and pricing files instead of submitting claims, you need to complete the steps in these setup instructions as well.
To set up the Firestone National Accounts Interface
| 1. | In TireMaster, select Interfaces > Interface Setups. |
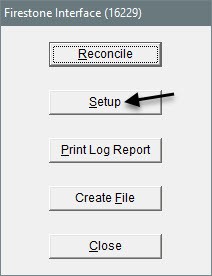
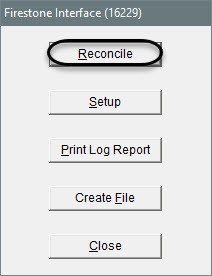
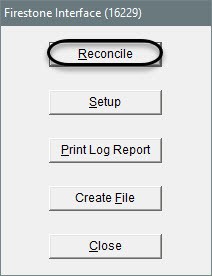
| 2. | Click Firestone Interface. The Firestone Interface screen opens. |
| 3. | Click Setup. The Firestone Setup screen opens. |
| 4. | Type the location number assigned to you by Firestone. |
| 5. | Type the base file name assigned by Bridgestone. You can get this name from TireMaster Support. |
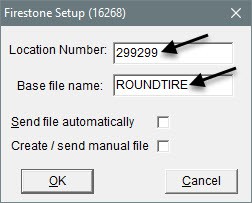
| 6. | Do one of the following: |
If you want to activate automatic claim submission, select the Send File Automatically check box. By default, the check box is clear.
If you’ve installed the integration to gain access to Bridgestone and Firestone product and pricing files, make sure the Send File Automatically check box is clear and disregard the information in this document about submitting claims.
If you want to create and manually submit the claims select the Create/send manual file check box.
| 7. | To save your changes, click OK. Then close the open screens. |
Various permissions define whether employees are allowed to use all or some of the functionality available in the Firestone National Accounts Integration. Permissions that affect FNA include the following:
Firestone NA - Create File allows users to create a file of claims that will be included in the next electronic submission.
Firestone NA - Sent to Unsent defines whether users are allowed to change the status of claims. It also allows uses to disable electronic reconciliation for claims.
Natl Recon Credits defines whether users can access the screen that lists all of the Firestone claims. The Firestone Reconcile screen also includes the means to update claim information, submit claims, and process credits.
Skip Electronic Submission allows users to flag invoices that they don’t want to submit for credit.
Assign permissions to your security groups as needed.
To assign the FNA permissions
| 1. | Open the Security Assignments screen. |
| a. | Select Setup > Users & Permissions. The User List opens. |
| b. | Click Security. |

| 2. | Select the group to which you’ll assign permissions. |
| a. | Under Selection, make sure Groups is selected. |
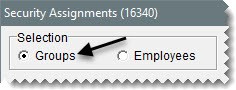
| b. | Select the group name. |
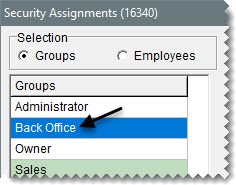
| 3. | Assign permissions to the group. |
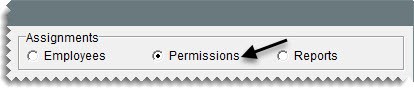
| a. | Under Assignments, select Permissions. |
| b. | For each permission you want to assign, select it on the Unassigned panel and click  to move it to the Assigned panel. to move it to the Assigned panel. |
| 4. | To assign the permission to additional security groups, repeat steps 2 and 3. |
| 5. | Close the open screens. |
The Firestone Customer Report lists customers who have national account agreements with Firestone. Whether users are allowed to generate this report depends on their security settings. To ensure that the applicable users are allowed to access and print the document, assign the report to their security groups.
To assign the Firestone Customer Report
| 1. | Select Setup > Users & Permissions. The User List opens. |
| 2. | Click Security. |
| 3. | Under Selection, make sure Groups is selected. |
| 4. | Select the name of the group to which you’ll assign the report. |
| 5. | Under Assignments, select Reports. |
| 6. | On the Unassigned panel, scroll down and select Firestone Customer Report. |
| 7. | Click to move the report to the Assigned panel. |
| 8. | To assign the permission to additional security groups, repeat steps 4 through 7. |
| 9. | Close the open screens. |
Before you can electronically submit claims to Firestone, you need to make sure that a variety of settings have been completed in TireMaster.
To verify TireMaster is ready for Firestone claim submission
| 1. | Make sure a vendor record exists for your Firestone vendor. If there is no vendor record for your Firestone vendor, add it. For more information, see Add and Manage Vendors. |
| 2. | Make sure the Firestone reconciliation code is set up. For more information, see Add a Reconciliation Code. |
| 3. | For each Firestone item, make sure the following is true: |
The vendor part number is an exact match of the article number (also known as a product ID) used by Firestone.
The Firestone reconciliation code has been assigned.
The parts price is greater than $0.00.
| 4. | Generate the Firestone Customer Report. For more information, see Generate a List of Firestone Customers. |
| 5. | Make sure there is a customer record for each customer who has a national account agreement with Firestone. For each of these customers, make sure the following is true: |
The customer’s TreadNet number has been entered in National/GS# field on the Customer Recon Codes screen.
The Firestone reconciliation code (typically, FI) has been assigned on the Customer Maintenance screen.
For more information, see Add a National Account Customer.
The Firestone Customer Report lists the names, addresses, and phone numbers for customers who have national account agreements with Firestone. It also lists the bill-to and ship-to TreadNet numbers for each customer.
To generate a list of Firestone customers
| 1. | Click Reports. The Report List openss. |
| 2. | Click the Customer tab. |
| 3. | Select Firestone Customer Report, and click Launch. The Firestone Customer Report screen opens. |
| 4. | For a list of customers from a particular state, select the state abbreviation from the Choose a State drop-down. Otherwise, leave the state blank. |
| 5. | For a list of customers who share the same home office number, type the number they have in common. Otherwise, leave the Home Office Account field blank. |
| 6. | Click Print. The Report Window opens. |
| 7. | Print the report. Then close the Report Window. |
| 8. | Close the open screens. |
TreadNet uses six-digit numbers to identify customers with Firestone national account agreements. In TireMaster, the TreadNet numbers need to be assigned to customers and in some instances, shipping addresses. When the TreadNet number is missing from a customer record or a shipping address, the Firestone National Accounts Integration generates an error. The TreadNet bill-to and ship-to numbers assigned to customers are available on the Firestone Customer Report. For more information, see Generate a List of Firestone Customers.
When the TreadNet number needs to be assigned, do the one of the following. The numbers are available on the TreadNet site.
For the customer bill-to number, search for the customer. Then click Recon Codes and type the number in the National/GS # field.
For the shipping address, search for the customer and click the ShipTo tab. Then select an existing shipping address and click Edit or add a new shipping address. Type the TreadNet number in the Contact field and save your changes.
TreadNet number assignments affect the information requirements for customers and data formatting guidelines, which are known as masks.
For an overview of TreadNet number assignments, watch the following video (length 2:25).

When you sell items to customers with Firestone national account agreements, you need to record information that Firestone requires to process claims for these types of sales. When you complete the sales, you can submit the claims to Firestone electronically.
You start Firestone national account work orders in the same manner as any other work order in TireMaster. However, you need to record additional information required by Firestone before you can complete the invoices for these sales.
To create Firestone work orders and invoices
| 1. | Start a work order for a customer who has a national account agreement with Firestone. |
| 2. | If you have a claim number for the sale, type it in the Ref# field on the Work Order screen. |

| 3. | Add all of the items (tires, parts, and services) covered under the customer’s agreement with Firestone to the work order. |
| 4. | If the work order includes a shop charge, clear the Shop check box. |
| 5. | If you’re not yet ready to collect the payment from the customer, click Work Order. If you’re ready to finish the sale, click Complete instead. |
| 6. | If you’re prompted for a shipping address, close the message. Then click ShipTo on the Firestone Additional Information screen and select the shipping address from the list that appears. |
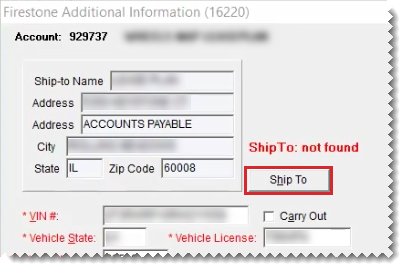
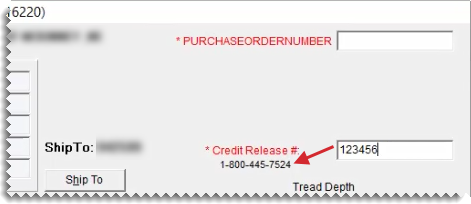
| 7. | On the Firestone Additional Information screen, enter the required information, along with optional information you want to include. Required information is labeled with red or green text and an asterisk (*). |
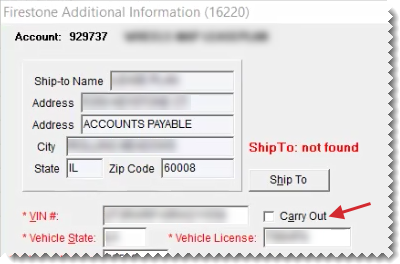
Here are some things to keep in mind as you fill out the requirements:
If the vehicle is on site, clear the Carry Out check box.
If authorization is needed for all of part of the purchase, call the toll-free phone number on the screen. Then type the authorization code in the Credit Release # field. Credit releases restrict the quantities customers are allowed to buy or the amounts they are allowed to spend when they purchase tires, parts, services, or various combinations of these items.
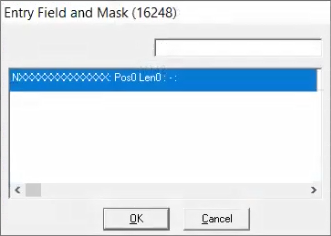
If a field requires specific formatting, you won’t be able to type in it. In this scenario, press  and refer to the entry field and mask guidelines listed. The letter A identifies where to use letters, N identifies where to use numbers, and X means numbers or letters can be used.
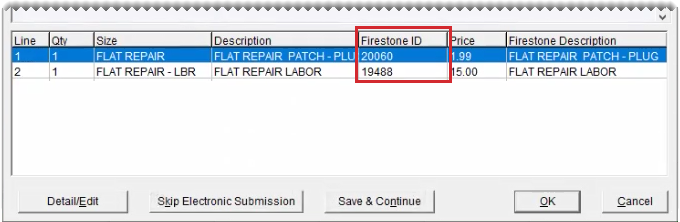
| 8. | Make sure each line item has a corresponding Firestone article number (also known as a product ID number). If you need to make a correction, see Correct Vendor Part Numbers. |
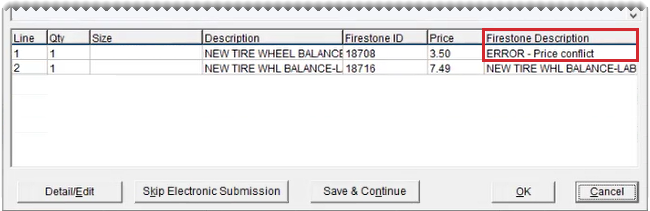
| 9. | If there are price conflicts for one or more items, resolve them. For more information, see Resolve Price Conflicts. |
| 10. | Save the work order or complete the invoice. |
If you’re done entering all of the required information, click OK.
If you don’t have all of the required information at this time, click Save & Continue (available for work orders only). The required information can be updated before completing the invoice and submitting the claim.

If you will not be submitting a claim for sale, click Skip Electronic Submission.

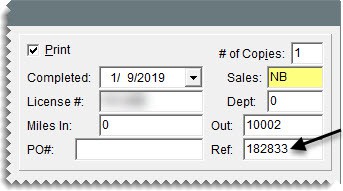
| 11. | If you’re completing the invoice and you have a claim number, enter it in the Ref field on the Invoice Completion screen (if it wasn’t already entered when the work order was started). |
Before claims are sent to Firestone, you can review the customer account information gathered at point of sale and make changes if needed. To view and update claims, you must belong to a TireMaster security group that’s assigned the Natl Recon Credits permission.
To review and update unsent Firestone claims
| 1. | Open the Firestone reconciliation screen. |
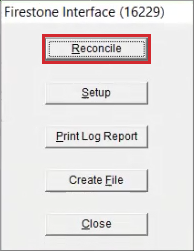
| a. | Select Interfaces > Interface Setups. Then click Firestone Interface. |
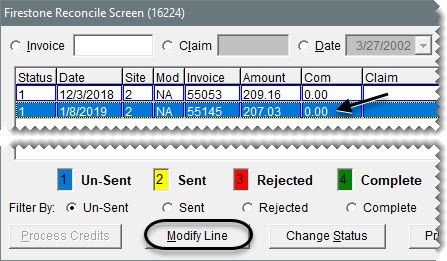
| b. | Click Reconcile. Claims that have not been sent to Firestone are outlined in blue. |
| 2. | To limit the claims displayed to only those that have not been sent, select Un-Sent. |

| 3. | To see details for a claim, select it and click Modify Line. The Firestone Additional Information screen opens. |
| 4. | If a claim needs to be updated, make the necessary changes and click OK. |
If entries (such as VIN, unit number, or driver name) on the top part of the screen, need to be updated, type your changes in the applicable fields. Required information is labeled with red and green text and an asterisk (*).
and refer to the entry field and mask guidelines listed. The letter A identifies where to use letters, N identifies where to use numbers, and X means either numbers or letters can be used. For example, FS499 is a valid entry for the mask AANNN. Letters must be capitalized.If any vendor part numbers do not match the Firestone article numbers, update them. For more information, see Correct Vendor Part Numbers.
If there are price conflicts for any of the items, resolve them. For more information, see Resolve Price Conflicts.
| 5. | To review and update additional claims, repeat steps 2 and 4. |
| 6. | When you’re done reviewing your claims, close the Firestone Reconcile screen. |
If the vendor part number for an item on a work order is incorrect, you can correct it before completing the invoice.
To correct a vendor part number
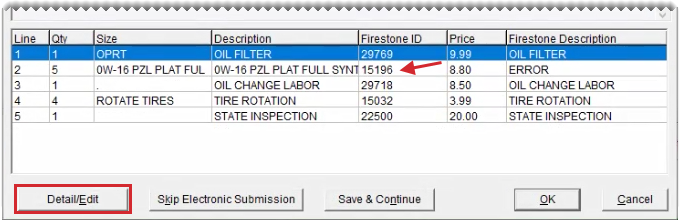
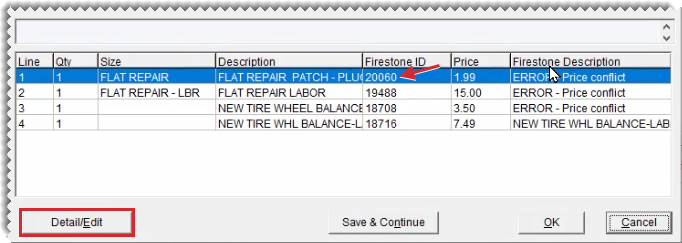
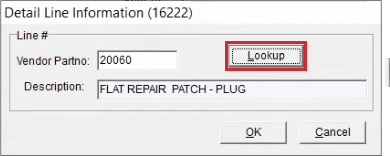
| 1. | On the Firestone Additional Information screen, select the item for which the vendor part number needs to be corrected and click Detail/Edit. The Detail Line Information screen opens. |
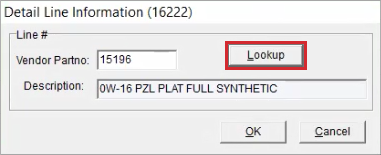
| 2. | To enter the Firestone article number, do one of the following: |
Type it in the VendorPartno field. Then go to step 4.
Click Lookup. The Product Selection screen opens.
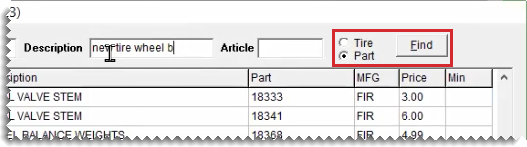
| 3. | Look up the Firestone article number. |
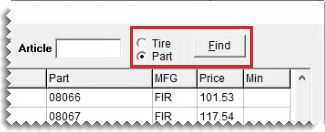
| a. | Type a partial or complete description or Firestone article number. |
| b. | Select Tire or Part. Then click Find. |
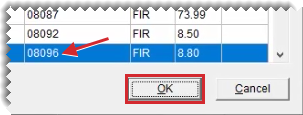
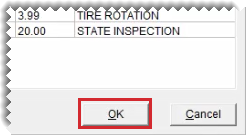
| c. | Select the item that matches the one on the work order, and click OK. |
| 4. | To save the updated vendor part number, click OK. |
For some items, Firestone has required sell prices. Therefore, the integration generates a price conflict error when the price you've charged for an item doesn't match the price set by Firestone. You can resolve the price conflict to ensure the claim can be successfully submitted.
To resolve price conflicts
| 1. | Retrieve Firestone's price book information for the item with the price conflict. |
| a. | On the Firestone Additional Information screen, select the item and click Detail/Edit. The Detail Line Information screen opens. |
| b. | Click Lookup. The Product Selection screen opens. |
For each item, the Price column lists one of the following:
The required sell price established by Firestone.
The minimum amount you're allowed to charge. The notation min identifies the items for which you can set the sell price.
| 2. | If you don't see the item for which you need to correct pricing, search for it. |
| a. | Type a partial or complete description or Firestone article number. |
| b. | Select Tire or Part. Then click Find. |
| 3. | Do one of the following: |
If you want to update the price to the amount defined by Firestone, select the item that matches the one on the work order.
If you want to submit your price, select a similar item that doesn't have a required price.
| 4. | Click OK. Depending on your selection, the price item's changes to match the Firestone price book amount or the item on the claim is replaced. |
You can change the status of claims and remove them from electronic submission. To change the status of claims, you need to belong to a security group that’s assigned the permission Firestone NA - Sent to Unsent.
To change the status of a claim
| 1. | Open the Firestone reconciliation screen. |
| 2. | Select Interfaces > Interface Setups. Then click Firestone Interface. |
| 3. | Click Reconcile. |

| 4. | On the list of claims, select the claim for which you want to change the status, and click Change Status. |
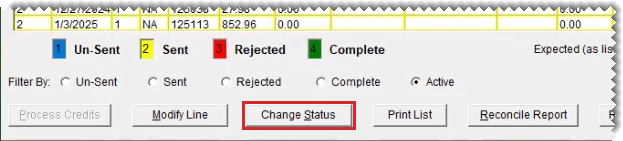
| 5. | Click the button for the new status you want to assign to the claim. |
You have the option of submitting Firestone claims via an electronic process or manually. You can also generate a file that shows you which claims are slated for the next submission.
Electronic submission of Firestone claims is a hands-off process. At 2:00 a.m., 10:00 a.m., and 2:00 p.m. daily, TireMaster transmits all claims with the unsent status to Firestone. No interaction is required from you. Before electronic submission, you can see which claims will be sent by generating a claims file and you can review unsent claims to ensure they include all of the required information. For more information, see Create a Claims File and Review and Update Unsent Claims.
If you want to see which claims will be included in the next electronic submission, you can create a file that includes this information. Claims files are saved inside the BFStone folder in the TireMaster directory. (Examples:c:\TireMaster\BFStone, c:\QDSTM\BFStone, and c:\TMPOS\BFStone.)
To create a claims file
| 1. | Select Interfaces > Interface Setup. Then click Firestone Interface. The Firestone Interface screen opens. |
| 2. | Review and update unsent Firestone claims if needed. For more information, see Review and Update Unsent Claims. |
| 3. | Click Create File. TireMaster prompts you to create the file. |
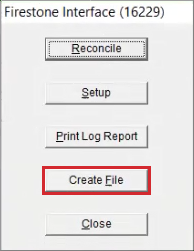
| 4. | Click Yes. |
| 5. | Close the Firestone Interface screen. |
| 6. | View the claims file. |
| a. | Open your TireMaster directory, and double-click the BFStone folder. (Examples:c:\TireMaster\BFStone, c:\QDSTM\BFStone, and c:\TMPOS\BFStone.) |
| b. | Select the file. Then right-click and choose Open With from the pop-up menu. |
| c. | Select a text editor such as Notepad from the list of applications that appears, and click OK. |
In addition to submitting claims electronically, you also have the option to manually submit claims with the Firestone National Accounts Integration. Manual claims submission allows you to send claims at any time instead of having to wait until the automated process occurs at 2:00 a.m., 10:00 a.m., or 2:00 p.m.
To manually submit claims
| 1. | Open the Firestone reconciliation screen. |
| 2. | Select Interfaces > Interface Setups. Then click Firestone Interface. |
| 3. | Click Reconcile. |
| 4. | Review and update unsent Firestone claims if needed. For more information, see Review and Update Unsent Claims. |
| 5. | Click Request & Submit. A confirmation message appears. |

| 6. | Click OK. |
| 7. | Close the open screens. |
With the Firestone National Account Log, you can track claims submission activity for the past seven days. The log lists both submitted and unsubmitted claims, and it tells you if missing requirements prevented invoices from being submitted. You can then look up those invoices, make corrections, and resend them.
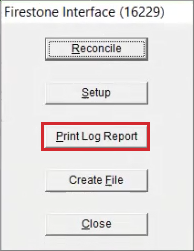
When the log includes new information, you’ll be prompted to print it when accessing the Firestone National Accounts Interface. (Select Interfaces > Interface Setups from the menu. Then click Firestone Interface.) You can also print the log at any time by clicking Print Log Report on the Firestone Interface screen.
You can view a list of claims and the status for each one on the Firestone Reconcile screen. To view claims, you must belong to a TireMaster security group that’s assigned the Natl Recon Credits permission.
To view a list of Firestone claims
| 1. | Open the Firestone reconciliation screen. |
| a. | Select Interfaces > Interface Setups. Then click Firestone Interface. |
| b. | Click Reconcile. |
| 2. | To define which claims are displayed, do one or more of the following as needed: |
For a specific invoice, select Invoice. Then type the invoice number and click Query.

For a specific claim, select Claim. Then type all or part of the claim number and click Query.

For claims completed on and after a specific date, select Date. Then type the invoice date and click Query.

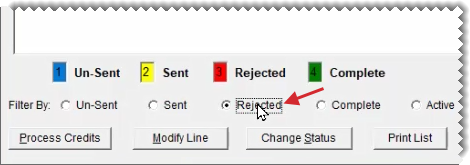
For claims with a specific status, select Un-Sent, Sent, Rejected, Complete, or Active.

| 3. | To sort the claims, select Date, Cust (for customer), or Site. |

| 4. | For a hard copy of the claims displayed on the screen, click Print List. |

| 5. | For a list of Firestone national account invoices, click Reconcile Report. Then define whether to limit National Account Recon Report to unreconciled items. If you click No, you’ll be prompted to enter a date. Only those invoices created on or after the date entered are listed on the report. |

When required information for a claim is missing or wrong, Firestone rejects the claim and you won't receive credit for the related sale. In this scenario, you can correct the claim and resubmit it.
To handle rejected claims
| 1. | Open the Firestone reconciliation screen. |
| a. | Select Interfaces > Interface Setups. Then click Firestone Interface. |
| b. | Click Reconcile. |
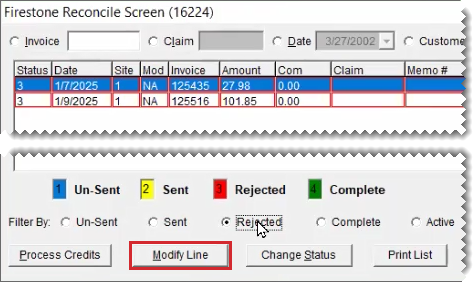
| 2. | Select Rejected to display only the rejected claims. Rejected claims are outlined in red. |
| 3. | If you want to sort the rejected claims, select Date, Cust, or Site. |
| 4. | Select the claim you want to correct. The reason for the selected claim appears in the text field toward the bottom of the screen. |
| 5. | Click Modify Line. The Firestone Additional Information screen opens. |
| 6. | Do the following as needed: |
Type correct information in the fields on the upper-portion of the screen. Example: Missing PO number.
Correct vendor part numbers. For more information, see Correct Vendor Part Numbers.
Resolve price conflicts. For more information, see Resolve Price Conflicts.
Error messages in the Firestone Description column identify items with incorrect vendor part numbers and price conflicts.
| 7. | Click OK. The status of the claim changes from Rejected to Unsent (outlined in blue). |
The corrected claim will be resubmitted the next time the electronic submission process runs, or you can submit the claim manually. For more information, see Submit Firestone Claims Electronically or Submit Firestone Claims Manually .
Credits for Firestone national account sales are received at 2:00 a.m., 10:00 a.m., and 2:00 p.m. daily. You also have the option to manually retrieve credits at any time. Once credits are received, you can electronically reconcile them.
To reconcile Firestone credits
| 1. | Open the Firestone reconciliation screen, using one of the following methods: |
| a. | Select Interfaces > Interface Setups. Then click Firestone Interface. |
| b. | Click Reconcile. |
| 2. | If you want to manually retrieve credits, click Request & Submit. Otherwise, disregard this step. |

| 3. | If there is a credit that you want to reconcile manually (with TireMaster’s National Credit screen), do the following. Otherwise, disregard this step. |
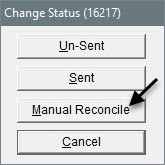
| a. | Select the credit you want to reconcile manually and click Change Status. |

| b. | When the Change Status screen opens, click Manual Reconcile. The colored border surrounding the credit disappears and the number in the Status column changes to 8. |
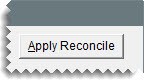
| 4. | Click Apply Reconcile. The status of all claims that have been processed by the vendor changes to Complete. The interface also inserts a credit memo, credit date, credit amount, and handling fee for each of the credits you’ve received. |
| 5. | To process the credits with the status Complete, click Process Credits. |
