National Account Sales
This help topic is applicable to the following TireMaster applications:
|
TireMaster Point of Sale |
TireMaster Plus |
TireMaster Corporate |
|---|---|---|

|

|

|
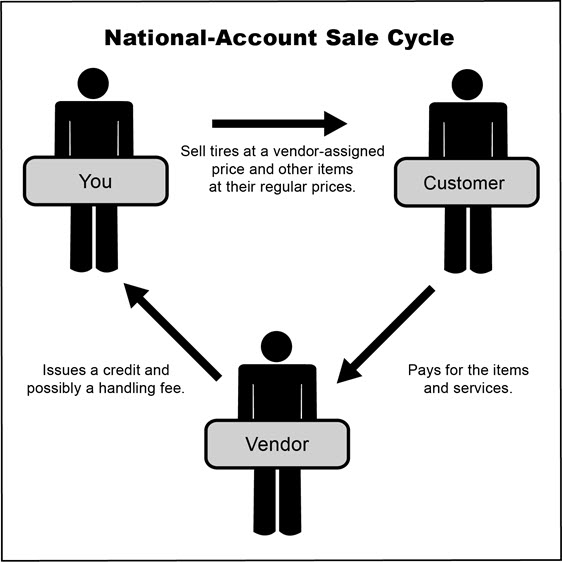
National account customers have agreements with vendors to buy tires, and perhaps other items or services, from certain dealers. In these arrangements, the vendors set the prices. Typically, an item’s price is your cost for that item, or it might be a price established by a price level.
When a you perform a national account sale, you sell items at vendor-assigned prices to a customer. At the end of the sale, the customer doesn’t pay you for the items and services; the customer pays the vendor instead. The vendor completes the cycle by giving you a credit and possibly a commission or handling fee.
Before you can perform national account sales, you need to do the following:
Add a reconciliation code for each vendor who does national account sales with you.
Assign at least one reconciliation code to each of the customers who have national account agreements with your vendors.
Assign a reconciliation code to each of the items distributed by your vendors.
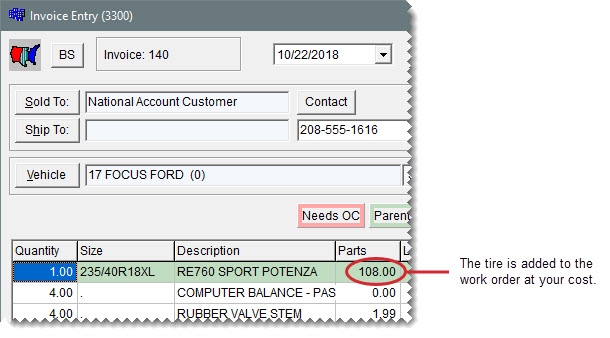
When a tire is sold to a national account customer, it’s added to the work order at your cost, but you charge the regular price for the add-ons.
When you complete the sale, the invoice total posts to a holding account for expected credits instead of an accounts receivable or cash account. The remaining entries are similar to those for a regular sale in TireMaster Plus and TireMaster Corporate.
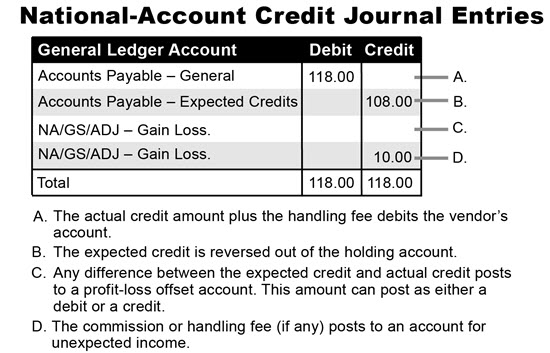
When you receive an invoice from the vendor, it includes the amount of the actual credit and it might include a handling fee.
When you reconcile the vendor credit, the following entries post to the general ledger in TireMaster Plus and TireMaster Corporate .
To ensure that sales to national account customers are handled correctly, you need to differentiate them your other clients by assigning the following:
The national account customer type
At least one reconciliation code
The reconciliation code identifies the vendor with whom the customer has a national account agreement.
To add a national account customer
| 1. | Add the new customer to TireMaster. For more information, see Add an AR Customer. |
| 2. | Enter the customer’s contact information. |
| 3. | To complete the customer’s account settings, do the following: |
| a. | Clear the Taxable and Cash Only check boxes. |
| b. | If you’ll perform any normal charge sales in addition to national account sales for the customer, leave the Statement and Finance Charge check boxes selected. If not, clear them. |
| c. | To base pricing for the customer on a price level, click the Price Level field, press  , and select a level from the list that appears. To sell items to the customer at cost, leave the Price Level field blank. , and select a level from the list that appears. To sell items to the customer at cost, leave the Price Level field blank. |
| d. | Click the Type field, and press  . Then select the national account customer type (N) from the list that appears. . Then select the national account customer type (N) from the list that appears. |
| 4. | Click OK to save the new customer. |
| 5. | To assign reconciliation codes to the customer, do the following: |
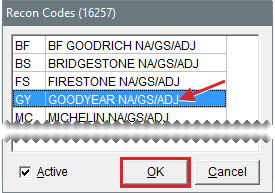
| a. | Click Recon Codes. The Customer Recon Codes screen opens. |
| b. | Click Add. The Recon Codes screen opens. |
| c. | Select the customer’s reconciliation code and click OK. |
| d. | If the vendor assigned identifying numbers, such as non-sigs, to the customer, type that information in the National/GS # field, Dealer # field, or both. |
| e. | If the vendor wants prices, the title Delivery Receipt, or both to print on invoices, select the corresponding check boxes. |
| f. | If you need to assign additional reconciliation codes, repeat steps 5b through 5e. |
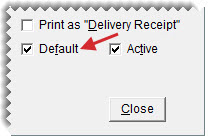
| g. | If multiple reconciliation codes are assigned to the customer, select the code that will be used most often and select the Default check box. |
| h. | Close the Customer Recon Codes screen. |
| 6. | Add vehicles and shipping addressees for the customer if needed. |
| 7. | Close the Customer Maintenance screen. |
The process of creating national account work orders is similar to the process for regular work orders. The only difference is that TireMaster prompts you to verify the customer’s reconciliation code.
To perform a national account sale
| 1. | Start a work order as you normally would for a regular customer. For more information, see Create a Regular Work Order. |
| 2. | When the Customer Recon Codes screen opens, select the vendor’s reconciliation code, and click OK. The Invoice Entry screen opens. |
| 3. | Add items to the work order. |
| 4. | If you need to collect sales tax for an item, make sure the entry in the Tax field is Parts, Labor, or Both. If you need to change the entry, click the Tax field and press  repeatedly to make your selection. repeatedly to make your selection. |
| 5. | To finish the sale, click Complete. The Invoice Completion screen opens and the Charge field is selected. |
| 6. | Press  to insert the invoice total in the Charge field. to insert the invoice total in the Charge field. |
| 7. | Complete the invoice. For more information, see Complete an Invoice. |
If you don’t want to sell items to national account customers at cost, you can establish selling prices with price levels. To use price levels for your national account customers, you need to do the following:
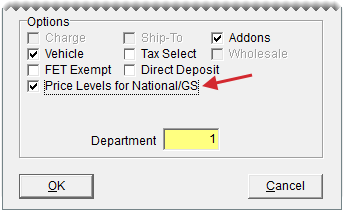
Enable price levels for the national account customer type by selecting the Price Levels for National/GS check box on the Customer/Vendor Type Edit screen.
Assign price levels to one or more national account customers as needed.
If you’ve enabled price levels for national accounts and assigned a price level to a national account customer, the selling price for an item added to a quote or a work order for that customer will be based on the assigned price level.
