Digital Vehicle Inspection App
This help topic is applicable to the following TireMaster applications:
|
TireMaster Point of Sale |
TireMaster Plus |
TireMaster Corporate |
|---|---|---|

|

|

|
With the Digital Vehicle Inspection App (DVI App), you can replace paper inspection forms with an electronic inspection that’s integrated with TireMaster. When you start a customer’s work order, you can also create an electronic inspection for the customer’s vehicle. A technician can then access that electronic inspection on a tablet and record the inspection results.
Because the integration links TireMaster and the electronic inspection, data seamlessly flows back and forth between the two applications. The electronic inspection also includes the means to capture images and videos to support the inspection findings. Furthermore, inspection reports produced by the electronic inspection can be retrieved in TireMaster and sent to customers by text or email.
Initial Release, May 2024
To install and use the Digital Vehicle Inspection App, you need the following:
TireMaster 9.3.0 or newer installed on your server and workstations
An internet connection
Wi-Fi
One or more of the following types of devices:
Android tablets with cameras and 7 inch or larger screens
Microsoft Surface tablets
To use the Digital Vehicle Inspection App, you need to know how to perform the following tasks in TireMaster, on a tablet, or both.
In TireMaster:
Start and retrieve customer work orders
Access and use the vehicle service checklist
On a tablet:
Add and remove text
Take pictures
Record videos
Before you can begin using the electronic inspection on a tablet, complete the following tasks.
To prepare to use the electronic inspection
| 1. | Provide ASA with the following information: |
Your business name, address, phone number, and location email contact (also referred to as the preferred email). This information is used to establish a unique electronic inspection for your business. For more information, see The Location Email Address.
Names (first and last) and email addresses for the employees who will perform electronic inspections with a tablet. This information is used to create their user accounts.
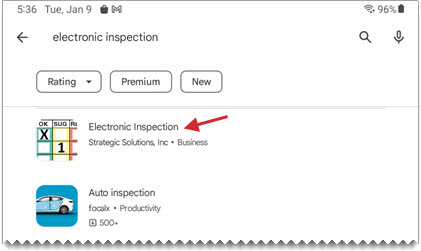
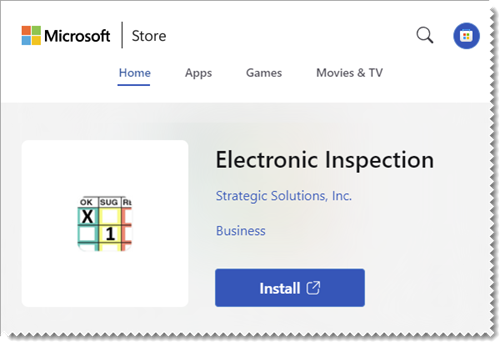
| 2. | Search for, download, and install the Electronic Inspection app on each of your tablets. |
The app for Android tablets is available from Google Play.
The app for Microsoft Surface is available from the Microsoft Store.
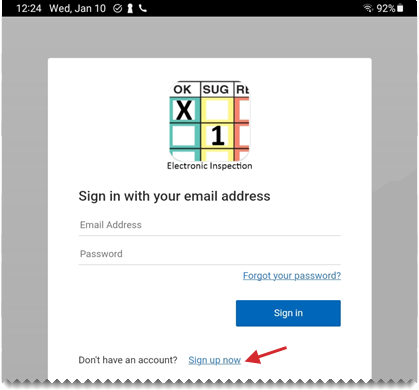
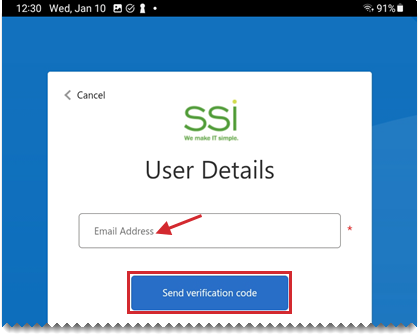
| 3. | Have each user sign in to the Electronic Inspection app for the first time and set a password. |
| a. | Tap Electronic Inspection. The electronic inspection welcome screen opens. |
| b. | Tap Sign up now. |
| c. | Type the email address associated with your user account for the app. Then tap Send verification code. |
| d. | When you receive the verification code, enter it. |
| e. | Follow the on-screen prompts to create your password. |
The location email address is an administrative email address that receives reports resulting from all of the electronic inspections. Simply put, sending the inspection reports to the location email provides a paper trail of all of the inspections performed for your business. The location email address is also called the preferred email address.
The Digital Vehicle Inspection App makes it possible for TireMaster to communicate with the electronic inspection on a tablet. Before you can install the Digital Vehicle Inspection App, do one of the following to locate the installation program:
Access the automatically-deployed installer from the apps directory. For instructions, see Access Automatically-Deployed Installers.
Download the installer from the TireMaster Support site. For instructions, see Download the Digital Vehicle Inspection App Installer.
Once you’ve located the installer, complete the installation. For instructions, see Complete the Digital Vehicle Inspection App Installation.
If your TireMaster system is set up to download automatically-deployed installers as part of the nightly backup process, the installer for the Digital Vehicle Inspection App is already available to you. Typically, installers are placed in one of the following locations:
|
c:\TireMaster\apps |
c:\TMPOS\apps |
d:\QDSTM\apps |
|
c:\QDSTM\apps |
d:\TireMaster\apps |
d:\TMPOS\apps |
To access automatically-deployed installers
| 1. | Right-click and select File Explorer from the menu that appears. |
| 2. | In the Quick Access navigation pane, scroll to This PC. |
| 3. | Double-click the letter or icon for the drive that TireMaster is installed in. (Usually, it’s the c: or d: drive.) |
| 4. | Double-click the TireMaster, qdstm, or tmpos program folder. |
| 5. | Double-click the apps folder, and locate the file CarSide00000000-01030000.exe. Once you have located the installer, complete the installation. For instructions, see Complete the Digital Vehicle Inspection App Installation. |
The installer for the DVI App is available for download from the TireMaster Support site. When you download the installer, save it on your TireMaster server. To log on to the TireMaster Support Site, you need your TireMaster customer number and password. If you no longer have that information, log a support request via the online portal, by email, or calling 800-891-7437.
To download the DVI App Installer
| 1. | Close all applications. |
| 2. | Log on to support.tiremaster.com. |
| 3. | Type your customer number and password, and click Login. The Support Center home page opens. |
| 4. | Click Download Programs on the menu. The Download Center page opens. |
| 5. | Under Update Files, click the link for the Digital Vehicle Inspection App. You’ll be prompted to save the file and possibly run the installation, depending on your browser. |
| 6. | Save the installer on your computer. |
| 7. | Exit the TireMaster Support site. |
| 8. | Once you have finished downloading the installer, you can complete the installation. For instructions, see Complete the Digital Vehicle Inspection App Installation. |
After you’ve located the installer for the DVI App, you can complete the installation. Install the application on the TireMaster server and workstations.
To install DVI App
| 1. | Right-click CarSide00000000-01030000.exe, and select Run as Administrator. A confirmation message appears. |
| 2. | Click Yes. The TireMaster - Installation Program screen opens. |
| 3. | Click OK. The TireMaster - Search Results screen opens. |
| 4. | Select the TireMaster location in which you want to install the interface, and click Update. |
| 5. | At the end of the installation, click Finish. |
You’ll be prompted to register the DVI App the first time you log in to TireMaster after the installation. When the Interface Registration screen opens and prompts you to register the Car Side Interface, click Register.
Before data can be shared between TireMaster and an electronic inspection, you need to establish communication between TireMaster and the Electronic Inspection app that runs on a tablet. To do this, perform the following tasks:
Define system control settings.
Map inspection areas in the default TireMaster system checklist to the inspection components, called inspection questions, from the electronic inspection.
To ensure that electronic inspection data can be successfully sent to and received by your TireMaster system, you need to define the DVI identification numbers for your company and location.
To set the DVI App controls
| 1. | Select Setup > System Controls. The System Controls screen opens. |
| 2. | Click the Other tab. |
| 3. | Select DVI Company ID, and press Enter. When you’re prompted for the ID, type it and click OK. |
| 4. | Select DVI Location ID, and press Enter. When you’re prompted for the ID, type it and click OK. |
| 5. | Close the System Controls screen. |
The electronic inspection includes a series of questions that represent individual components of a vehicle that can be inspected, such as the brake pads, headlights, and tailpipe. The questions need to be mapped to inspection areas on the default service checklist in TireMaster. This mapping ensures that when you mark an inspection question as passing or failing on the tablet, that same status is also assigned to the corresponding inspection area on the TireMaster Service Checklist (bottom of the Quote and Estimate Writer screen).
Perform the mapping on the TireMaster server.
To map a TireMaster checklist to tablet inspection questions
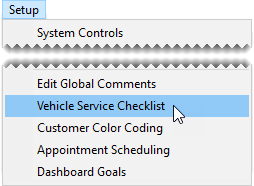
| 1. | On the TireMaster server, select Setup > Vehicle Service Checklist. The Service Checklist Maintenance screen opens. |
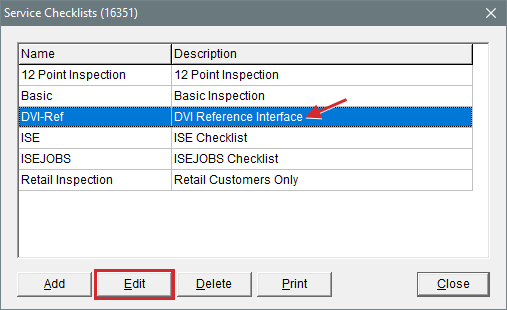
| 2. | Select the DVI-Ref checklist, and click Edit. |
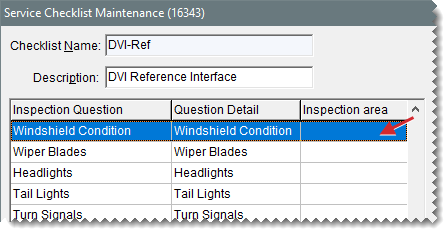
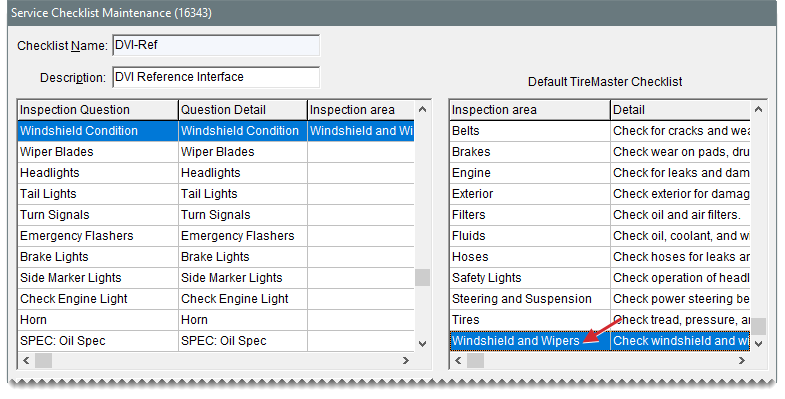
TireMaster retrieves the list of electronic inspection questions and displays them on the left side of the checklist maintenance screen. The inspection areas for your default TireMaster service checklist are listed on the right side of the screen.
| 3. | Assign TireMaster checklist inspection areas to electronic inspection questions. |
| a. | Select an electronic inspection question (left side of screen). |
| b. | Click the TireMaster inspection area (right side of screen) you want to map to electronic inspection question. |
| c. | Repeat steps 3a and 3b for each electronic inspection question that needs to be assigned a TireMaster inspection area. |
| 4. | If you need to correct the mapping of an electronic inspection question and a TireMaster inspection area, do the following as needed: |
To assign a different TireMaster inspection area to an electronic inspection question, select the question (left side of screen) and then click a different TireMaster inspection area (right side of screen).
If you mistakenly assigned a TireMaster inspection area to a tablet question that should be left blank, select the question (left side of screen) and click None at the top of the inspection area list (right side of screen).
| 5. | To save your inspection area assignments, click OK. |
| 6. | Close the Service Checklists screen. |
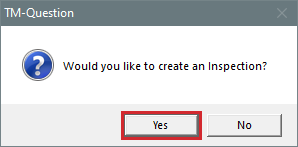
If multiple electronic inspections are available to your business, you need to define which one will be used most often. This default is associated with the new inspection prompt that appears when you start a work order in TireMaster. When you answer Yes, the selected default is used to generate the electronic inspection for the tablet.
To define the default electronic inspection
| 1. | On the TireMaster server, select Setup > Vehicle Service Checklist. The Service Checklist Maintenance screen opens. |
| 2. | Select the DVI-Ref checklist, and click Edit. |
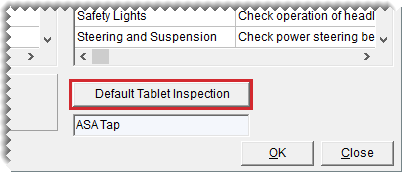
| 3. | Click Default Tablet Inspection. A list of available electronic inspections opens. |
| 4. | Select the inspection that you will use the most, and click OK. |
| 5. | Close the Service Checklist Maintenance screen. |
When the DVI App is integrated with TireMaster, you’ll be given the option to create a new electronic inspection when you start a customer’s work order.
To automatically create an electronic inspection in TireMaster
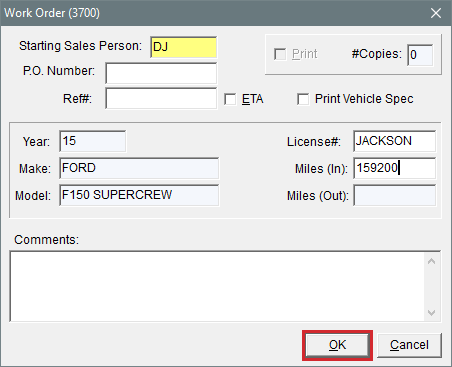
| 1. | Start a customer’s work order. For more information, see Create a Regular Work Order. |
| 2. | If you know the vehicle’s mileage, type it in Work Order screen’s Mile (In) field. |
| 3. | Click OK. |
| 4. | When the prompt to create an inspection appears, click Yes. |
An electronic inspection for the customer’s vehicle is created and can be accessed on a tablet. TireMaster advances to the Invoice Entry screen.
| 5. | To close the TireMaster Invoice Entry screen, click Quit. |
The option to manually create electronic inspections is available for use in the following scenarios:
You weren’t prompted to create an inspection when you started a customer’s work order
You accidentally clicked No when the create inspection prompt appeared
You need to select an electronic inspection other than the default inspection used for most customers
To manually create an electronic inspection
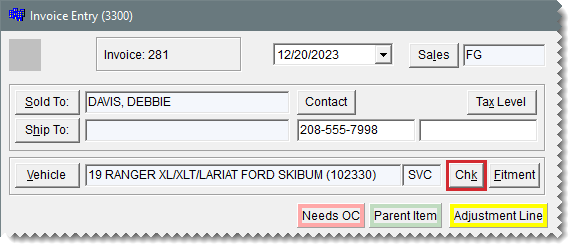
| 1. | If the Invoice Entry screen isn’t open, retrieve the customer’s work order. For more information, see Retrieve a Customer's Work Order. |
| 2. | Click Chk. |
One of the following occurs:
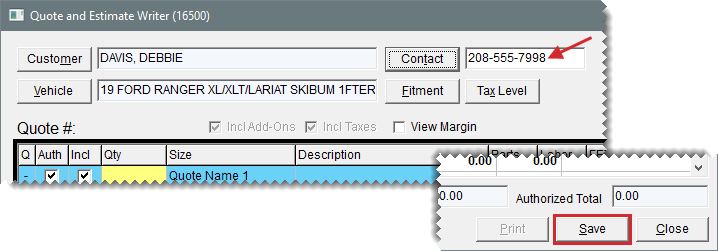
The Quote and Estimate Writer screen opens.
TireMaster prompts you to open an existing quote/estimate. In this scenario, click Yes.
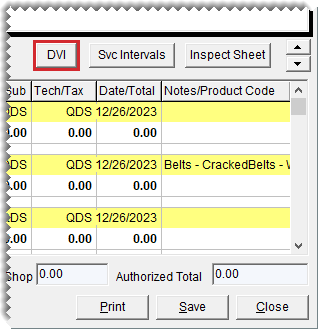
| 3. | Make sure a phone number is entered for the customer, and click Save. The DVI button becomes active. |
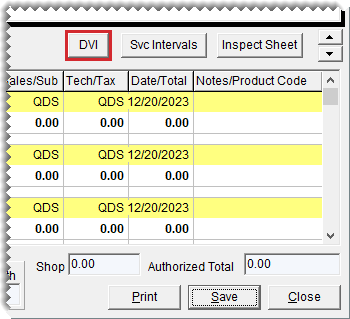
| 4. | Click DVI. The Digital Vehicle Inspection screen opens. |
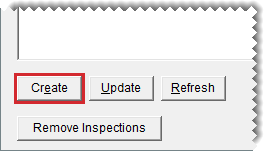
| 5. | Click Create. A list of electronic inspections opens. |
| 6. | Select the inspection you want to use, and click OK. An electronic inspection is generated for the tablet and a copy of it is generated in TireMaster. |
| 7. | Close the Digital Vehicle Inspection screen and the other open TireMaster screens. |
Before you can record inspection results on a tablet, you need to log in to Electronic Inspection app.
To log in to the Electronic Inspection
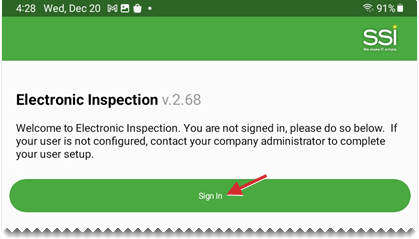
| 1. | Tap the Electronic Inspection icon on the screen. The welcome screen opens. |
| 2. | Tap Sign In. |
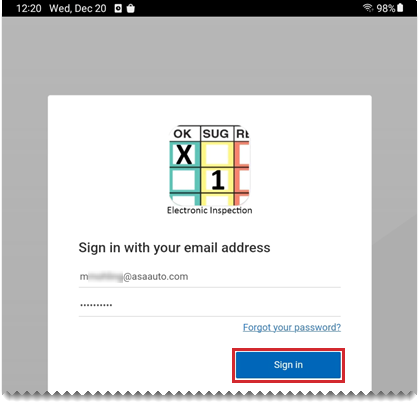
| 3. | When you’re prompted for credentials, type them and tap Sign In (again). The inspection application opens. |
Once an electronic inspection is created by TireMaster, you can retrieve it on a tablet and examine the customer’s vehicle. Electronic inspections are organized into groups of questions that represent vehicle components that can be inspected.
To record inspection results on a tablet
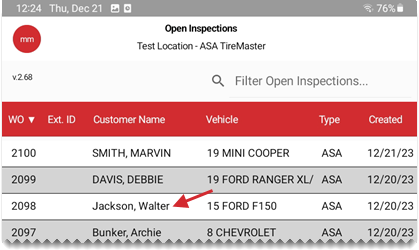
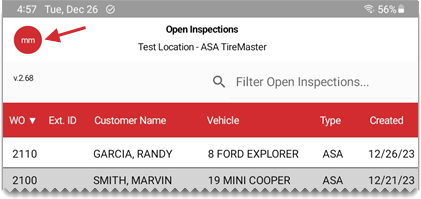
| 1. | Tap the row for the customer ’s vehicle on the list of open inspections. |
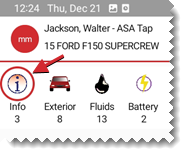
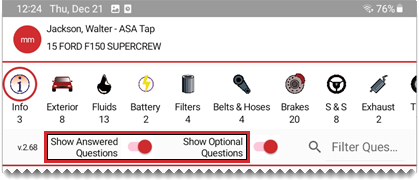
The inspection checklist opens, with the information icon selected.
| 2. | Make sure Show Answered Questions is enabled. |
| 3. | To display optional inspection questions, select Show Optional Questions. |
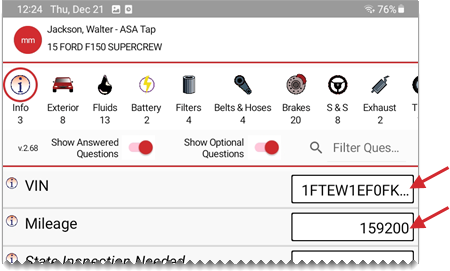
| 4. | If the vehicle’s VIN, mileage, or both were not entered when the customer’s work order was started, add them now. The VIN and mileage are required to save the inspection. |
| 5. | Tap the icon for the inspection group you want to work with. |
| 6. | Answer the questions for the selected group as needed. If you don’t inspect a vehicle component, leave the corresponding question unanswered. |
If a question has a text field, tap it. Then type and save your answer.
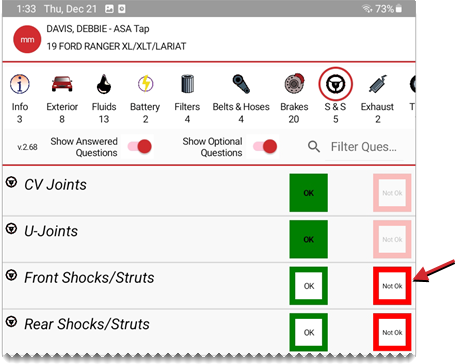
If a question has buttons, tap the applicable button. For failed inspection questions, a prompt for more information appears. In this scenario, define the failure symptoms and add notes, photos, or video as needed. For more information, see Document Inspection Failures Electronically.
| 7. | Repeat steps 5 and 6 for each additional inspection group you examine. |
| 8. | When you’re done answering questions, tap Next. The reportable findings appear. |
| 9. | Review the inspection findings, and do one of the following: |
If you need to make changes, tap Back and update the inspection.
If you’re satisfied with the inspection, tap Finish. The inspection report is sent to TireMaster, the location email address, and your (technician) email addresses. The completed inspection is also moved to the list of closed inspections.
When a vehicle component fails the inspection, you can document the failure by identifying symptoms, taking photos, and recording notes and videos. This documentation will be included in the formal inspection report that you can share with the vehicle owner.
To document inspection failures
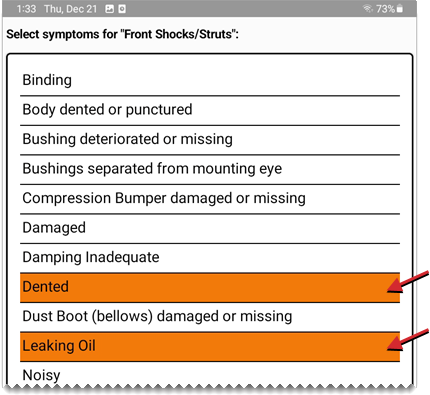
| 1. | Tap button for marking the component as failed. A list of symptoms opens. Depending on your inspection, your button might look like  or or  . . |
| 2. | Do the following as needed: |
Tap each symptom that describes the failed component.
Tap  to open the camera. Then take a picture and tap OK.
Tap  to launch the video recorder. Then record a video and tap OK when you’re finished.
Tap  . Then type and save a comment about the failed component. The note appears beneath the list of symptoms.
| 3. | Tap  . The notes, photos, and videos collected are added to inspection. . The notes, photos, and videos collected are added to inspection. |
If changes need to be made to an inspection before the results are turned over to the service writer or a salesperson, you can make the needed changes with the tablet.
To update inspection details on the tablet
| 1. | If the inspection isn’t already open, tap the customer’s name on the open inspection list. |
| 2. | Add the VIN and mileage if needed. |
Tap the VIN field. Then type the VIN or tap Photo to Text and follow the on-screen prompts to take a picture of the VIN, crop it (if needed), and accept the results.
Tap the Mileage field, type the odometer reading, and save your changes.
| 3. | To change the pass/fail status for an inspection question (inspected vehicle component), tap the applicable button. |
| 4. | To update the notes for an inspection question, do the following as needed: |
To add or edit a note, tap the status button. Then tap a symptom, tap  , type the note, and save your changes.
To remove a note, tap the status for the question that includes the note. Then tap  , delete the note text, and save your changes.
| 5. | To update the photos for an inspection question, do the following as needed: |
To add a photo, tap the status button for the question that needs a photo. Make sure at least one failure symptom is selected from the list, and tap  . Then take the picture and save it. When the photo is done loading, tap
  .
.
To remove a picture, tap the camera icon on the question. When the image opens, tap Delete.
| 6. | To update the videos for an inspection question, do the following as needed. |
To add a video, tap the status button for the question that needs a video. Make sure at least one inspection failure reason is selected, and tap  . Then record and save the video. When the video is done loading, tap
  .
.
To remove a video, tap the icon for it. Then tap Delete.
| 7. | When you’re finished making changes to the inspection, do one of the following: |
Tap Open Inspections (lower-right) to return to the open inspection list.
Tap  and follow the prompts to finish the inspection.
Service writers and sales personnel don’t need a tablet to retrieve inspection results recorded on a tablet. Electronic inspection reports can be accessed from within TireMaster.
To retrieve and review an electronic inspection in TireMaster
| 1. | If the customer’s work order isn’t already open, open it. For more information, see Retrieve a Customer's Work Order. |
| 2. | On the Invoice Entry screen, click Chk. TireMaster prompts you to open an existing quote/estimate. |
| 3. | Click Yes. |
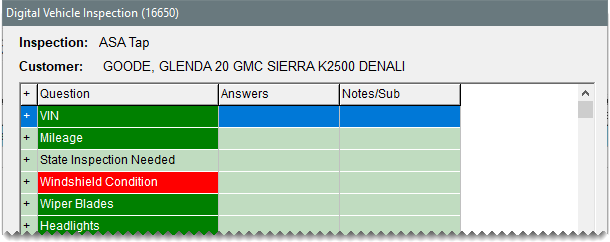
| 4. | Click DVI. The Digital Vehicle Inspection screen opens and displays a desktop version of the inspection from the tablet. |
The color green identifies the vehicle components (questions) that passed the inspection.
The color red identifies vehicle components (questions) that failed the inspection.
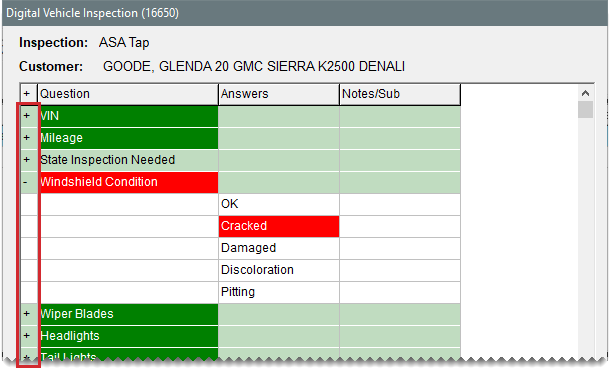
| 5. | To show the answers and notes for an inspection question, click  . To hide the information, click . To hide the information, click  . . |
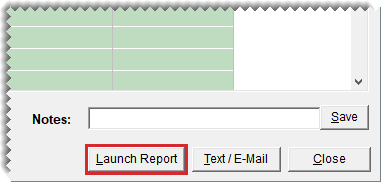
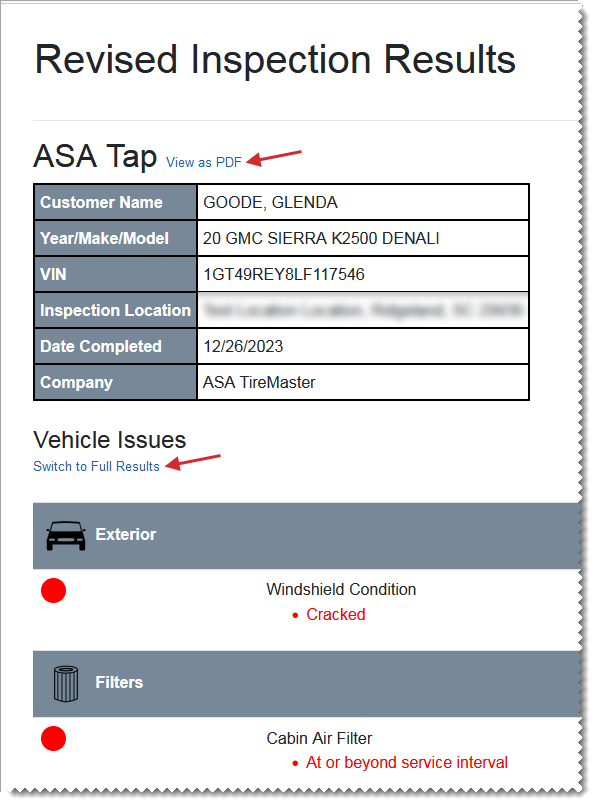
| 6. | To generate the inspection report, click Launch Report. The inspection report opens in your default web browser and lists the failed inspection items. |
| 7. | Review the report, and do the following as needed. When you’re done looking at the report, close the browser window(s). |
To see the entire inspection, click the Switch to Full Results link under Vehicle Issues. To return a list of inspection failures, click Switch to Full Results.
To generate a PDF, click View as PDF (upper left of the page). Hard copies of report PDFs can be saved and printed.
The electronic inspection information on the screen and the report can be updated in TireMaster. For more information, see Work with Electronic Inspection Results in TireMaster.
Inspection reports can be shared with customers by text and email.
To share digital inspection reports with customers
| 1. | If the Digital Vehicle Inspection screen isn’t already open in TireMaster, open it. |
| a. | Open the customer’s work order if needed. For more information, see Retrieve a Customer's Work Order. |
| b. | On the Invoice Entry screen, click Chk. TireMaster prompts you to open an existing quote/estimate. |
| c. | Click Yes. |
| d. | Click DVI. |
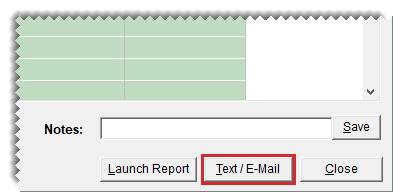
| 2. | Click Text/E-Mail. |
| 3. | Do one of the following: |
To text the report to the customer, type the customer’s number in the Text field and click Text.
To email the report to the customer, click E-Mail. Then select the customer’s email address from the To list and click OK.
| 4. | Close the Text/Email screen and other open screens as needed. |
Personnel, such as service writers and salespeople, don’t need a tablet to view and update the results of electronic inspections. The means to work with electronic inspections is available in TireMaster.
To work with electronic inspection results in TireMaster
| 1. | Retrieve the inspection. For more information, see Retrieve and Review an Electronic Inspection in TireMaster. |
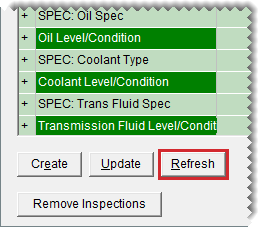
| 2. | To see the latest changes made with the tablet, click Refresh. |
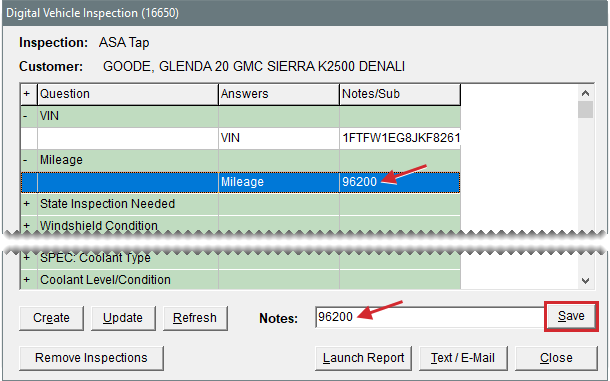
| 3. | If the mileage, VIN, or both were not recorded earlier, add them now. |
Click  for VIN. Then select the VIN answer, type the vehicle identification number in the Notes field, and click Save.
Click  for mileage. Then select the Mileage answer, type the odometer reading in the Notes field, and click Save.
| 4. | To see the reasons (answers) for inspection failures, click  . To hide the information, click . To hide the information, click  . . |
| 5. | To update the details for an inspection component (question), do the following: |
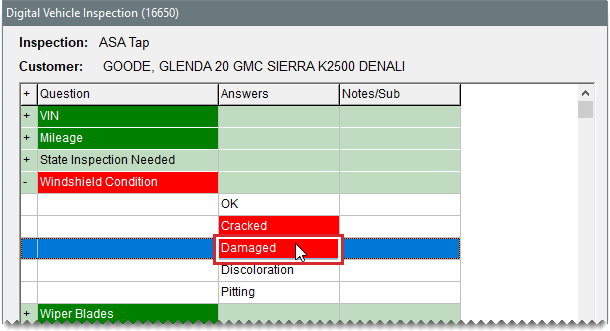
To indicate that a reason (answer) on the list is a cause of failure, double-click it. The reason (answer) turns red.
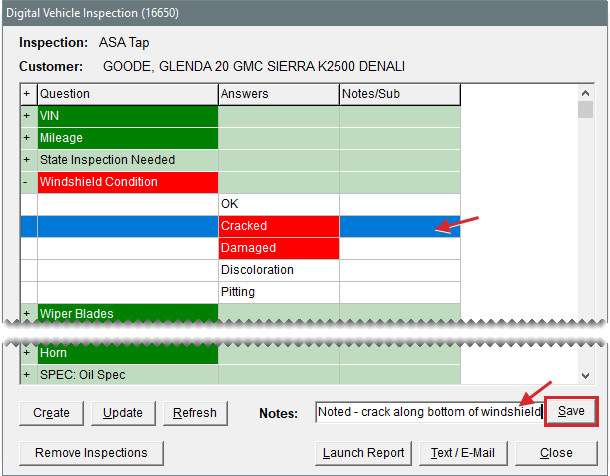
To add a note to a reason (question), select it. Then type your comment in the Notes field (lower right), and click Save.
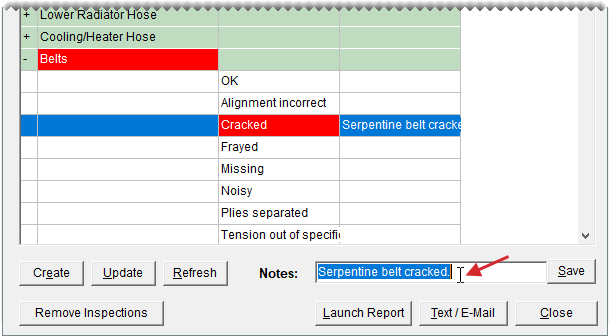
To delete a note from a reason (question), select it. Then remove the comment in the Notes field (lower right), and click Save.
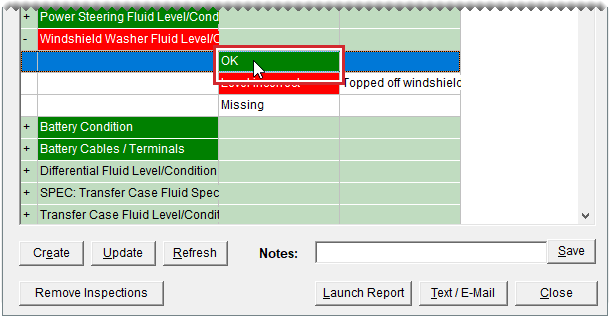
To indicate that all necessary repairs have been made to a vehicle component (question), double-click the answer OK.
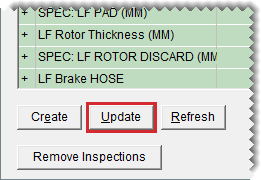
| 6. | To send the changes made to the inspection in TireMaster to the electronic inspection, click Update. |
When a technician records an inspection failure with a tablet, the failure is also recorded in the TireMaster service checklist. You can use the tablet information that has been added to TireMaster to prepare a service and repair estimate for the vehicle owner.
To prepare an estimate with tablet inspection data
| 1. | Make sure the Quote and Estimate Writer screen is open. |
If you’re working on the Digital Vehicle Inspection screen, click Close.
If you’re working on the Invoice Entry screen, click Chk. Then click Yes when you’re prompted to open an existing quote/estimate.
| 2. | To enlarge the service checklist (bottom of the screen) click  twice. The entry twice. The entry  identifies TireMaster inspection areas for which services and repairs are recommended. identifies TireMaster inspection areas for which services and repairs are recommended. |
| 3. | To see the reasons for the failed inspections, double-click the Notes/Product Code field. The reasons listed are the same reasons for failure that the technician recorded with the tablet. |
| 4. | For each failing inspection area, add the parts and labor needed for the recommended services and repairs. For more information, see Vehicle Inspections and Prepare Estimates. |
| 5. | Save the estimate and provide the customer with a copy. |
If a customer decides to purchase recommended services and repairs after reviewing the estimate, add those items to the work order. For more information, see Convert Estimates to Sales.
If you need to review information for a completed inspection that was recorded on a tablet, you can retrieve it from the list of closed inspections.
To review a closed electronic inspection
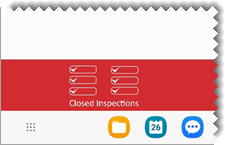
| 1. | Tap Closed Inspections (lower-left corner). |
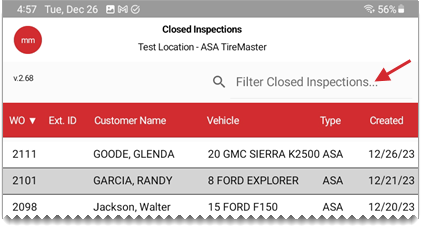
| 2. | To narrow down the list of closed inspections, type all or part of the customer name or vehicle description in the Filter Closed Inspections search field. |
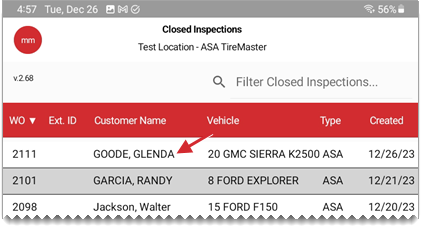
| 3. | Tap the inspection you want to review. |
| 4. | Review the recorded inspection results. |
| 5. | To return to the list of closed inspections, tap Closed Inspections (again). |
If you created an electronic inspection in error you can remove it, or you might want to remove inspections as part of a system clean-up process. Inspection removals are performed in TireMaster, and they affect the corresponding electronic inspections on the tablet. Inspections can be removed regardless of whether the status on the tablet is open or completed.
To remove inspections
| 1. | Open the Quote and Estimate Writer using one of the following methods: |
| a. | Open an existing work order, and click Chk. For more information, see Retrieve a Customer's Work Order . |
| b. | Perform a standalone customer search. Click the Vehicle tab on the Customer Maintenance screen. Then select a vehicle and click Checklist. Customer Searches |
| 2. | Click DVI. The Digital Vehicle Inspection screen opens. |
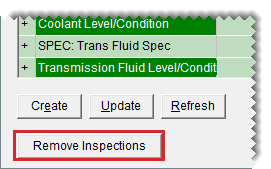
| 3. | Click Remove Inspections. |
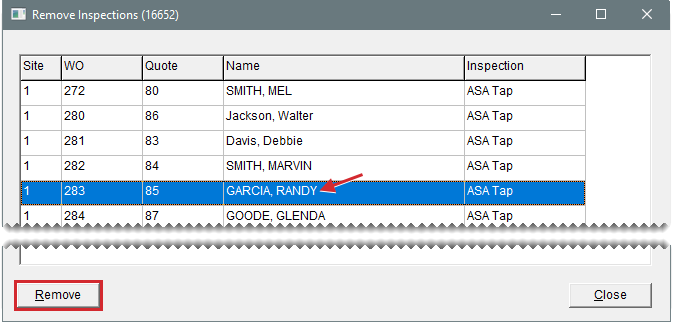
A list of inspections opens. If the work order associated with an inspection has already been completed, the Name column will include the entry NA instead of the customer’s name.
| 4. | Select the inspection you want to delete and click Remove. After a pause, the inspection disappears from the list. |
| 5. | Close the Remove Inspections screen and the other opens screens. |
