Estimate Builder
This help topic is applicable to the following TireMaster applications:
|
TireMaster Point of Sale |
TireMaster Plus |
TireMaster Corporate |
|---|---|---|

|
|
|
The Estimate Builder is a simplified alternative to Quote and Estimate Writer. With the Estimate Builder, you can create free-form estimates for your customers. Specifically, you have the flexibility to:
Add only the sections (for vehicle inspection areas) you want.
Arrange recommended items within the sections.
Move recommended items from one section to another.
Name the sections.
When you use the Estimate Builder, you add recommended service information to a one-panel screen instead of the legacy two-panel screen, which has an area for tire quotes at the top and a service checklist for parts and labor at the bottom. The Estimate Builder is available in TireMaster 9.5.7 and newer.

If you decide to use the Estimate Builder for preparing estimates, set controls that modify the behavior of the Quote and Estimate screen and update your service checklist if needed.
| 1. | Select Setup > System Controls. The System Controls screen opens. |
| 2. | Click the Other tab. |
| 3. | Define whether TireMaster will open the one-panel Estimate Builder or the legacy two-panel screen by default. |
| a. | Select Quotes - Default to Estimate and press Enter. |
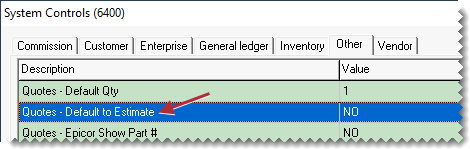
| b. | To default to the one-panel screen, select Yes. To default to the legacy two-panel screen instead, select No. |
| 4. | Define whether to automatically use Epicor's job codes and descriptions for estimate section names on the screen and printed documents. |
| a. | Select Quotes - Estimate Group Epicor and press Enter. |
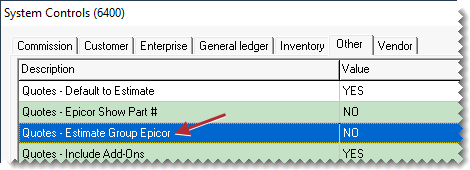
| b. | Select Yes or No. Then click OK. |
| 5. | Define whether the one-panel Estimate Builder opens when users reset the Quote and Estimate Writer screen. |
| a. | Select Quotes - Reset to Estimate and press Enter. |
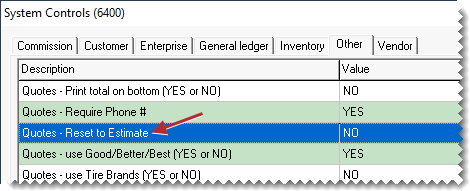
| b. | To open the one-panel screen, click Yes. To open the legacy two-panel screen instead, click No. Then click OK. |
| 6. | Close the System Controls screen. |
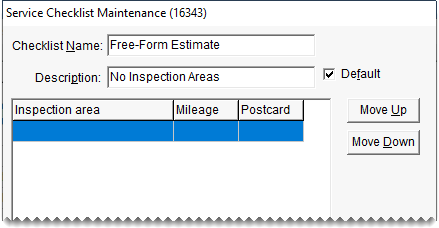
Before you begin using the Estimate Builder, review your default service checklist. Because you can add your own sections to the Estimate Builder as needed, you might decide to remove some inspection areas from your existing checklist. For a totally free-form experience with the Estimate Builder, use a default service checklist with no inspection areas. For more information, see Service Checklists.
Once a vehicle inspection has been completed, add the parts and labor needed for the recommended services to the Estimate Builder and organize the information.
Prepare an estimate with the estimate builder
| 1. | Open the Quote and Estimate Writer screen. |
Press F12.
Click Quote on the Open Work Order List.
Click Chk on the Invoice Entry screen and then answer the question.
| 2. | Add the customer and vehicle information if needed, using one of the following methods: |
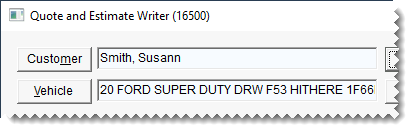
Click Customer. Then look up the customer and select the vehicle. For more information, see Customer Searches.
Type the customer’s name and the vehicle’s year, make, and model.
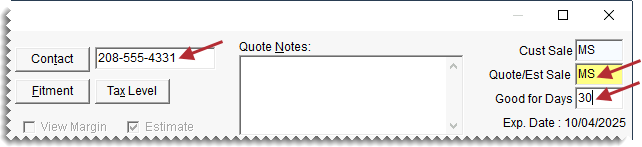
| 3. | Add customer contact and salesperson information, notes (if needed), and the expiration date. |
Type the customer's phone number or click Contact and select a phone number from the list.
Type your comments in the notes field.
If your user ID is not already in the Quote/Est Sale field, press  and select it from the list.
Type the number of days when the estimate will be honored.
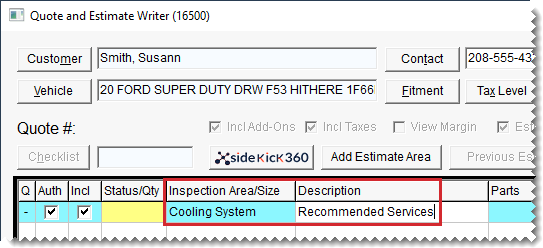
| 4. | Add one or more sections to the estimate. |
| a. | Type the section name and description in the cyan row for the Inspection Area/Size and Description columns. |
| b. | Add items to the section, using one of the following methods: |
Click Inventory, and search for the item you want to add. For more information, see Inventory Searches.
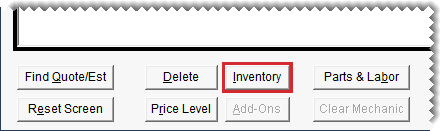
Click Fitment, and select a tire from the fitment guide. For more information, see Fitment Guide.
Click Parts & Labor, and retrieve items from the Epicor Integrated Service Estimator. For more information, see Epicor Integrated Service Estimator Interface.
| c. | Edit the sections as needed: |
Assign a status to each section. Click the Status/Qty column for the beginning of the section (yellow field) and press repeatedly until the applicable status is listed. Choose  for failed inspections and
  for repairs that are needed but not urgent.
Update item quantities.
Remove add-on items.

| d. | To add another section, click Add Estimate Area and repeat steps 4a through 4. |
| 5. | Move the items within a section or to another section as needed. Select the item (green for parent items and white for add-ons) and repeatedly press Page Up or Page Down until the item is in the right spot. |
| 6. | Save the estimate. |
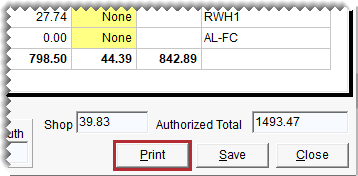
| 7. | Print a copy of the estimate for the customer. |
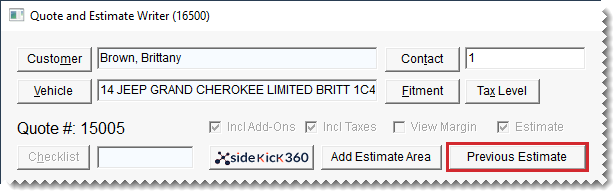
When you're preparing an estimate for a return customer, you can retrieve the customer's previous estimates to follow up on declined services that might be up-sell opportunities. To retrieve a customer's prior declined service information, do one of the following:
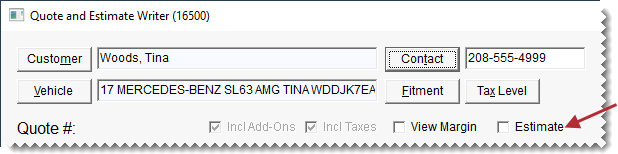
When you're working with the one-panel Estimate Builder, click Previous Estimate. Then click Yes when you're prompted to load previous estimates.
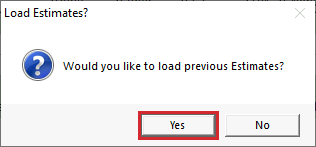
When you're opening the Estimate Builder, you'll be asked two questions. The first question asks if you want to open an existing (the current) estimate. Answer yes or no.

Once you answer the first question, TireMaster asks if you want to load previous estimates. To see the prior declined services, click Yes.
If you want to change the type of screen used to prepare an estimate, you can switch between the one-panel Estimate Builder and the legacy two-panel Quote and Estimate Writer. The settings for the system controls Quotes - Default to Estimate and Quotes - Reset to Estimate affect how switching from one screen to the other works.
To switch from one estimating screen to the other:
On the two-panel legacy screen, select the Estimate check box. Once the check box is selected, it becomes disabled.
On the one-panel Estimate Builder, click Reset Screen to open the two-panel legacy screen. You can revert to the one-panel screen by selecting the Estimate check box. Once the check box is selected, it becomes disabled.
When a customer agrees to have your shop perform recommended services, you can use the entries on the estimate to create a new work order or updated an existing work order.
To add recommended services to a work order
| 1. | On the one-panel Estimate Builder, do the following: |
| a. | Make sure the authorization and include check boxes are selected for the recommended service and items you want to add to a work order. |
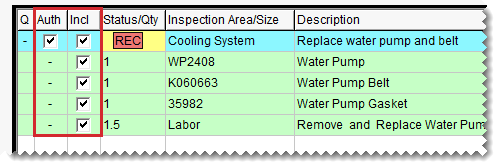
| b. | Clear the authorization check boxes for any services the customer has declined. |

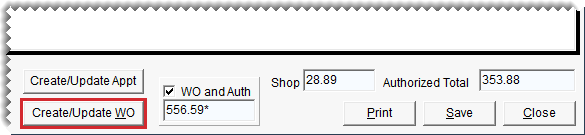
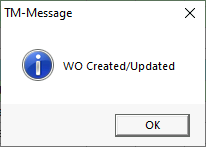
| 2. | Click Create/Update WO. A confirmation message appears. |
| 3. | Click OK to close the message. |
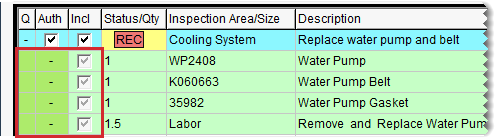
Green shading in the Q and Auth columns and disabled check marks identify the items that were just added to the work order.
| 4. | Close the one-panel Estimate Builder. |