Flat Rate Reporting
This help topic is applicable to the following TireMaster applications:
|
TireMaster Point of Sale |
TireMaster Plus |
TireMaster Corporate |
|---|---|---|

|
|
|
Flat rate reporting is method of measuring employee productivity. You can assign a flat rate, which is the amount of time it takes an average mechanic to complete a job, to each of your labor items. You can then base a mechanic’s payment for performing a service or repair on the flat rate assigned to the job, regardless of how much time was actually spent completing the work.
You can set an item’s flat rate by including the number of hours an average mechanic takes to complete the service or repair in the item’s price and quantity settings. Flat rates for the automotive field are published in industry labor guides, or you use a rate of your choice. Assign flat rates to labor items only.
To set an item’s flat rate
| 1. | Look up the item whose flat rate you want to set. For more information, see Inventory Searches. |
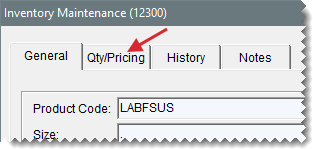
| 2. | On the Inventory Maintenance screen, click the Qty/Pricing tab. |
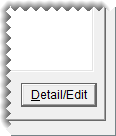
| 3. | Click Detail/Edit. The Site Prices & Quantity screen opens. |
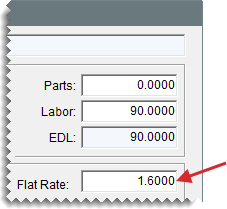
| 4. | Type the average number of hours needed to complete the job in the Flat Rate field. |
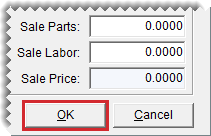
| 5. | To save your changes, click OK. |
| 6. | Close the Inventory Maintenance screen. |
Calculating the number of hours that a mechanic worked is a two-step process. First, add the job to a work order. If a flat rate has already been assigned to the item, that value will be included on the work order automatically. You can pay the mechanic for the number of hours defined by a job’s default flat rate, or you can enter a different number of hours.
When you’re ready to see the number of hours produced by a single mechanic or a group of mechanics, print a Mechanic Flat Rate Report. This report can be generated on a daily, weekly, or monthly basis.
To calculate mechanic productivity
| 1. | Start a work order. For more information, see Create a Regular Work Order. |
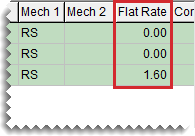
| 2. | Add a job (labor item) to the work order. The flat rate that has been assigned to the job is displayed in the Flat Rate column. |
| 3. | Assign the mechanic to the items on the work order. Click the Mech 1 field for the first item listed, type the mechanic’s ID, and press  . . |
 , and select the mechanic’s name from the list that appears.
| 4. | When the mechanic is done with the job, enter one of the following in the Qty column: |
The amount of time you want to bill the customer.

The job’s flat rate

The quantity of 1

| 5. | If you want to pay the mechanic for the number of hours defined by the job’s default flat rate, leave the entry in the Flat Rate column alone. If you want to base the payment on a different number of hours, change the value in the Flat Rate column. |
| 6. | Complete the invoice. For more information, see Complete an Invoice. |
| 7. | Generate a flat rate report. For more information, see Mechanic Flat Rate Report. On the report, the number of hours worked is displayed under the flat rate heading. |